Orphan Heiress Blog
by Alisa Rigolin

How to
Research
How to
Make a Book Trailer
With AI
Creating a captivating book trailer can be a powerful way to engage your audience and promote your book on social media. In this tutorial I’m going to teach you how to produce a professional-looking trailer without the need for advanced technical skills. It will guide you through the process using the following tools:• Bing Image Creator
• Leonardo AI Upscaler
• MoShow App
• VideoLeap
• ElevenLabs Voice Generator
Step 1: Generate Images with Bing Image Creator
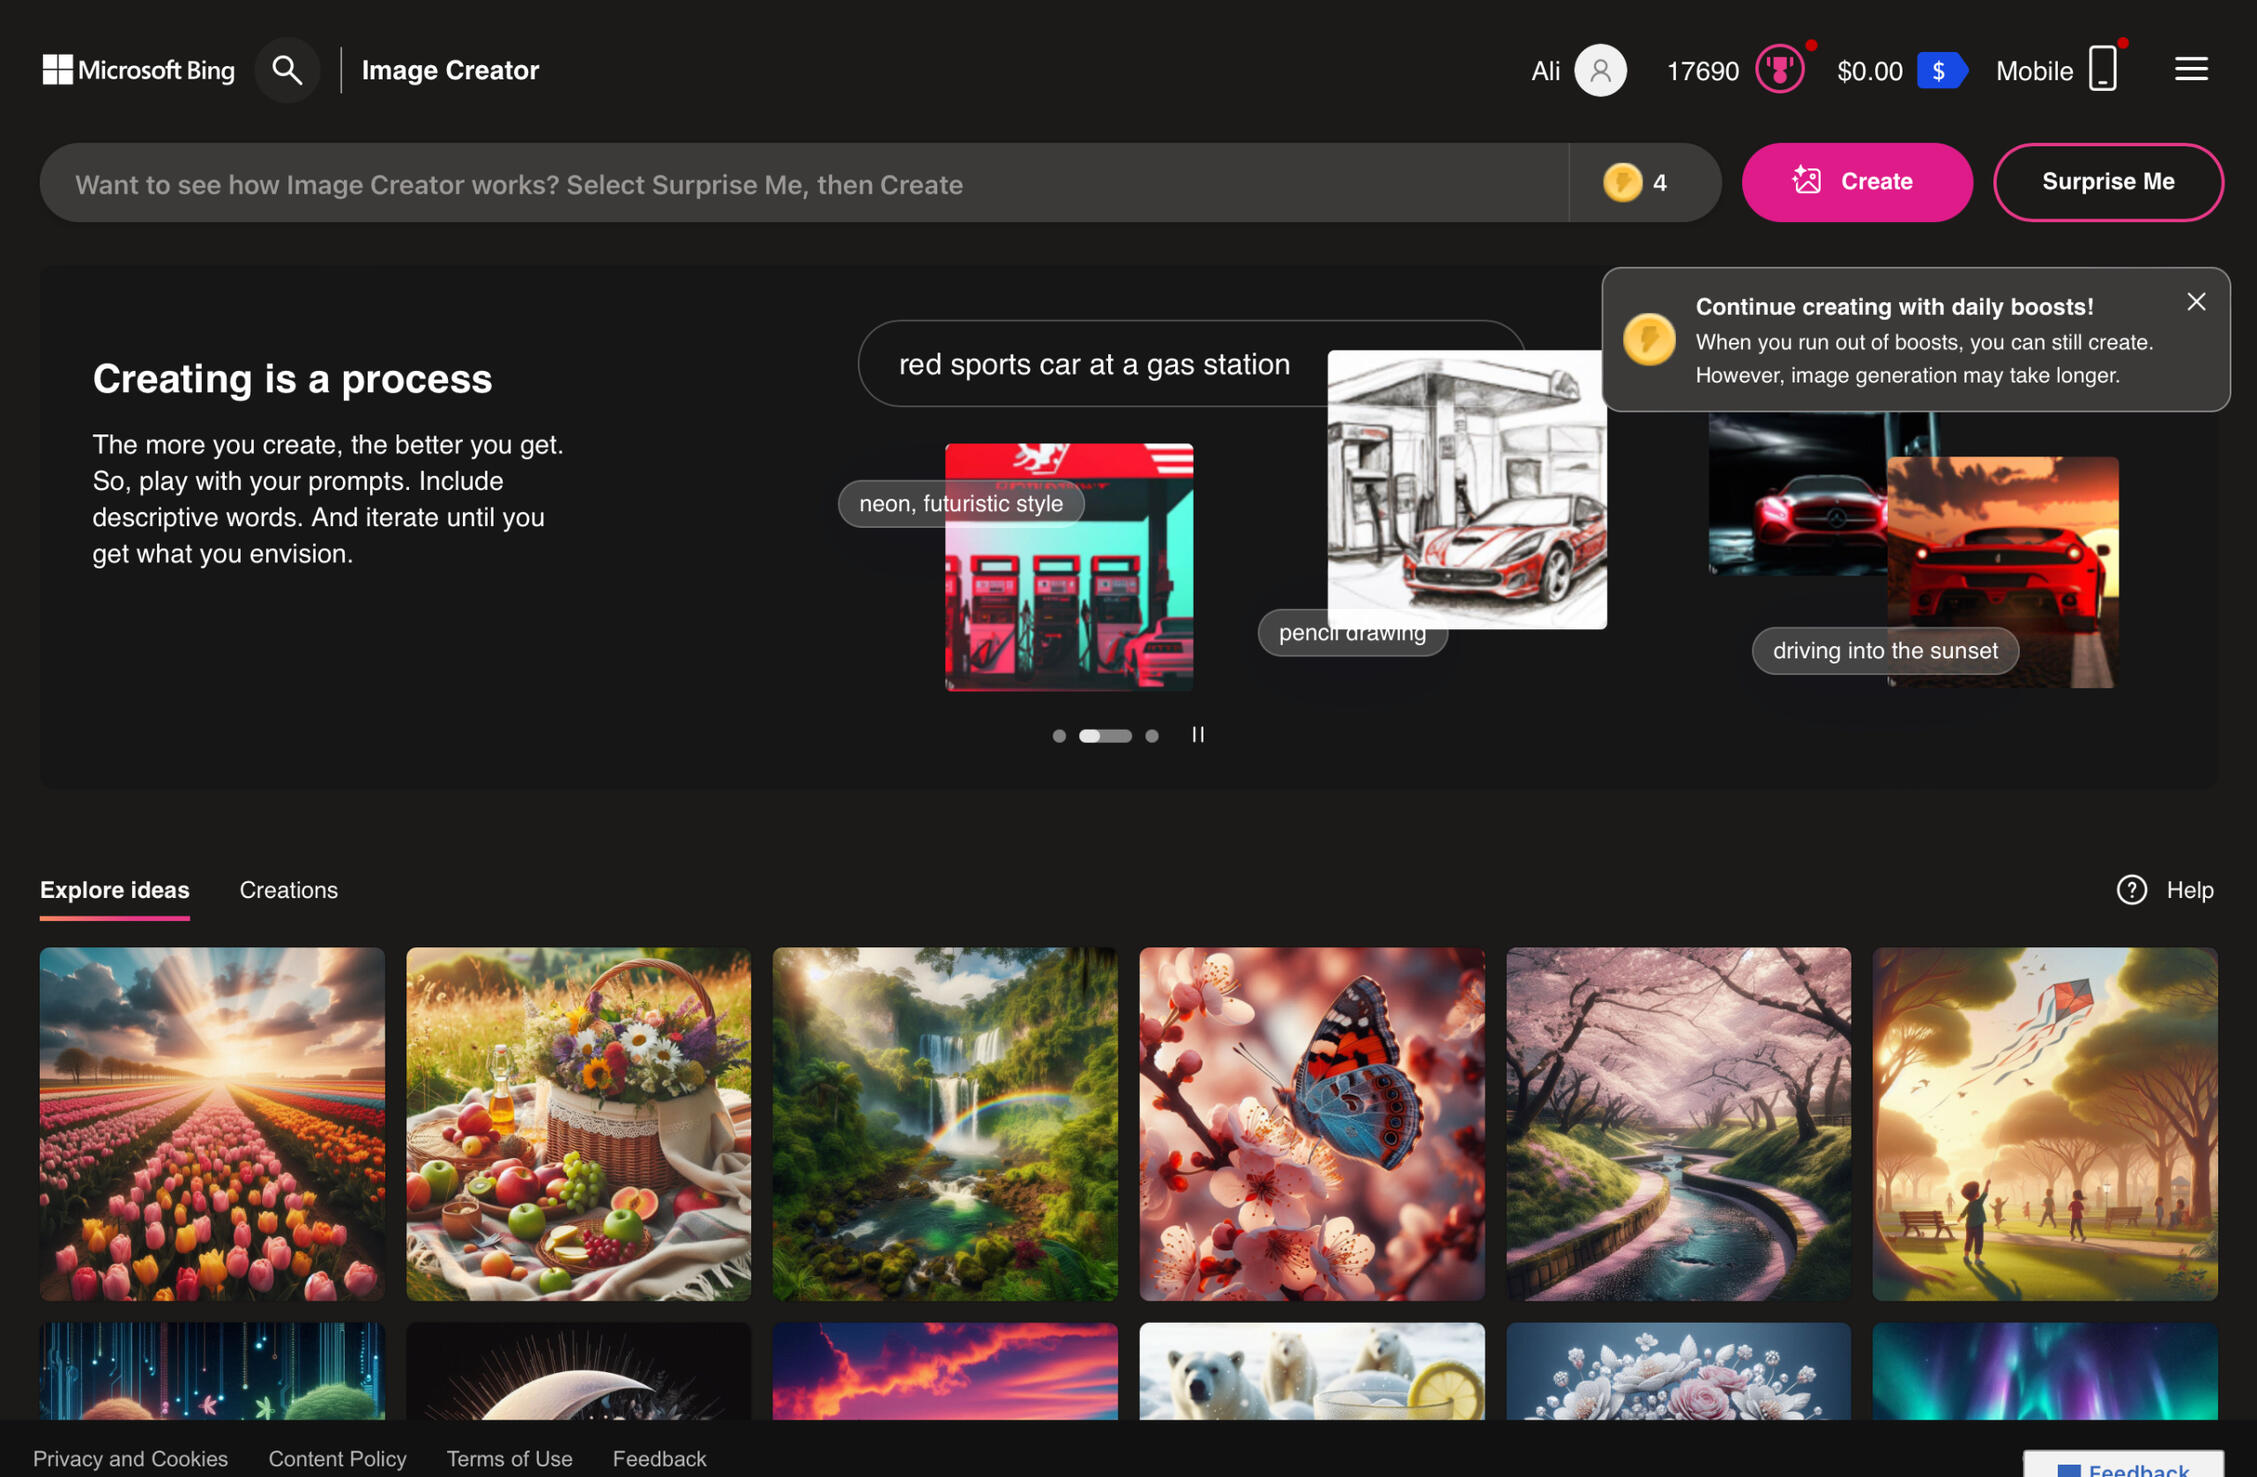
ACCESS BING IMAGE CREATOR1. Visit the Website: Go to Bing Image Creator.
2. Sign Up (If Necessary): Log in with your Microsoft account for full access.CREATE VISUALS
1. Input Prompts:
• Think about the key themes, characters, and scenes in your book.
• Use descriptive language to generate specific images.
• Example: “A lone figure (describe how you see the character) standing on a cliff overlooking a stormy sea at sunset.”

2. Generate Images:
• Enter your prompt into the search bar.
• Click on “Create” to generate images.
• Keep generating and experimenting with the prompts until you get the desired results. It’s free!
3. Select and Save Images:
• Browse through the generated images.
• Click on the ones you like to view them in full size.
• Right-click and select “Save Image As” to download them.
(NOTE: 1. While Bing Image Creator is amazing and free, you might want to get a paid subscription with Midjourney or Leonardo to make sure you retain all the rights of your images if you’re planning on promoting your book on a bigger scale. Bing is still a little foggy on the details when it comes to the rights of their creations, but it should be fine for non-commercial use and presentations. 2. Additionally, if you have the budget to hire a professional artist or cartoonist to work on your trailer, feel free to skip Step 1 altogether.)
Step 2: Enhance Images with Leonardo AI Upscaler
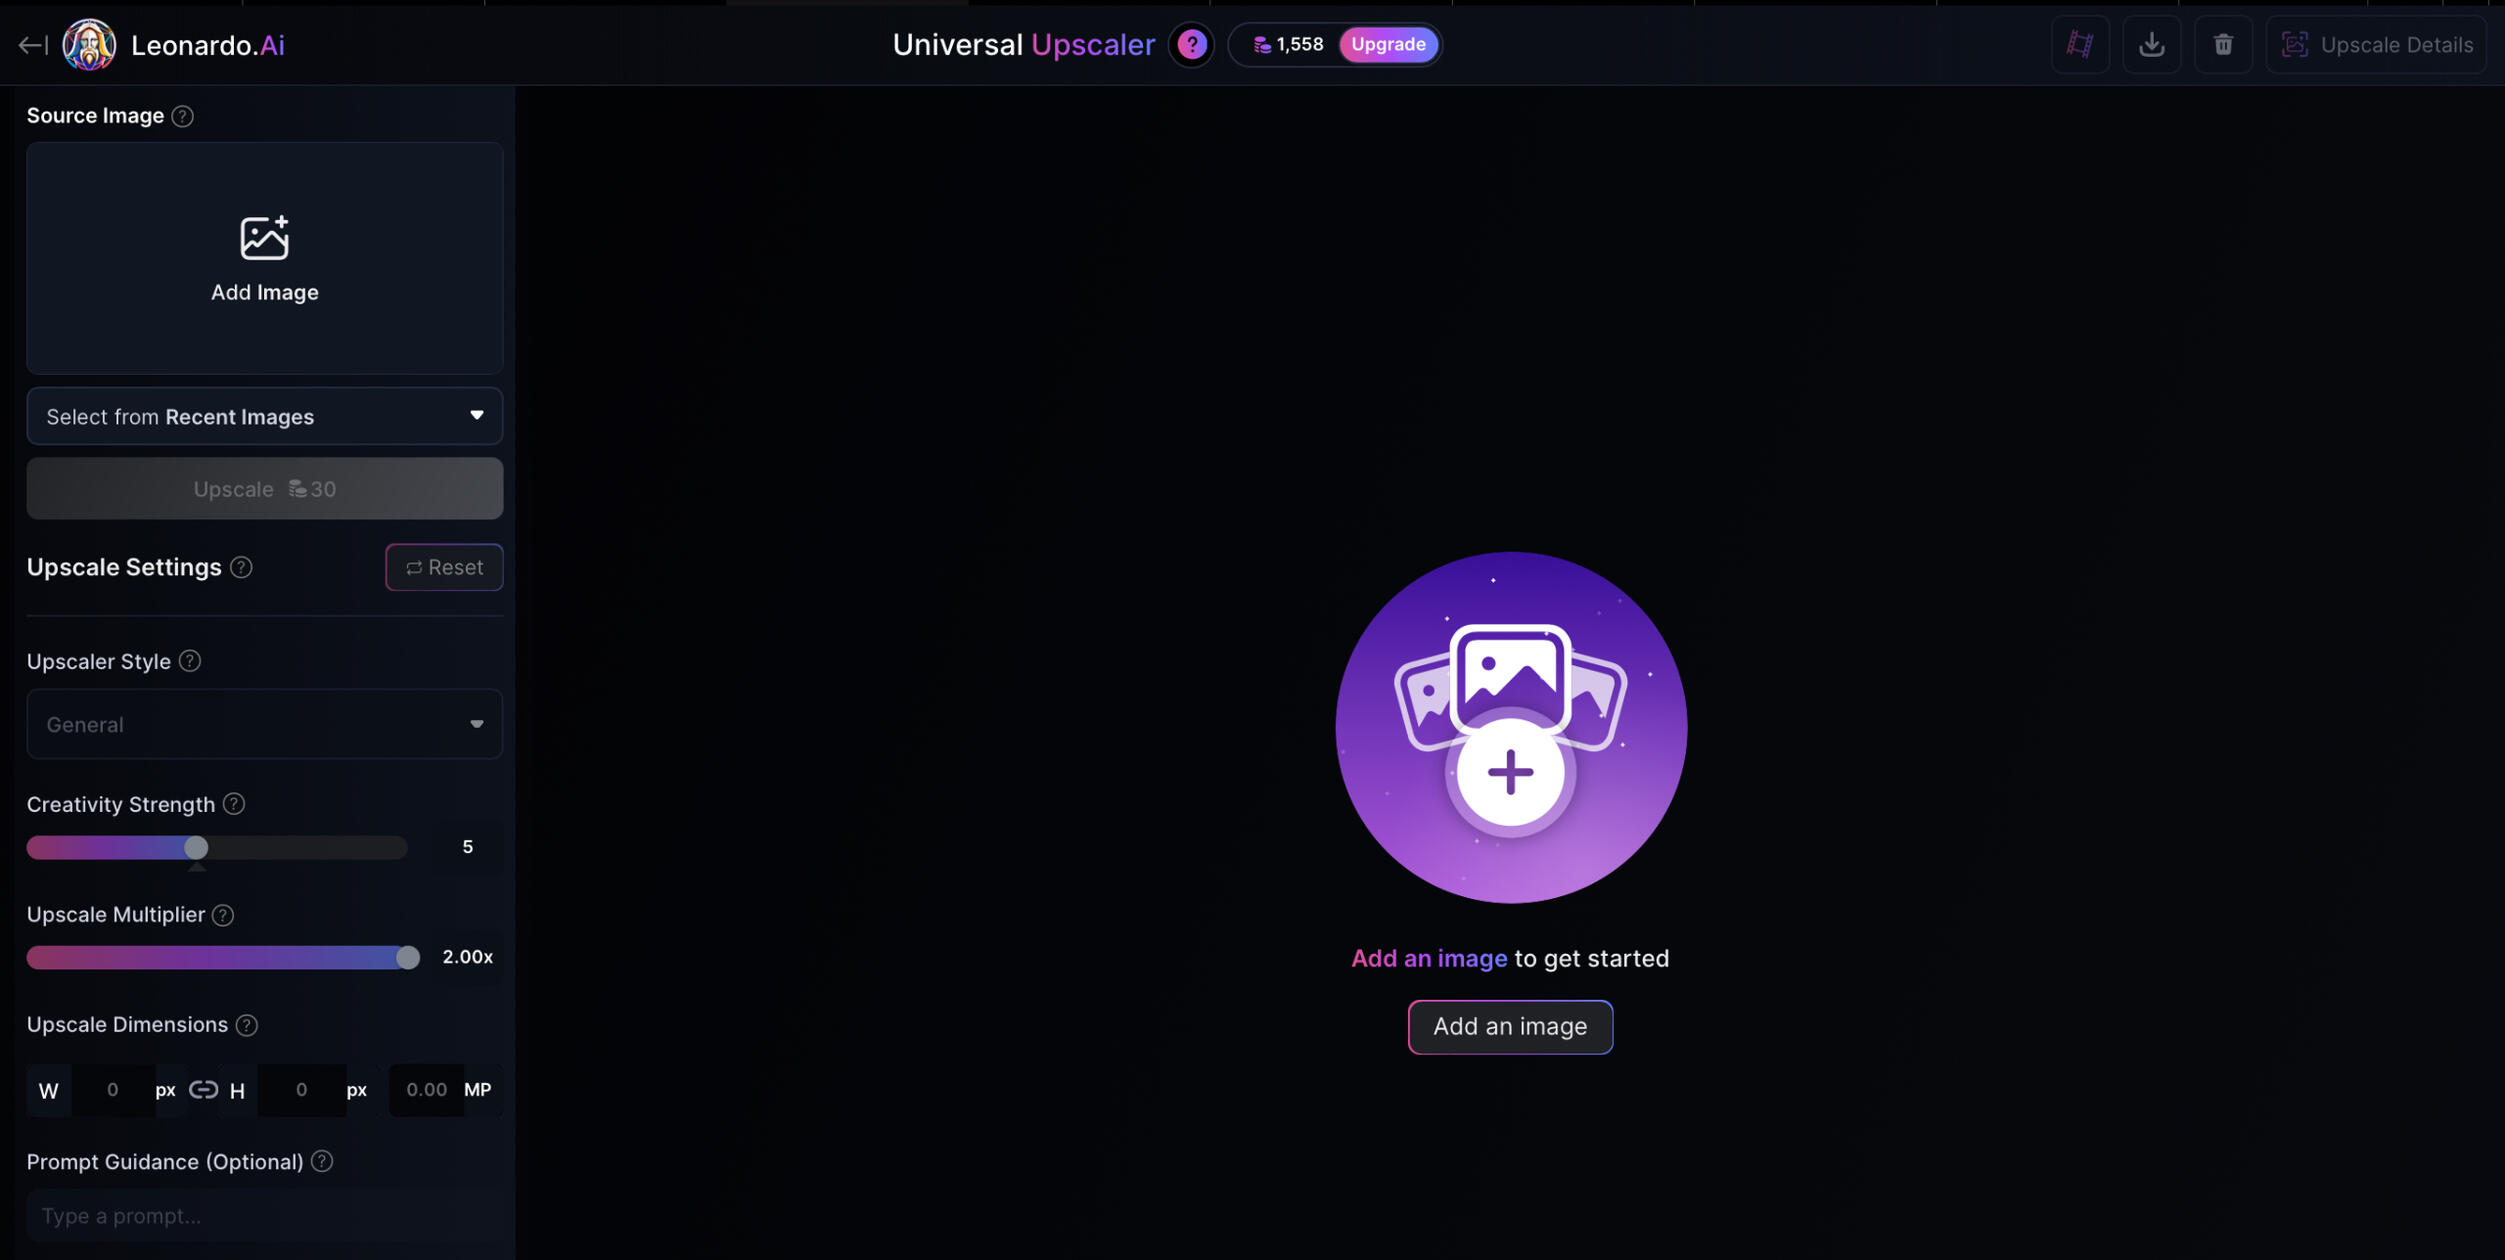
ACCESS LEONARDO AI UNIVERSAL UPSCALER1. Visit the Website: Navigate to Leonardo AI Upscaler.UPSCALE YOUR IMAGES1. Upload Images:
• Click on “Upload Image” or drag and drop your saved images into the designated area.
2. Enhance Quality:
• Select the desired upscale factor (e.g., 2x, 4x).
• Choose any additional enhancement options if available.
3. Process Images:
• Click on “Upscale” to start the enhancement process.
4. Download Enhanced Images:
• Once processing is complete, click “Download” to save the high-resolution images.See full upscaling tutorial here
Step 3: Create a Voiceover with ElevenLabs Voice Generator

ACCESS ELEVENLABS VOICE GENERATOR1. Sign Up or Log in to ElevenLabs
• Create an account if you don’t have one.2. Write Your Script:
• Craft a compelling narrative for your trailer.
• Keep it concise (about 60-90 seconds when read aloud).
• Include:
• A hook to grab attention.
• Introduction to the main plot or characters.
• A cliffhanger or intriguing question.
• A call to action (e.g., “Available now wherever books are sold”).(Note: If you don’t already have a script for your book trailer, you can always type in the book summary into ChatGPT as a prompt and ask it to be turned it into a script or a voiceover text for you.)3. Select a Voice:
• Choose from a variety of AI voices.
• Consider the tone that matches your book’s genre (e.g., mysterious, energetic).4. Generate Audio:
• Paste your script into the text box.
• Click “Generate” to create the voiceover.5. Review and Download:
• Listen to the generated audio.
• If satisfied, click “Download” to save the MP3 file.
• If not, adjust the script or voice settings and regenerate.
Step 4: Assemble Images and Audio in MoShow App
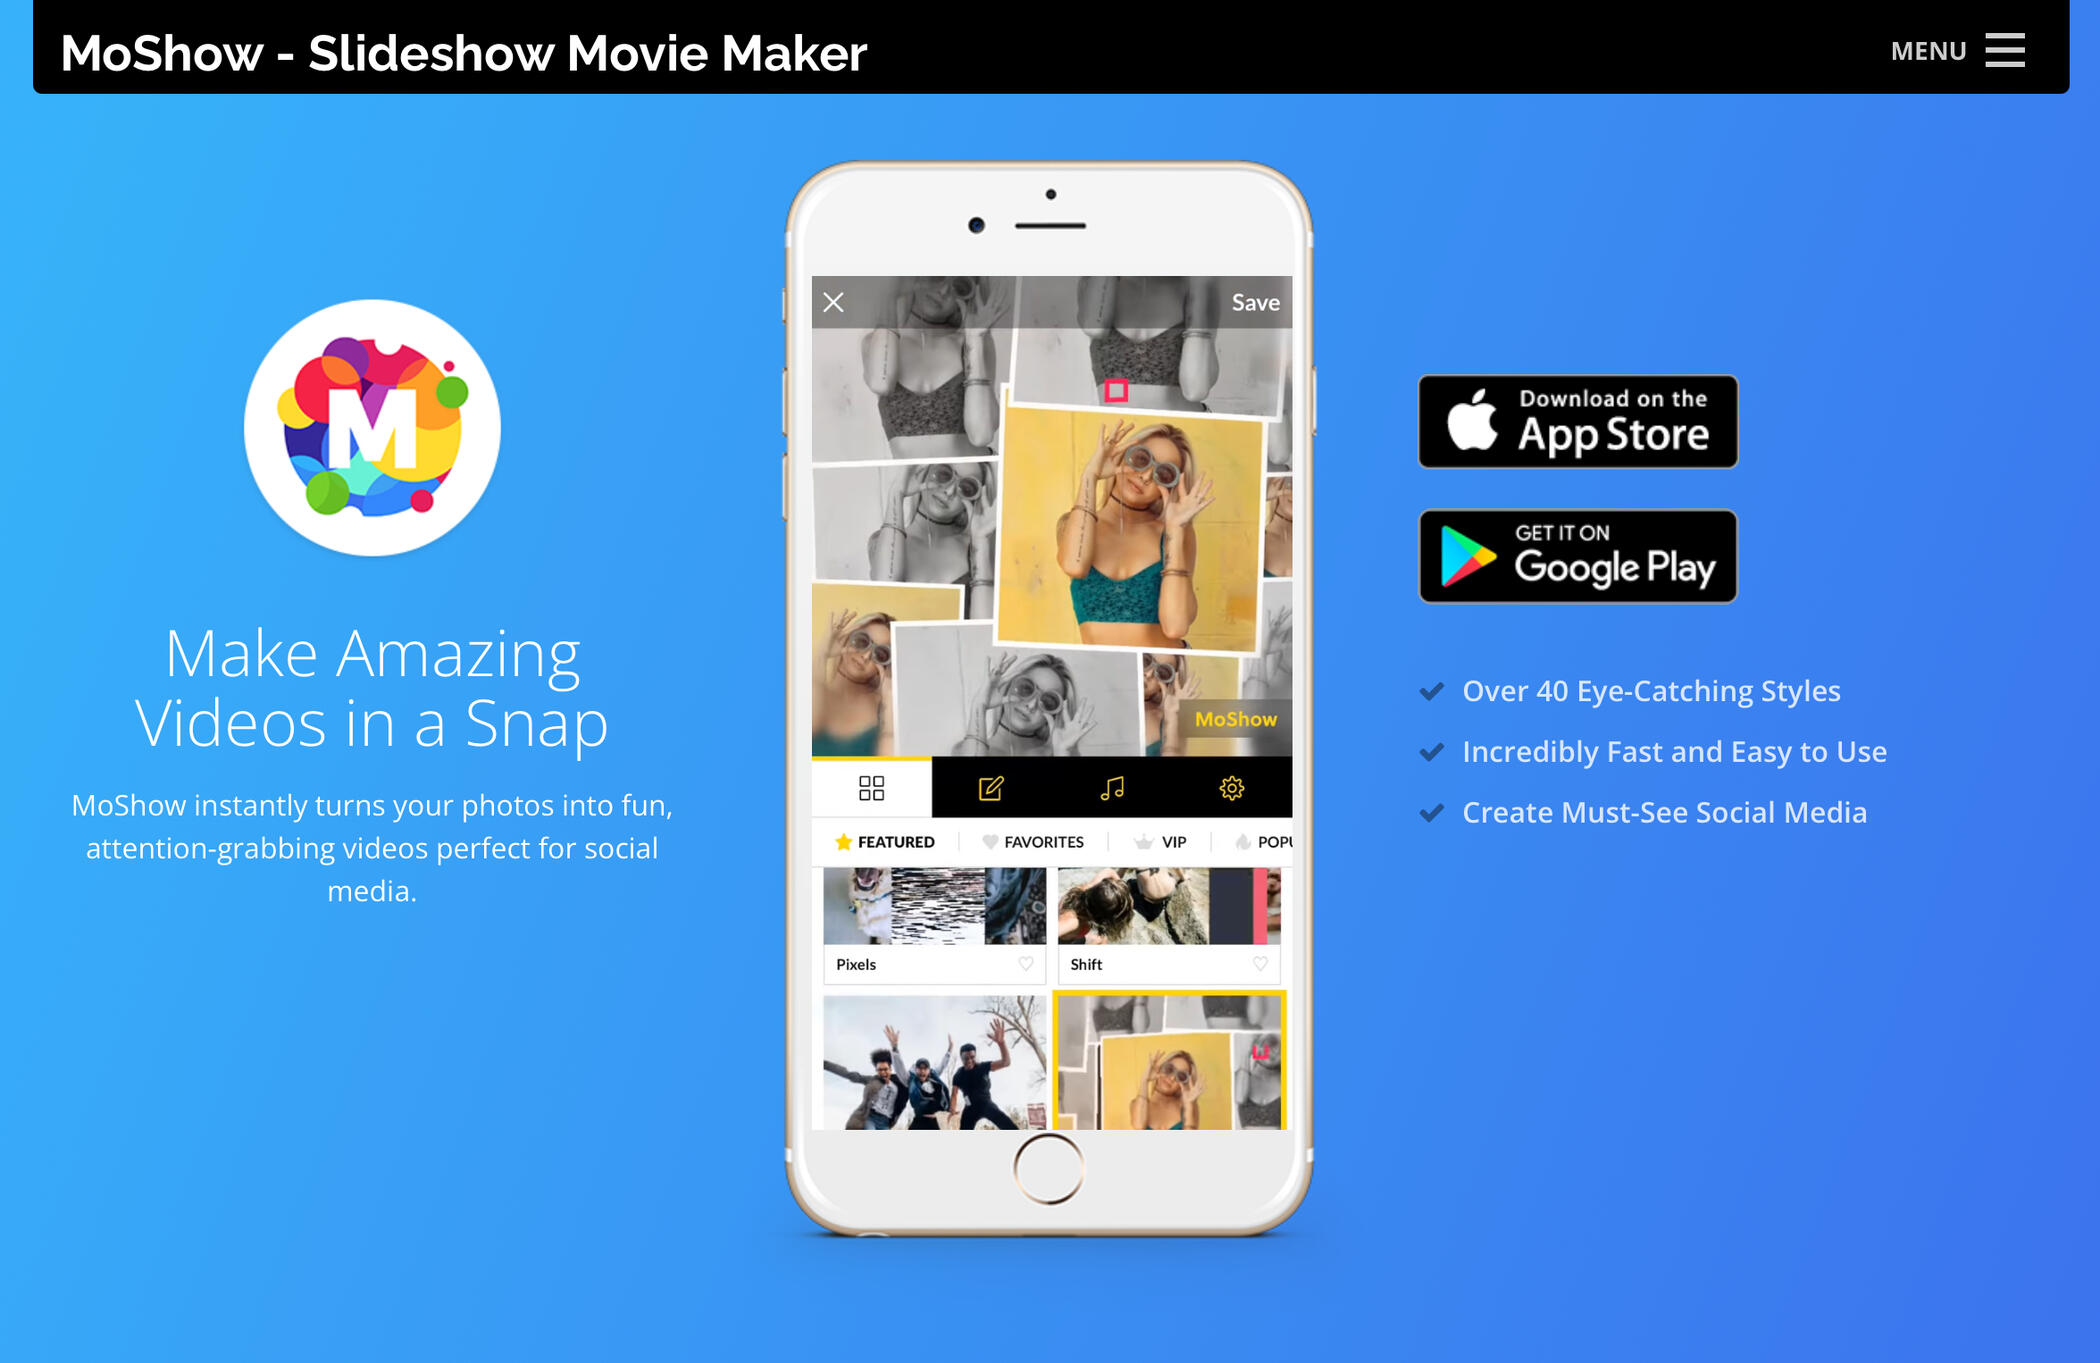
DOWNLOAD AND OPEN MOSHOW APP1. Install the App:
• Search for “MoShow Slideshow Photo & Video” in your app store.2. Launch the App:
• Open MoShow after installation.
• For best results, get a VIP subscription to export your trailer. It will provide higher quality video and let you use your own music tracks.Create Your Slideshow1. Import Images:
• Tap “Create” or ”+” to start a new project.
• Select the enhanced images from your gallery.2. Choose a Style:
• Browse through various slideshow styles and effects.
• Preview styles by tapping on them.
• Select one that fits the mood and adds sufficient movement and cinematic feel to your trailer.3. Edit Slides:
• Rearrange the order of images by dragging them.
• Adjust the duration each image appears on screen.4. Add Music:
• Tap on “Music” and choose a track from MoShow’s library or import your own.
• Ensure the music complements the tone of your book.5. Preview Your Slideshow:
• Tap “Play” to see how everything fits together.
• Make adjustments as needed.6. Save and Export:
• Once satisfied, tap “Save” or “Export”.
• Choose the desired video quality.
Step 5: Fine-Tune Your Trailer with Videoleap App
DOWNLOAD AND OPEN VIDEOLEAP1. Install the App:
• Available on iOS and Android.
2. Launch the App:
• Open Videoleap after installation.
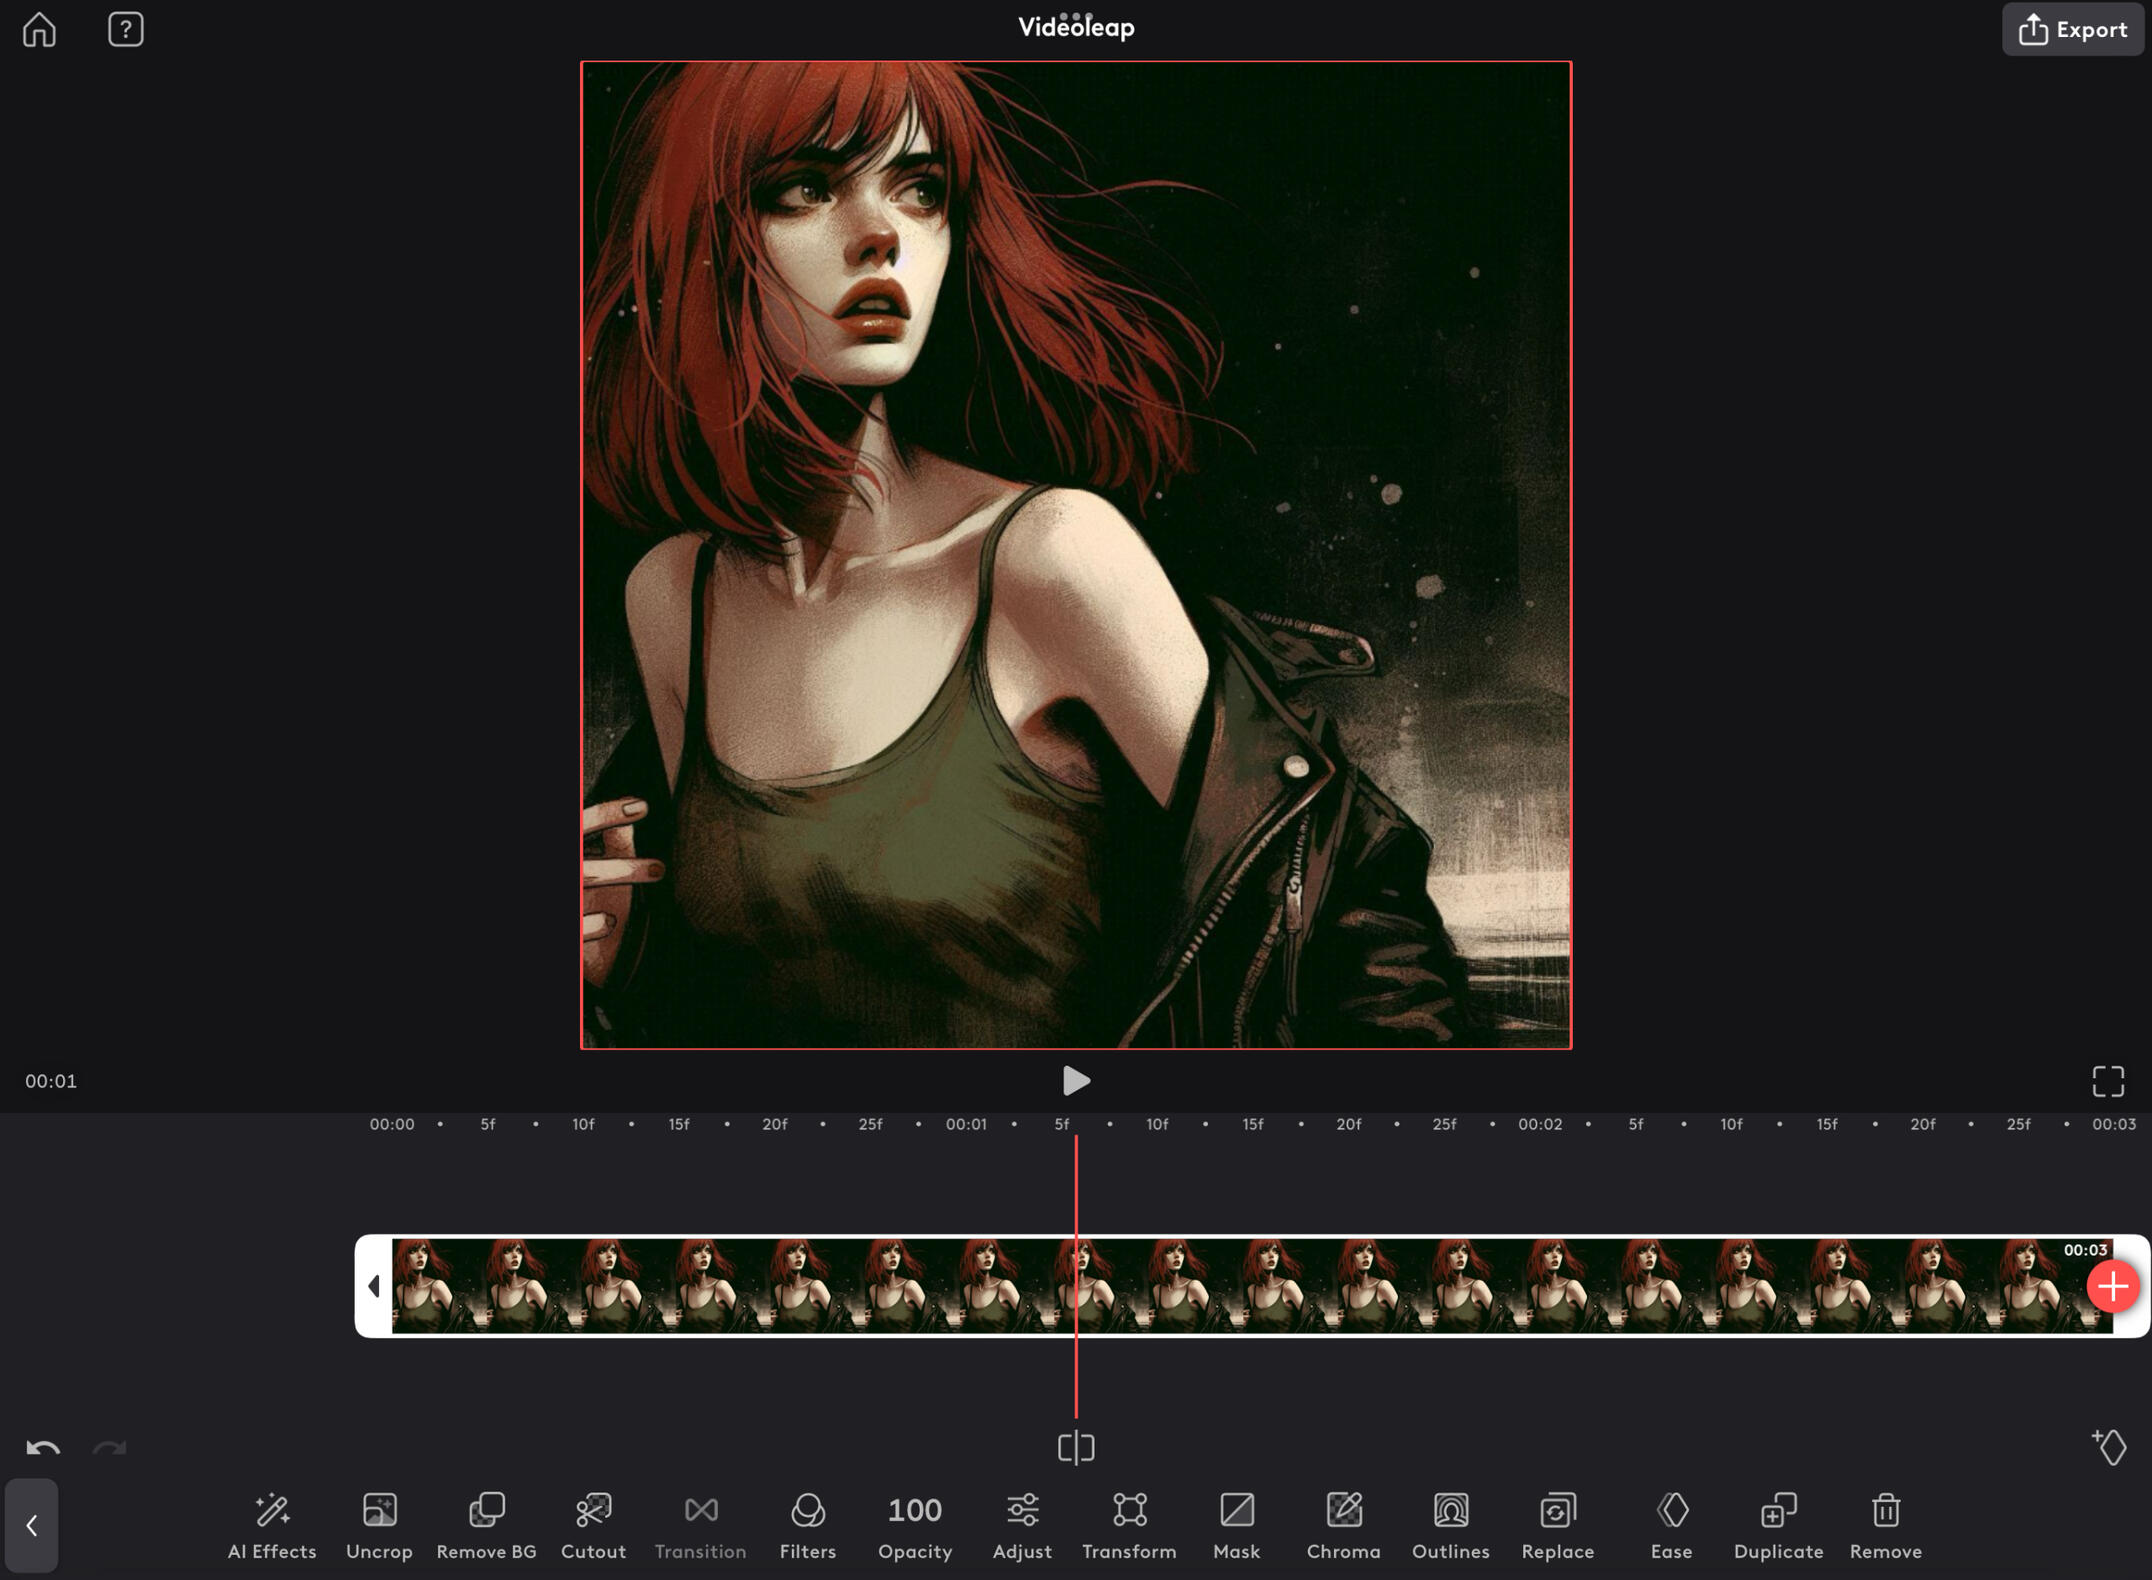
EDIT YOUR VIDEO1. Import Video:
• Tap “New Project”.
• Select the video you created in MoShow.2. Insert Voiceover/Adjust Audio:
• Find your ElevenLabs mp3 file and import it into the timeline either by dragging it directly or, if you’re on iOS, sharing it directly into the app.
• Tap on the audio track to fine-tune volume levels.
• Ensure clarity of the voiceover over background music.
• Split the audio clip if you need longer or shorter pauses against the music backdrop.3. Add Text Overlays:
• Tap “Text” to add titles, subtitles, or quotes.
• Customize font, color, and animation.
• Suggestions:
- Display your book title and author name.
- Include critical acclaim or testimonials.4. Incorporate Additional Effects if Desired:
• Use “Effects” to add cinematic filters.
• Apply transitions between clips if you added new footage.5. Color Correction:
• Use “Adjust” to tweak brightness, contrast, and saturation, if needed.6. Preview and Refine:
• Play the video to check for any issues.
• Make necessary adjustments for a smooth flow.7. Export Final Video:
• Tap “Export” in the top right corner.
• Choose the most suitable resolution and frame rate.
• Save the video to your device.(Note: Consider video dimensions depending on the platform where you will be sharing your book trailer. Wide for YouTube, vertical for TikTok, square for Instagram, etc.)
Step 6: Share Your Book Trailer
DISTRIBUTE YOUR TRAILER• Upload to Video Platforms.
• Share on Social Media.
• Add the video to your author website.
• Implement email marketing by including the trailer in newsletters to your subscribers.
• Collaborate with Influencers by reaching out to book bloggers or influencers to share your trailer.
Additional Tips
• Keep It Concise: Aim for a length of 60-90 seconds to maintain viewer engagement, or split the trailer into several shorter clips to post to TikTok as a series of mini-trailers.• Match Tone and Genre: Ensure that the visuals, music, and voiceover align with your book’s theme.• High-Quality Assets: Use high-resolution images and clear audio for a professional look.• Legal Considerations:
- Verify that all content used complies with licensing agreements.
- Use royalty-free music or obtain the necessary permissions.
- Test Audience Feedback:
- Share a draft with friends or beta readers for feedback before the final release.By following these steps, you’ll be able to create an engaging and visually appealing book trailer using AI tools. This not only enhances your book’s promotional material but also provides a dynamic way to connect with potential readers.Happy creating!

Next post
How to
Professionally Edit Photos With AI
For nearly seven years, I have relied on my iPad Pro and Apple Pencil as essential tools for detailed photo and video retouching. In the realm of photo editing, my approach has always been uniquely my own, combining art with cutting-edge technology. Starting with the basics, like mastering Adobe Lightroom for iOS, my skills have evolved to incorporate AI tools, cinematic effects, and complex image layering.In this tutorial, I will share my unique technique that merges traditional photography with AI enhancements to create visually compelling images. This guide is intended for both professional photographers and creative enthusiasts eager to explore the dynamic fusion of photography and artificial intelligence.
Step 1: Capturing the Perfect Photograph

The foundation of this technique is a well-planned photograph. Here’s how I approach it:Styling for AI Compatibility:I style the photoshoot to make working with AI layers effortless. This involves:• Contrasting Elements: Choosing clothing that contrasts with the model’s skin tone to help the AI distinguish between different parts of the image.
• Neutral Backgrounds: Using a simple, neutral background that serves as a blank or semi-blank canvas will save you time when editing later on. It will prevent the AI from generating odd shapes in place of the original backdrop.
• Clothing Choices: Opting for minimalistic, black, or patternless clothing. It provides a clean canvas for applying new prints, textures, or styles during the AI editing phase.Tip: Think of the initial photo as a template. The cleaner and more defined it is, the easier it will be to work with later.
Step 2: Preparing the Image in Leonardo.ai
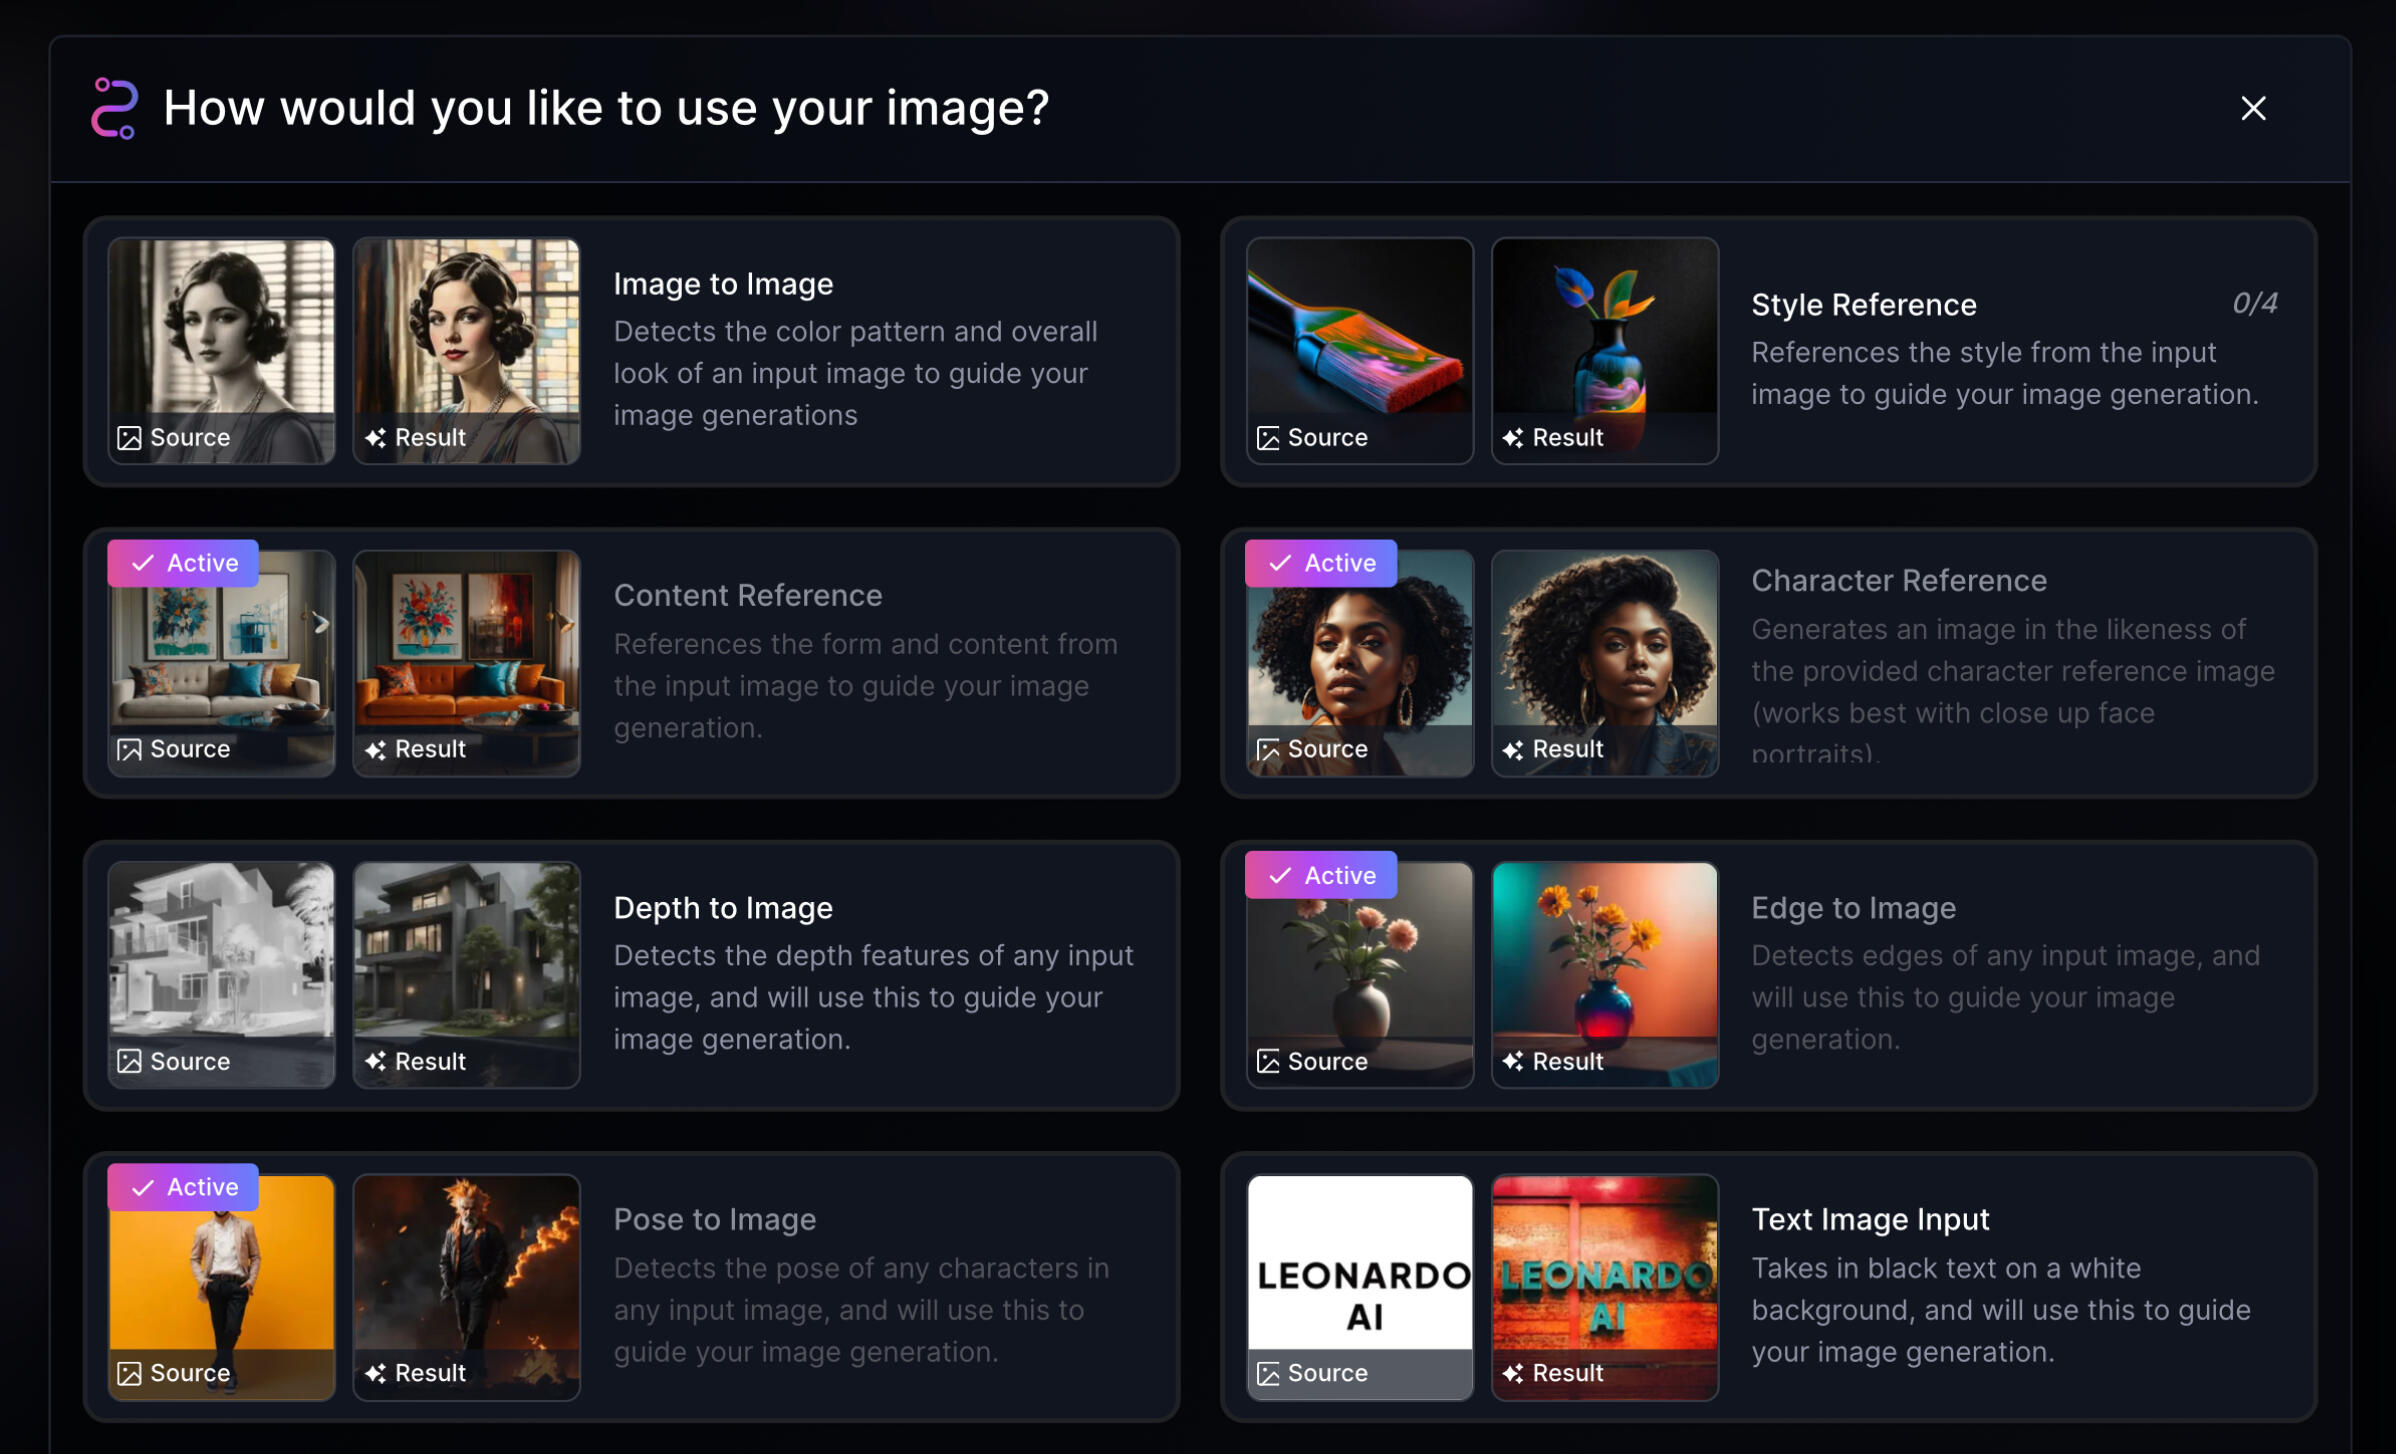
With the photograph ready, I move on to Leonardo.ai to leverage its AI capabilities:• Uploading the Image: I start by uploading the original photograph to Leonardo.ai.
• Applying Image Guidance Filters: I use the following filters, referencing only the original image:• Content Reference
• Character Reference
• Edge to Image
• Pose to Image

• Crafting the Prompt: I write a detailed prompt describing my vision for the photograph. This might include changes to clothing styles, background alterations, or specific visual effects.
• Alternative Method: Sometimes, I use the Style Reference feature by uploading an additional image. This allows Leonardo.ai to adopt the colors, textures, and styles from that image and apply them to my photograph.Tip: Be as descriptive as possible in your prompts. The more detail you provide, the better the AI can realize your vision.
Step 3: Experimenting with Models and Filters
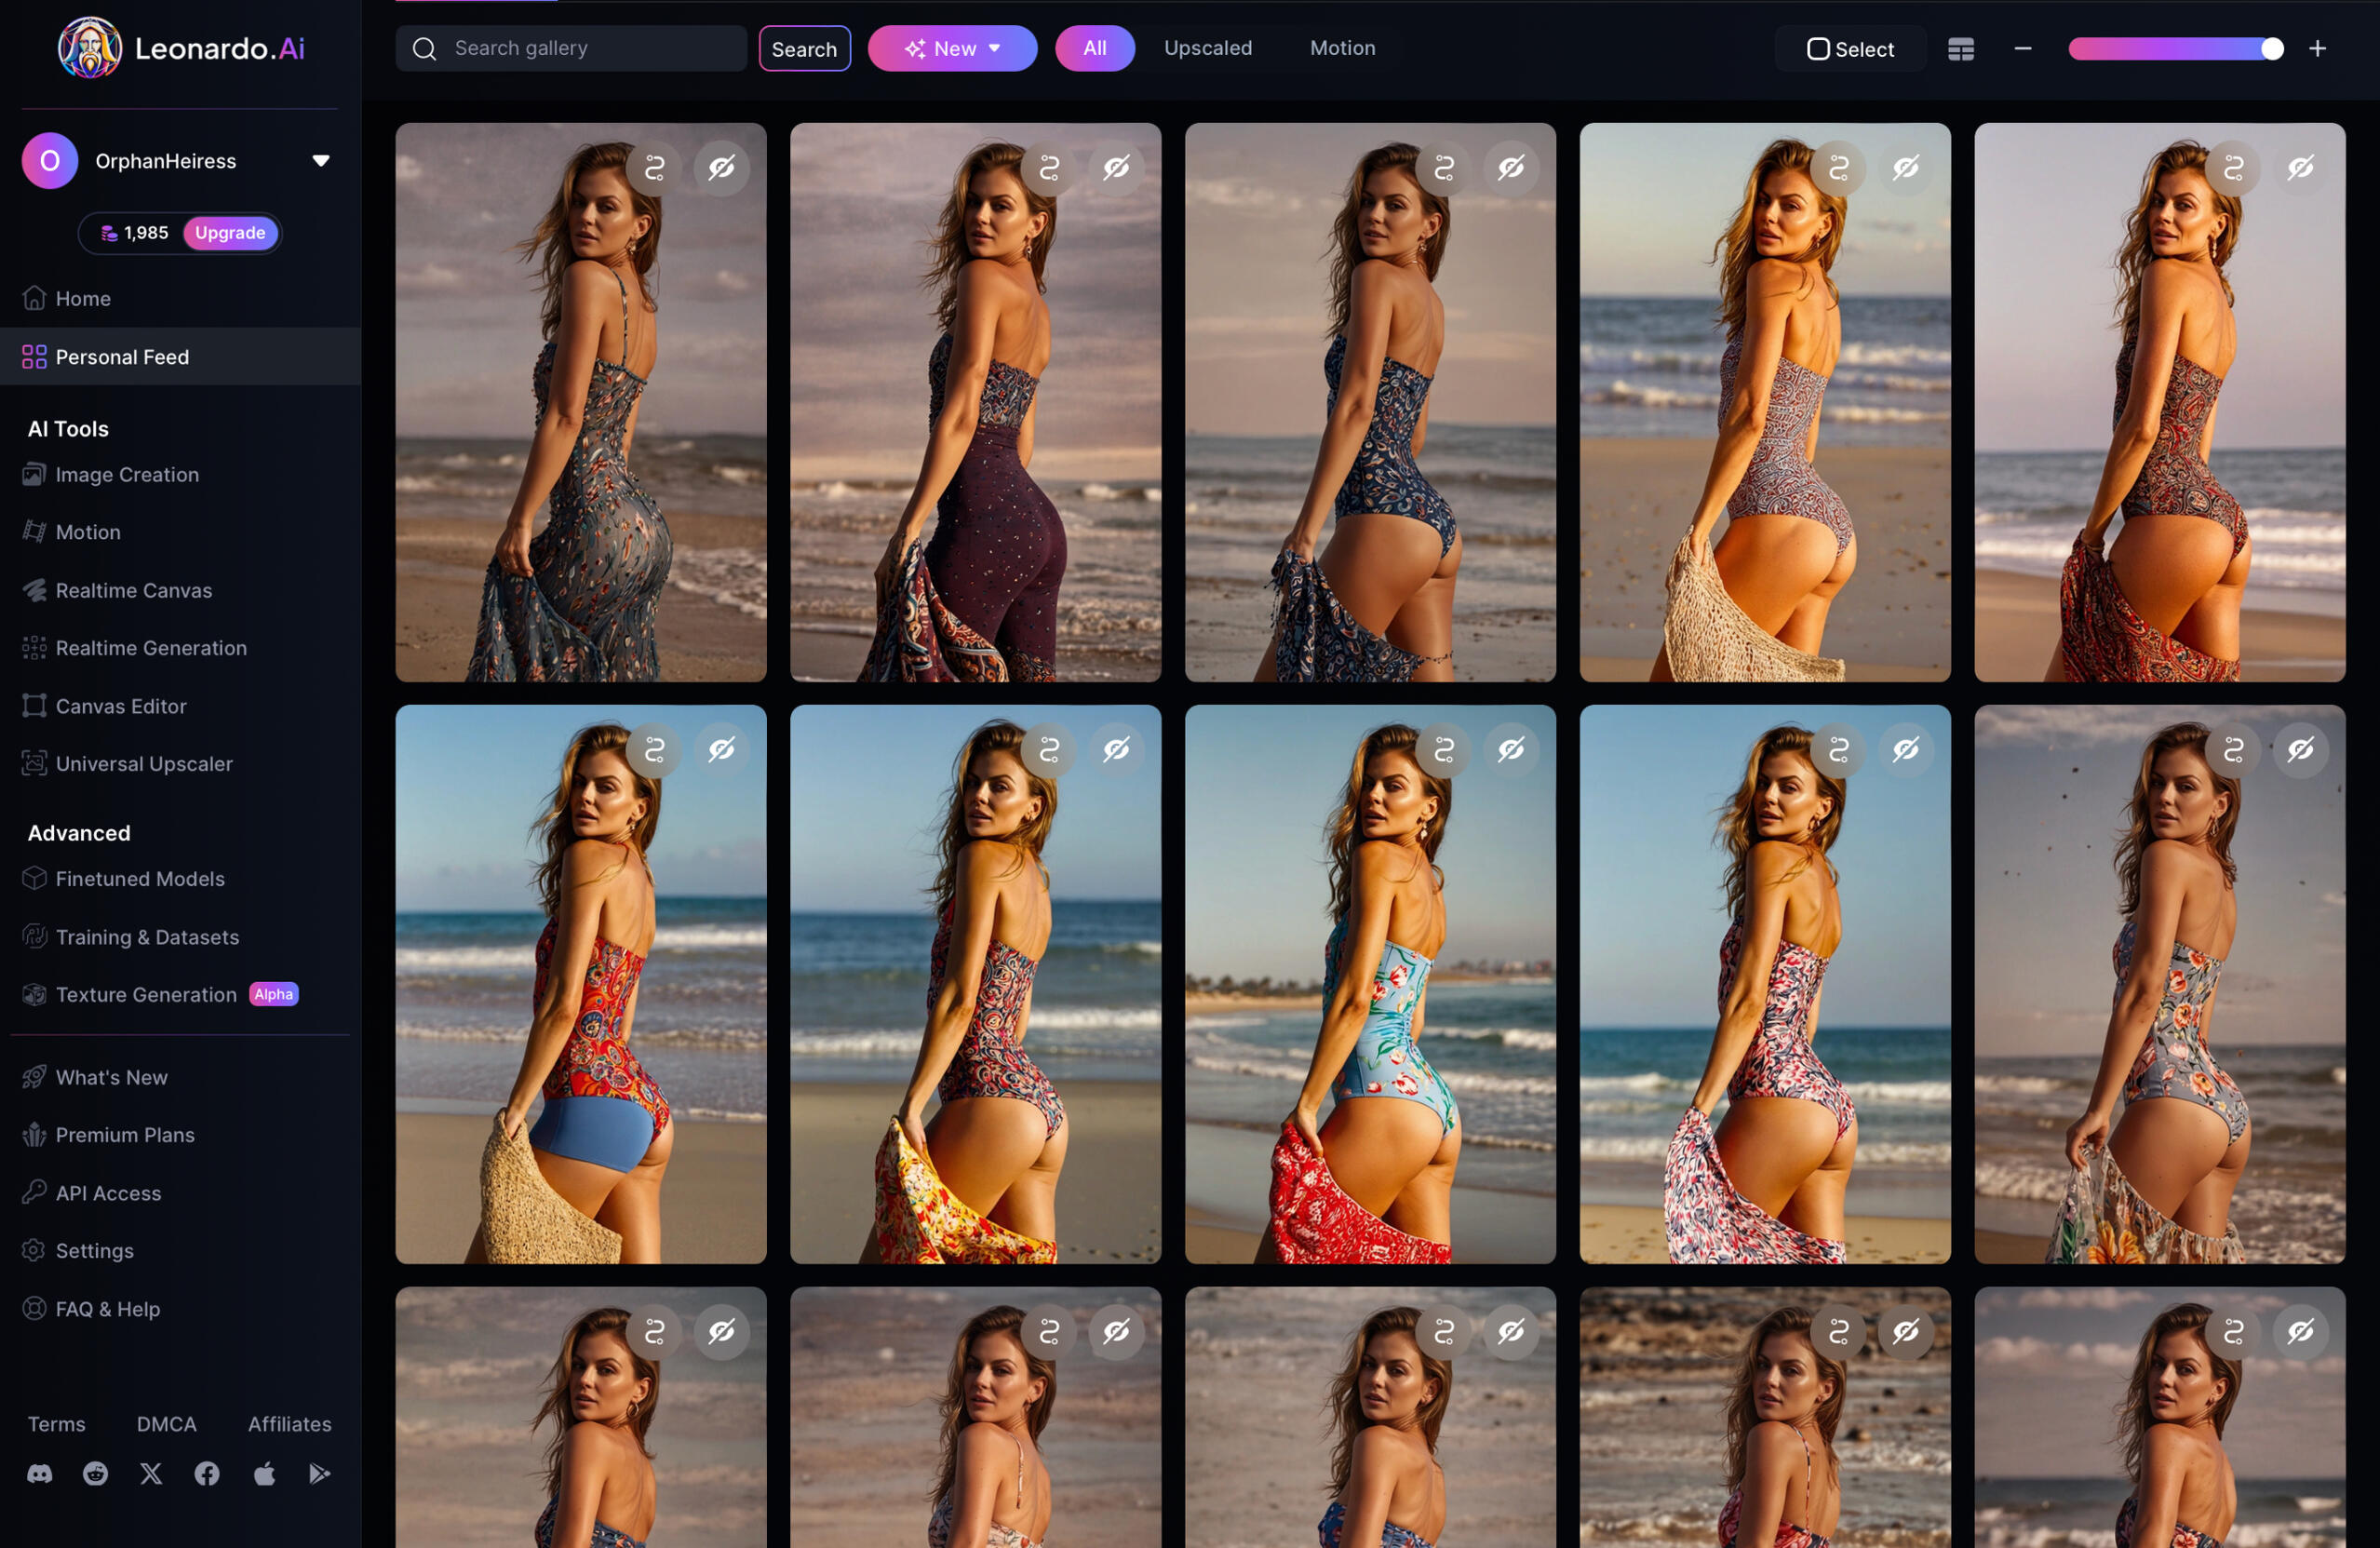
Finding the perfect look often requires some experimentation:• Testing Different Models: I try out various AI models and filters to see which one complements my photo the best.
• Preferred Model: I often gravitate towards Leonardo Lighting XL, as it tends to produce results that align with my vision.
• Saving the Result: Once I’m satisfied with the AI-generated image, I save it to my device.Tip: Don’t be afraid to experiment. Different models can yield surprisingly different outcomes, so it’s worth exploring multiple options.
Step 4: Layering and Editing
with PicsArt or Photoleap
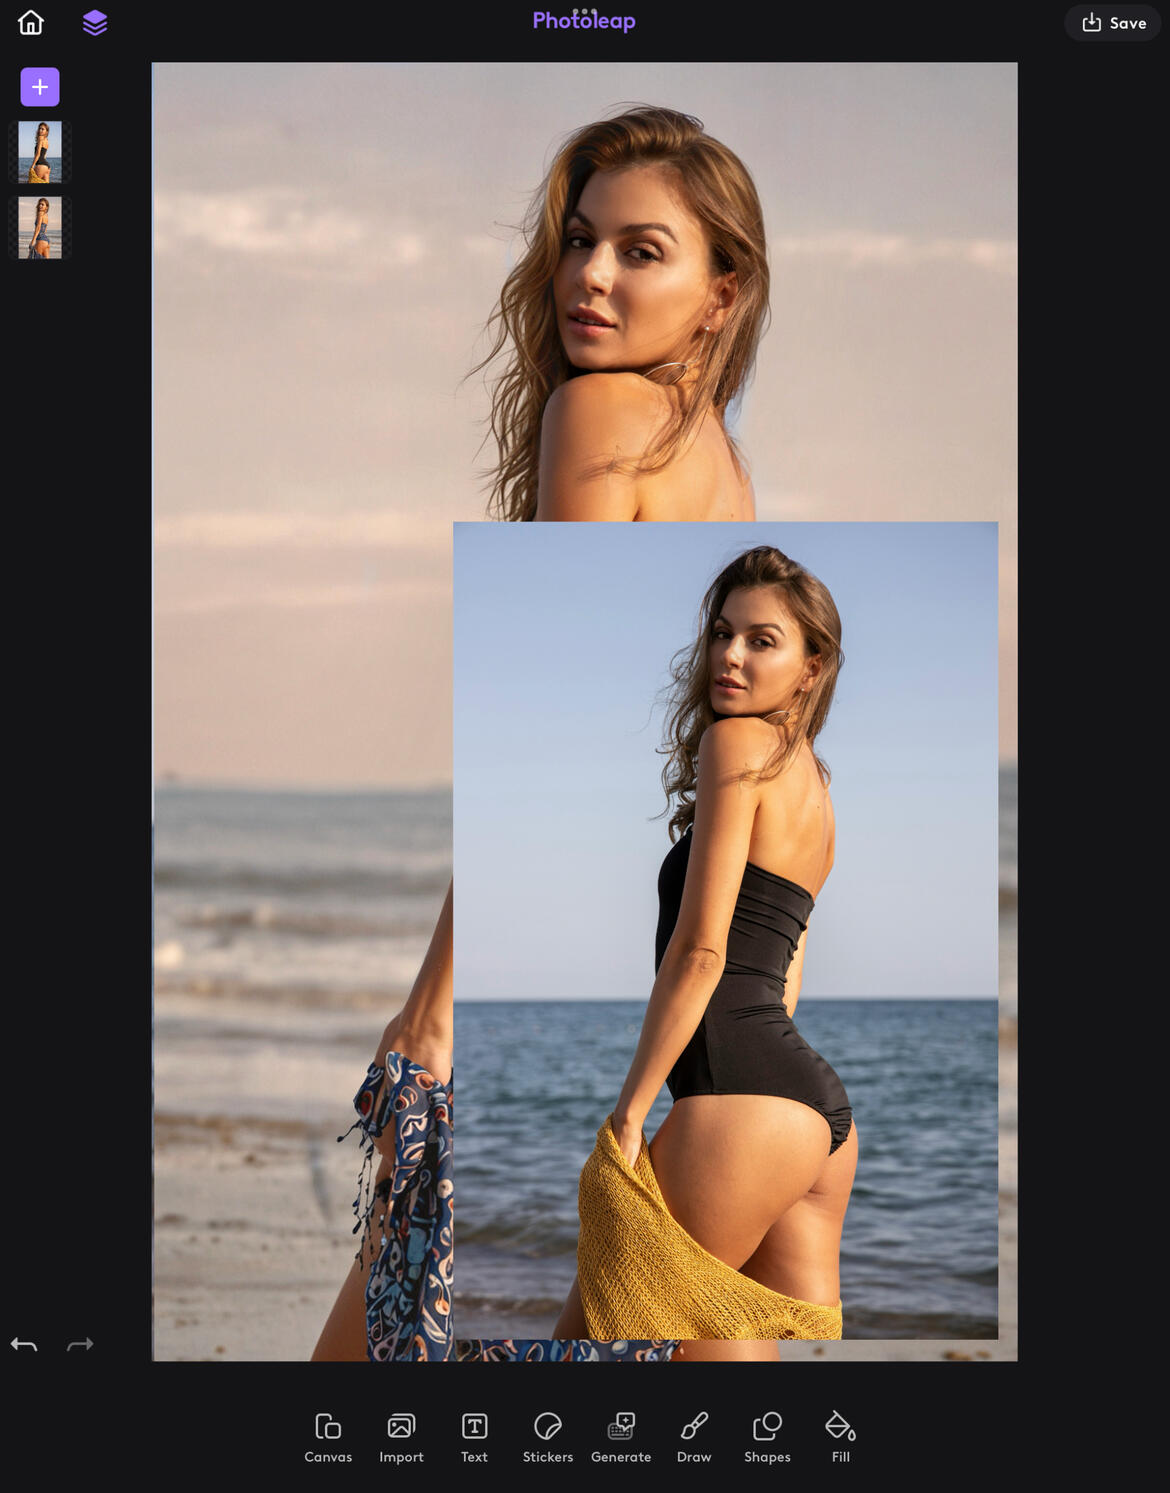
Now comes the creative blending of the original and AI-generated images:1. Choosing an Editing App:
• I use Photoleap on my iPad as my preferred editing tool, though PicsArt is another viable option.2. Importing Images:
• Original Photo: I load the original photograph into the app.
• AI-Generated Image: I add the AI-enhanced image as a new layer on top of the original.3. Selective Erasing and Revealing:
• Using my Apple Pencil, I slowly go over the layers, erasing parts of the AI layer to reveal the original photo beneath and vice versa.
• I keep the AI enhancements in areas where they add value to the image, while keeping the rest of it intact.Tip: Pay attention to edges and details to ensure a seamless blend between layers.
Addressing Lighting Differences:If there’s a discrepancy in lighting or color between the two images:• Editing for Consistency: I adjust either the original or the AI-generated image using the app’s editing tools.
• Matching Tones: This might involve tweaking brightness, contrast, saturation, or applying filters to harmonize the images.Tip: Consistent lighting is key to making the composite image look natural.
Step 5: Refining Light and
Makeup with FaceTune
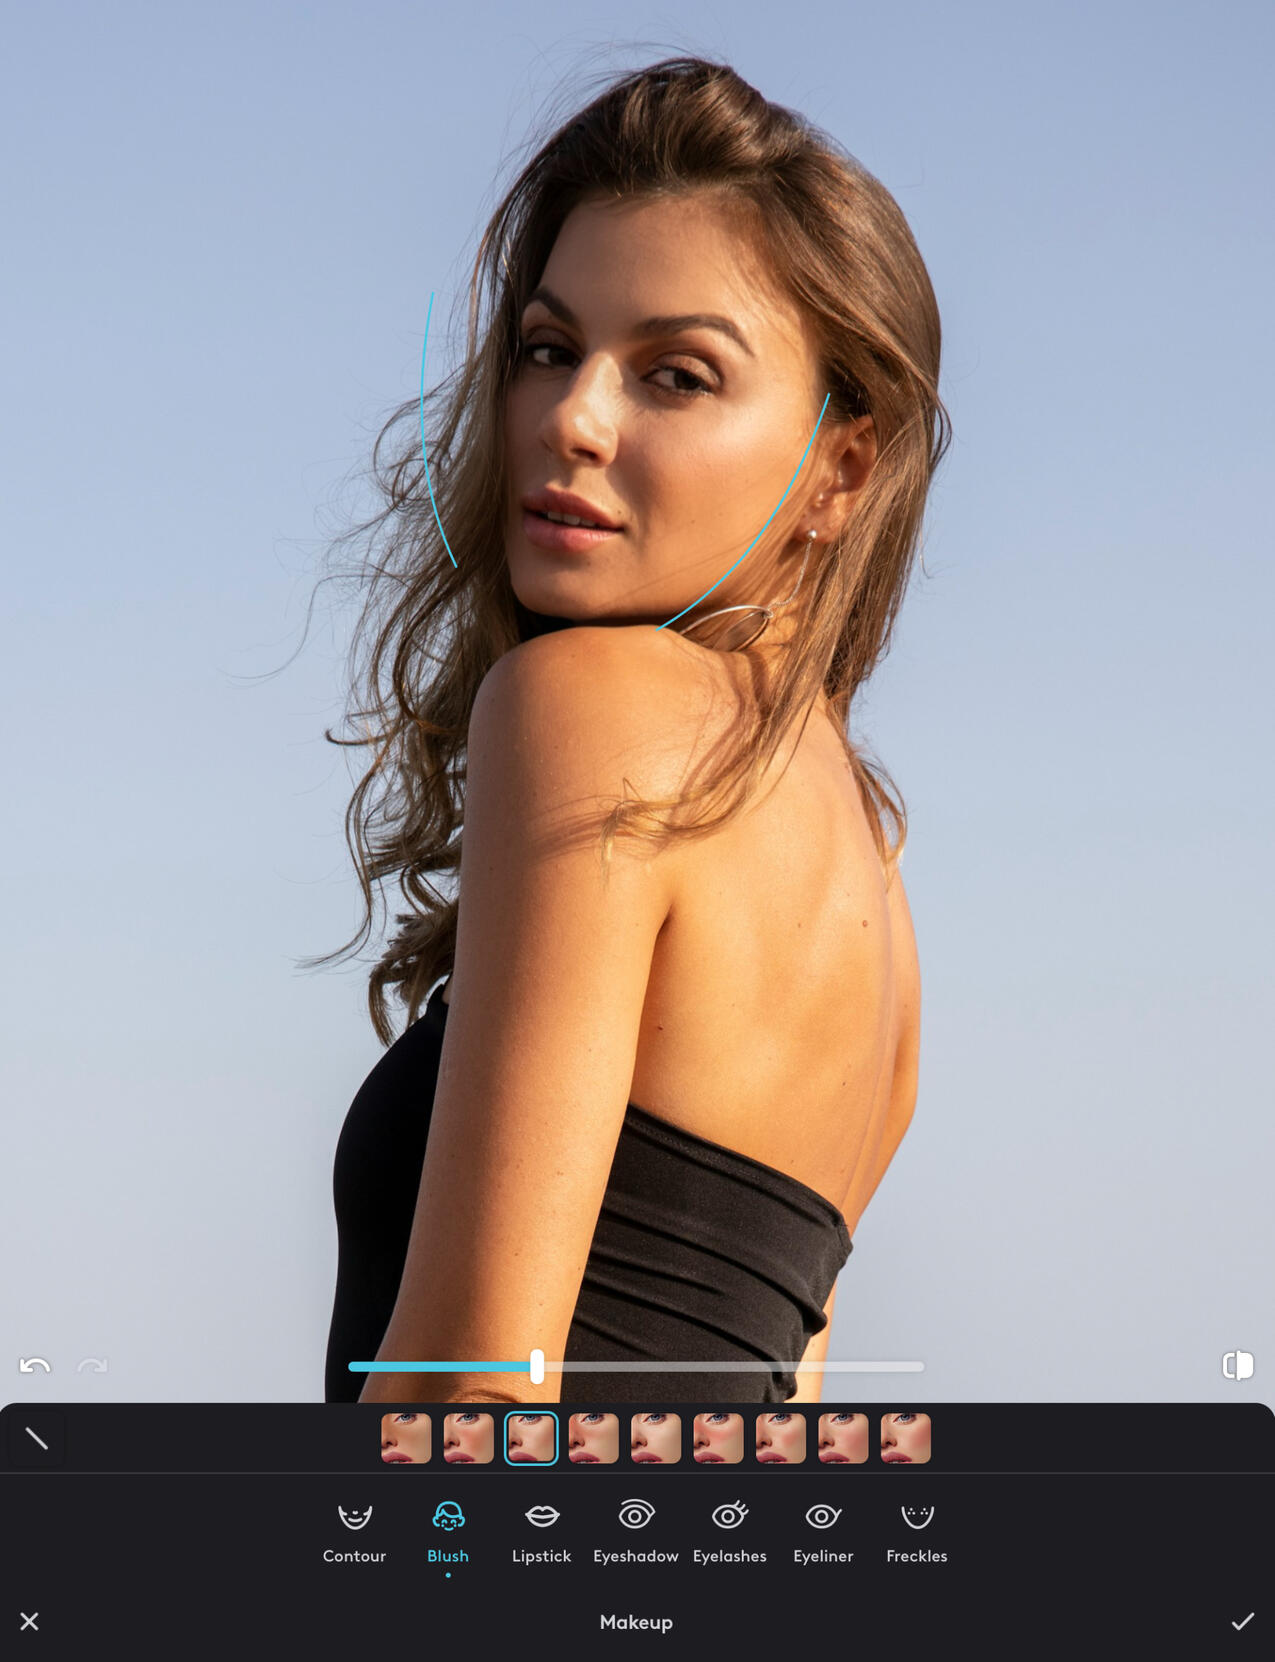
Sometimes, the AI may alter facial features in ways that don’t match the original subject. In that case, the steps I take are:• FaceTune Import: I import the original photograph into FaceTune.
• Adjusting Light and Color: I edit the photo to match the lighting and color tones of the AI-generated image.
• Touching Up Makeup: I enhance or adjust makeup details to ensure consistency across the composite image.Tip: Keeping the subject’s face true to the original helps maintain their identity and ensures the final image is recognizable.
Step 6: Finalizing the Image

With all adjustments made, it’s time to wrap up the project:• Merging Layers: I merge the layers in the editing app to create a single, cohesive image.
• Saving the Final Photograph: I save the high-resolution image to my device, ready for sharing or printing.Tip: Before saving, zoom in to check for any imperfections or inconsistencies that might have been missed.Additional Tips and Considerations• Backup Your Work: Always keep copies of your original photographs and intermediate edits. This allows you to revert or make changes without starting over.
• If the image quality lacks sharpness or clarity, consider using an Upscaler (tutorial here) to improve image quality and detail.
• Stay Ethical: When altering images, especially portraits, consider the ethical implications and obtain necessary permissions if sharing publicly.
• Continuous Learning: The fields of AI and photo editing are constantly evolving. Stay updated with the latest tools and techniques to enhance your workflow.
Conclusion
This technique offers a fusion of traditional photography and the latest AI tools, unlocking new creative avenues. By capturing your initial photograph with this process in mind and carefully blending AI-generated enhancements, you can produce images that are both original and captivating.Don’t hesitate to experiment with different tools and settings to find what works best for your style. Happy creating!

Next post
How to
Clone Your Voice
for TikTok & Video Voiceovers

In the bustling atmosphere of Central Los Angeles, finding a quiet moment to record a crisp, clear voiceover for videos can be quite challenging. As a content creator constantly battling ambient noise and the occasional need for vocal warm-ups, I've found a high-tech workaround that has me pretty psyched: voice cloning. Here’s how I did it using ElevenLabs, and how you can too.
Why Clone Your Voice?
Voice cloning offers an escape from the hassle of traditional recording setups, providing a ready-to-use, perfectly modulated version of your voice directly from text. This technology is ideal for anyone needing to produce content in less-than-ideal conditions or simply looking to streamline their production process.
Using ElevenLabs
for Voice Cloning
Using ElevenLabs to clone your voice involves a straightforward yet precise process. Here’s how you can upload your voice samples and train your model to start creating voiceovers:STEP 1: Choosing the Right PlanBefore you begin, you need to select the appropriate plan based on your needs:Instant Voice Cloning: Suitable for quick projects with minimal customization. This is cost-effective and allows for immediate results, but is in no way as precise when it comes to voice cloning. I consider it voice copying, rather than cloning.Professional Voice Cloning: Best for high-quality, customizable voice cloning. This requires more voice data but offers superior control and output, making it ideal for professional uses such as audiobooks, high-end content creation, or customer service applications.You can review the specific features and costs of each plan on the ElevenLabs pricing page to determine which best suits your project's scale and budget.
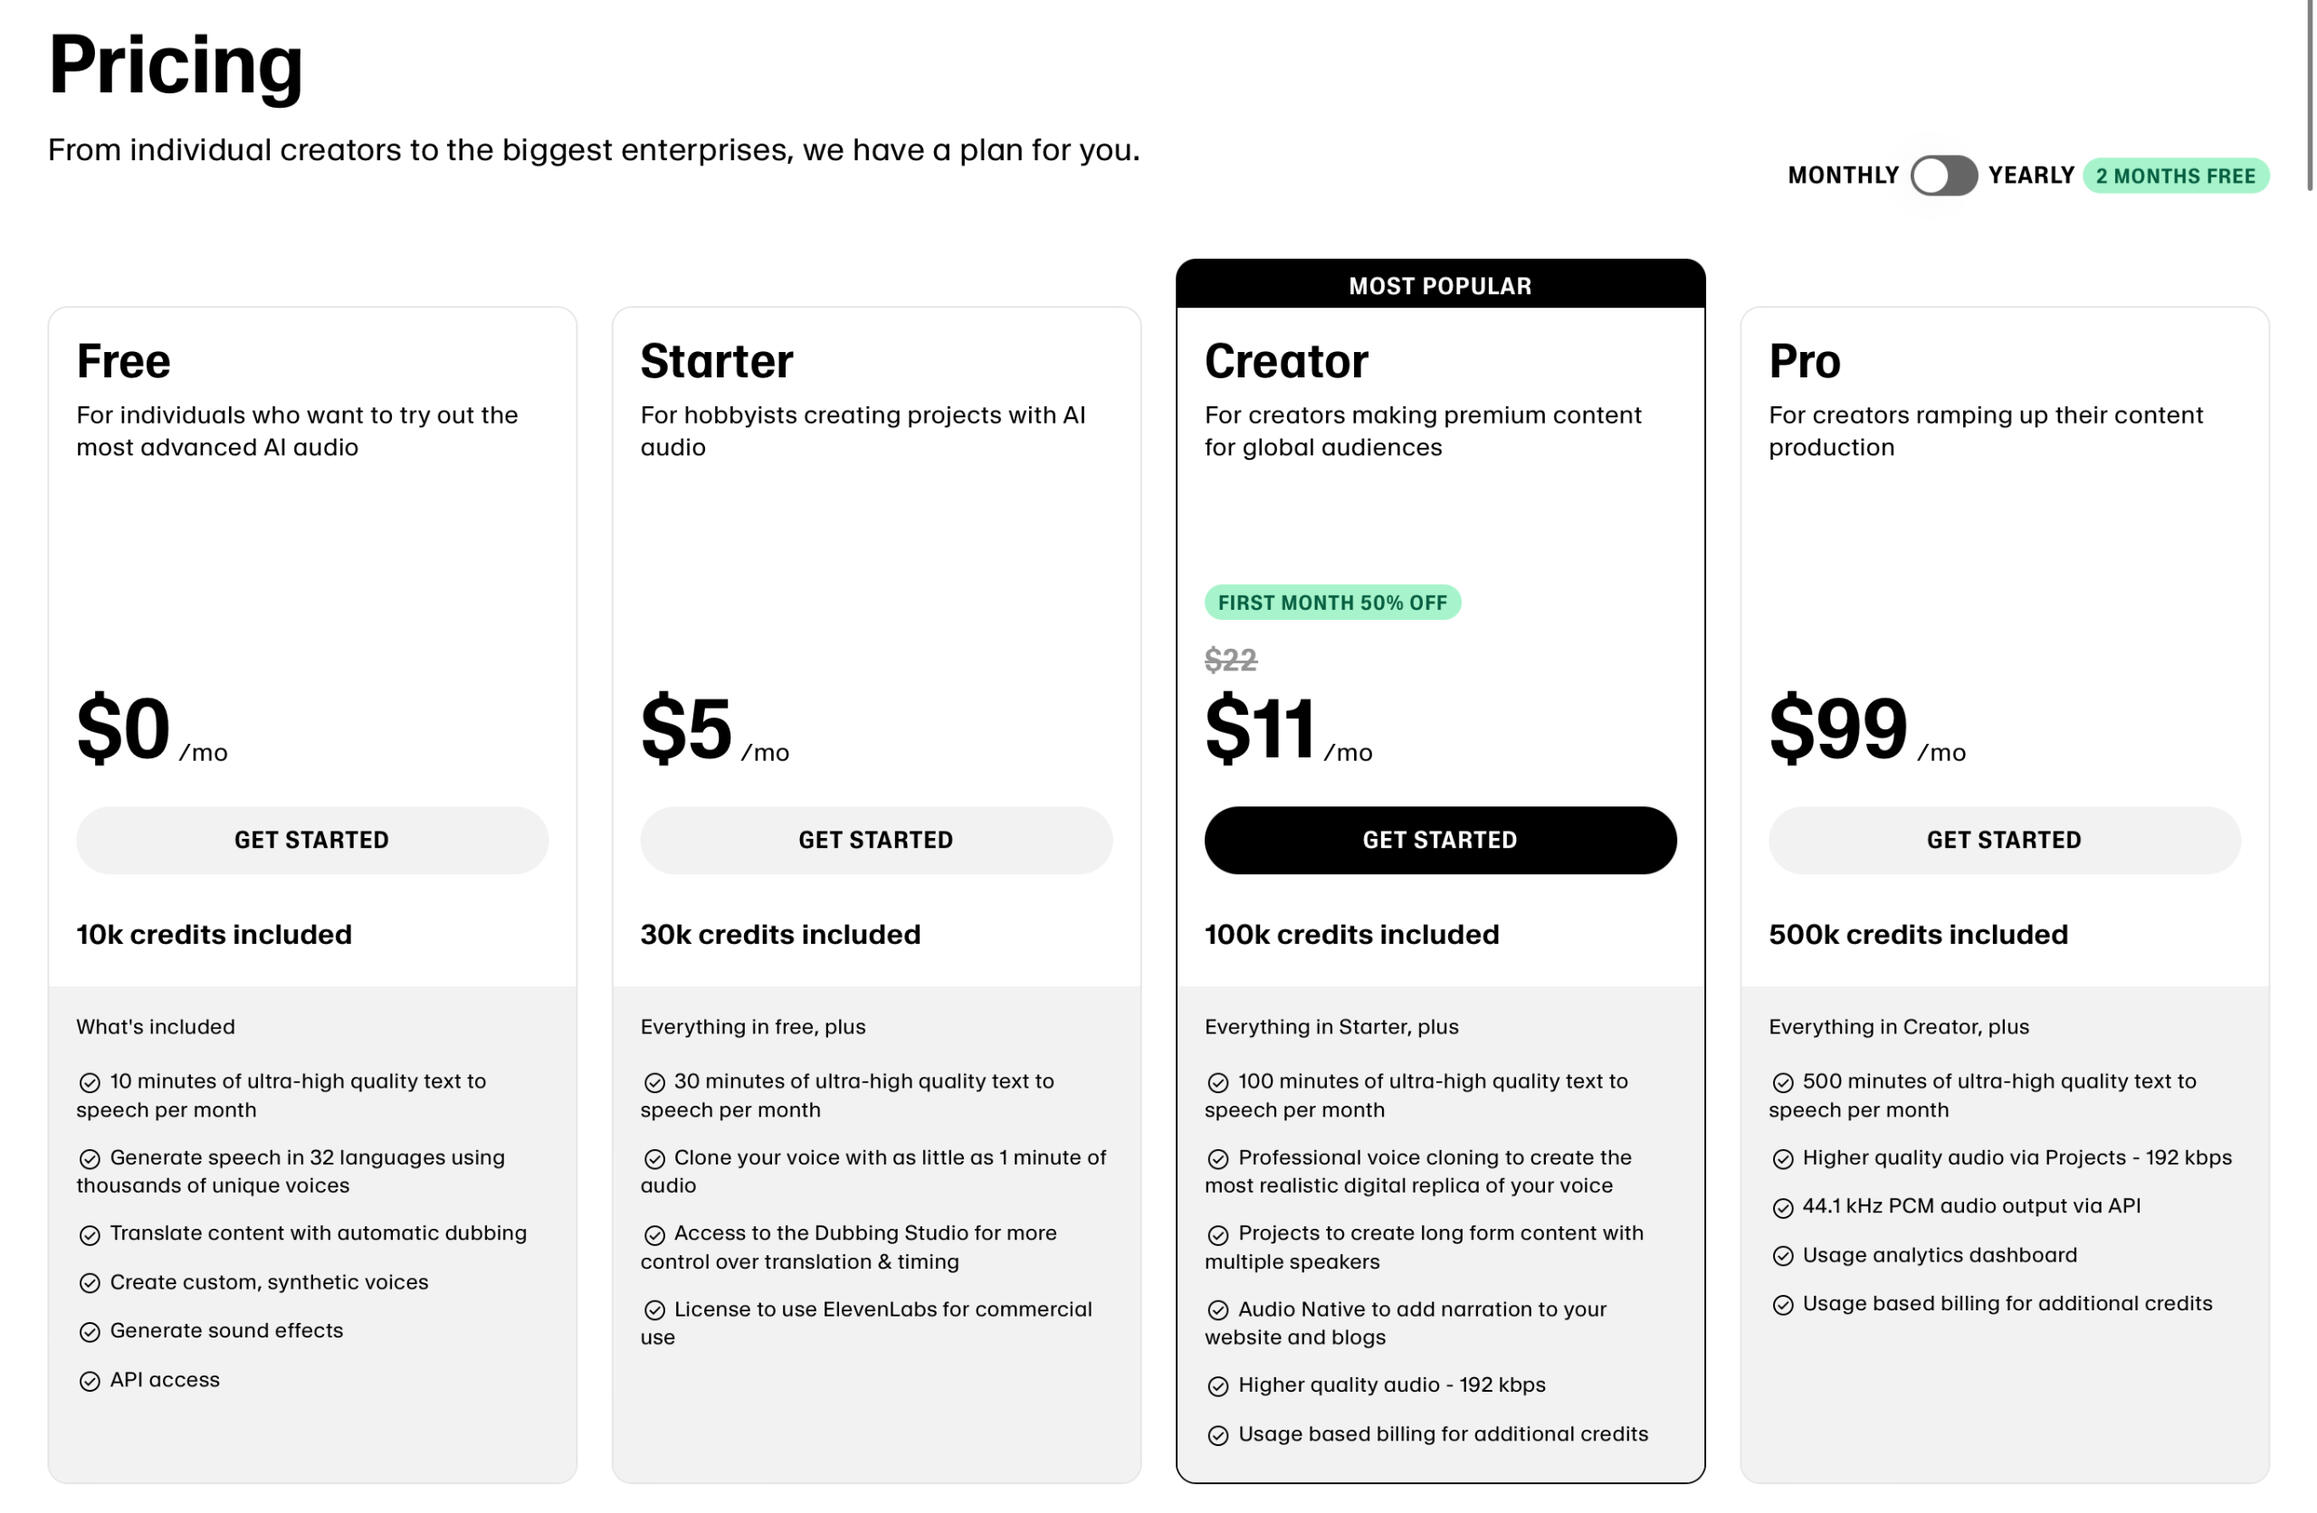
STEP 2: Uploading Your Voice Samples1. Record Your Voice: If you haven’t already, record at least 30 minutes of high-quality voice samples. For the best results, aim for 3 hours of diverse recordings, covering different pitches, tones, and speech patterns. Use a quiet environment and good recording equipment to ensure clarity. Personally, I was able to get away with 2 hours of recording on an iPhone and an old lavalier mic. Results? Quite passable.2. Log In/Create an Account: Visit the ElevenLabs website and log in or create a new account.3. Access the Voice Cloning Section: Navigate to the voice cloning section through the dashboard. For that, you will need a Creator Plan, priced at $22 per month. It’s designed for content creators needing high-quality narration, and offers up to 100,000 characters per month.4. Upload Files: Upload your voice recordings. The platform supports various file formats, but check their guidelines for recommended settings to ensure compatibility and quality.5. Set Parameters: Depending on the plan chosen, you might have options to specify certain parameters such as emotional tone, speech rate, and other vocal characteristics that define your style.STEP 3: Training the Model1. Begin Training: Once your files are uploaded, initiate the training process. ElevenLabs uses advanced machine learning algorithms to analyze and learn from your voice data.2. Monitor Progress: You can monitor the training progress on your dashboard. Training times can vary based on the amount of data and the server load, but typically, a few hours are enough for the initial training.3. Adjustments and Feedback: After the initial training, listen to the samples generated by the model to check for accuracy. You might need to provide feedback or adjust settings if the output isn't as expected.4. Finalize the Model: Once satisfied with the cloned voice, finalize the model. This version will be used to generate speech from text inputs.
Using Your Voice Model
Now that your model is trained, you can start creating voiceovers:Generate Speech:
Type the text you want to be read in your cloned voice and generate the speech. You can create voiceovers for YouTube videos, TikTok, podcasts, etc.Download or Direct Use:
Download the audio files or use them directly within the platform if integrating with other ElevenLabs tools or APIs.
Security and Safety Tips
Voice cloning is powerful but comes with potential risks:- Choose Reputable Services
- Understand Privacy Policies
- Secure Your OutputsBy doing a little research, we can say that ElevenLabs is generally considered a safe platform for voice cloning, thanks to its robust security measures and ethical guidelines. The company emphasizes the safety and privacy of its users by implementing several protective mechanisms:1. Moderation and Content Review: ElevenLabs employs both automated systems and human moderators to monitor and review content generated using their technology.2. voiceCAPTCHA: To minimize unauthorized use, ElevenLabs has developed a proprietary voice verification technology.3. Traceability and Accountability: The platform has systems in place that allow tracing generated content back to the original accounts. This traceability ensures accountability, as it helps identify users who might misuse the tools. According to their website, ElevenLabs cooperates with law enforcement to address illegal activities, enhancing overall platform safety. They are also involved in initiatives like the Tech Accord on Election Safety to collaboratively establish and adhere to protocols that ensure the responsible use of AI technologies during the election period.4. Provenance and AI Detection Standards: ElevenLabs supports the adoption of industry standards for content authenticity, which includes using metadata, watermarks, and fingerprinting solutions to verify the origins of digital content. This is part of a broader effort to ensure transparency and prevent misuse of AI-generated content.These safety protocols and ethical commitments suggest that ElevenLabs is dedicated to maintaining a secure and responsible environment for voice cloning.
Conclusion
Voice cloning—while not for everyone—simplifies not only the production of voiceovers but also empowers you to create high-quality audio content efficiently, regardless of your recording environment. By following these steps, you can harness the power of AI to maintain a consistent and professional voice presence across all your digital content.

Next Post
How to
Create a Beautiful
Pitch Deck Presentation

Creating a stunning pitch deck is crucial for capturing the attention of investors, clients, or any other stakeholders. A well-crafted deck not only conveys your business idea but also reflects your professionalism and attention to detail. Here’s a step-by-step guide on how to create a beautiful pitch deck using Slidebean for text and structure, Canva for design, and AI tools like Bing Image Creator or Leonardo.ai for custom images.
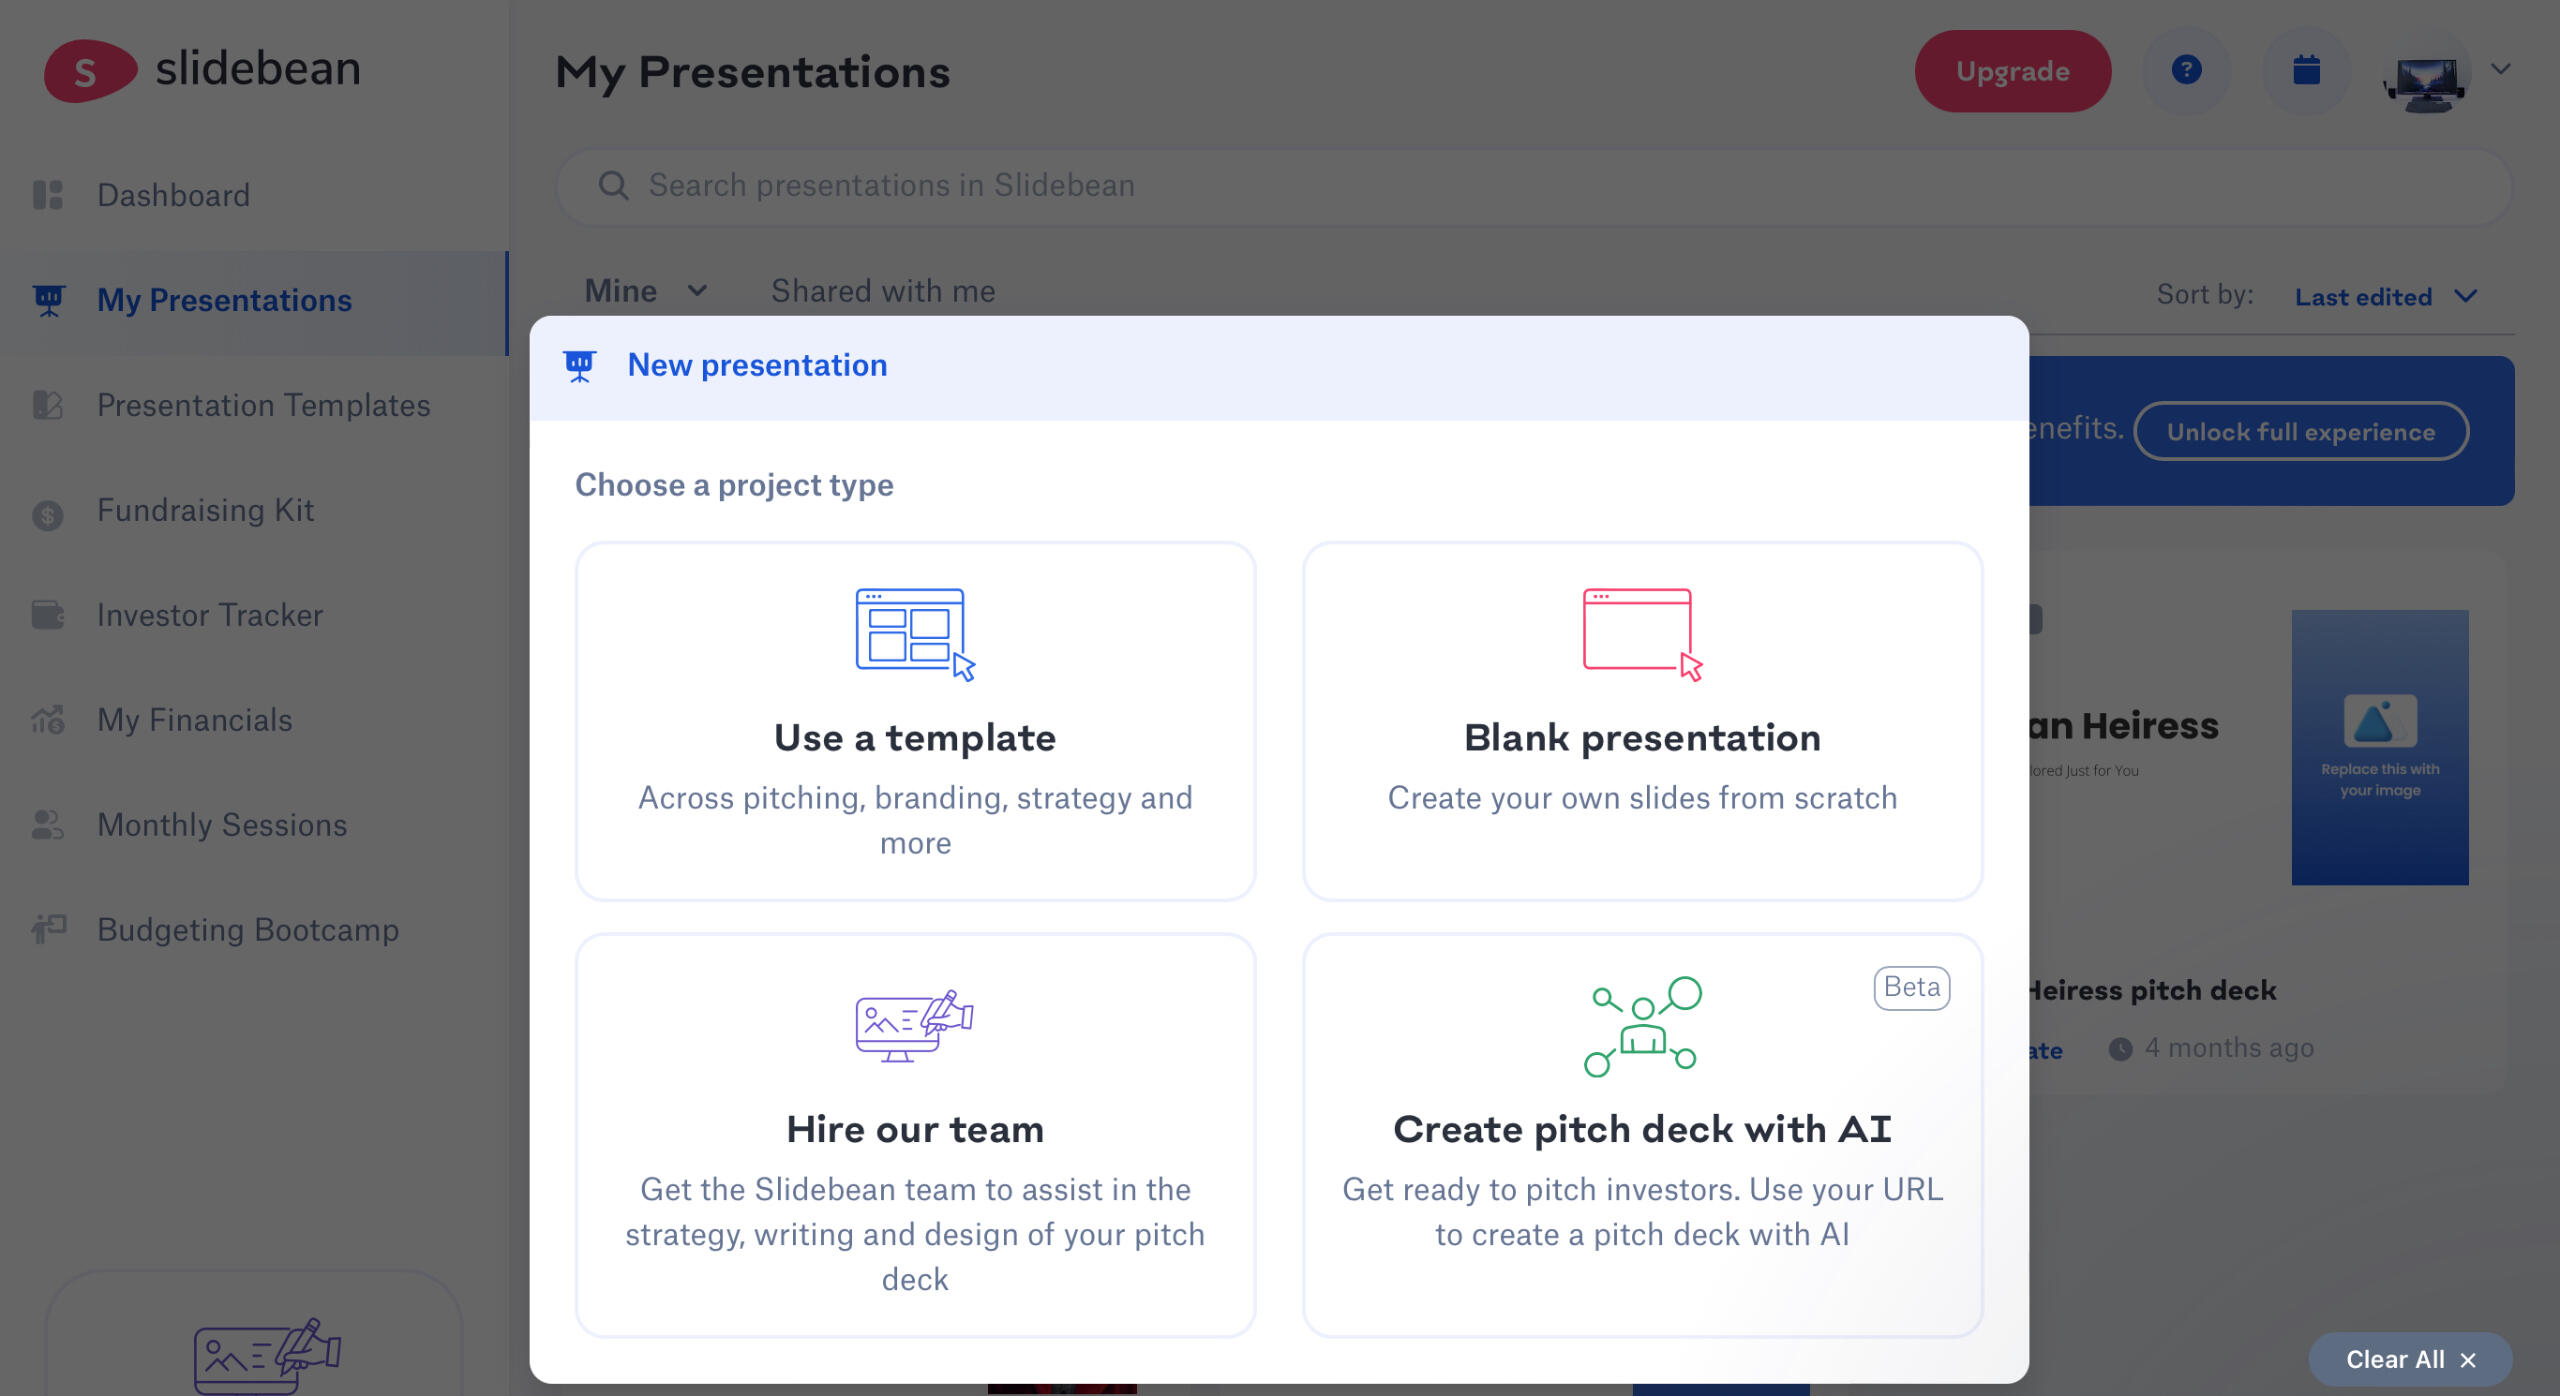
STEP 1: OUTLINE YOUR CONTENT WITH SLIDEBEAN1. Sign Up and Start a New Project: Begin by signing up at Slidebean and starting a new pitch deck project.
2. Select a Project Type: While Slidebean offers various templates designed specifically for pitch decks, I recommend starting with their AI-powered option. Choose "Create a Pitch Deck with AI," and then either enter your website URL or provide a brief description of your pitch or company details. Be as specific as possible. This approach allows the AI to generate a customized pitch deck tailored to your needs.
3. Polish Your Content: While you can use the text generated by Slidebean’s AI, it’s important to review and edit it to better fit the specific purpose of your pitch deck. Slidebean’s interface makes it easy to refine the content for each slide, allowing you to focus on crafting a clear and concise message that aligns with your unique goals.
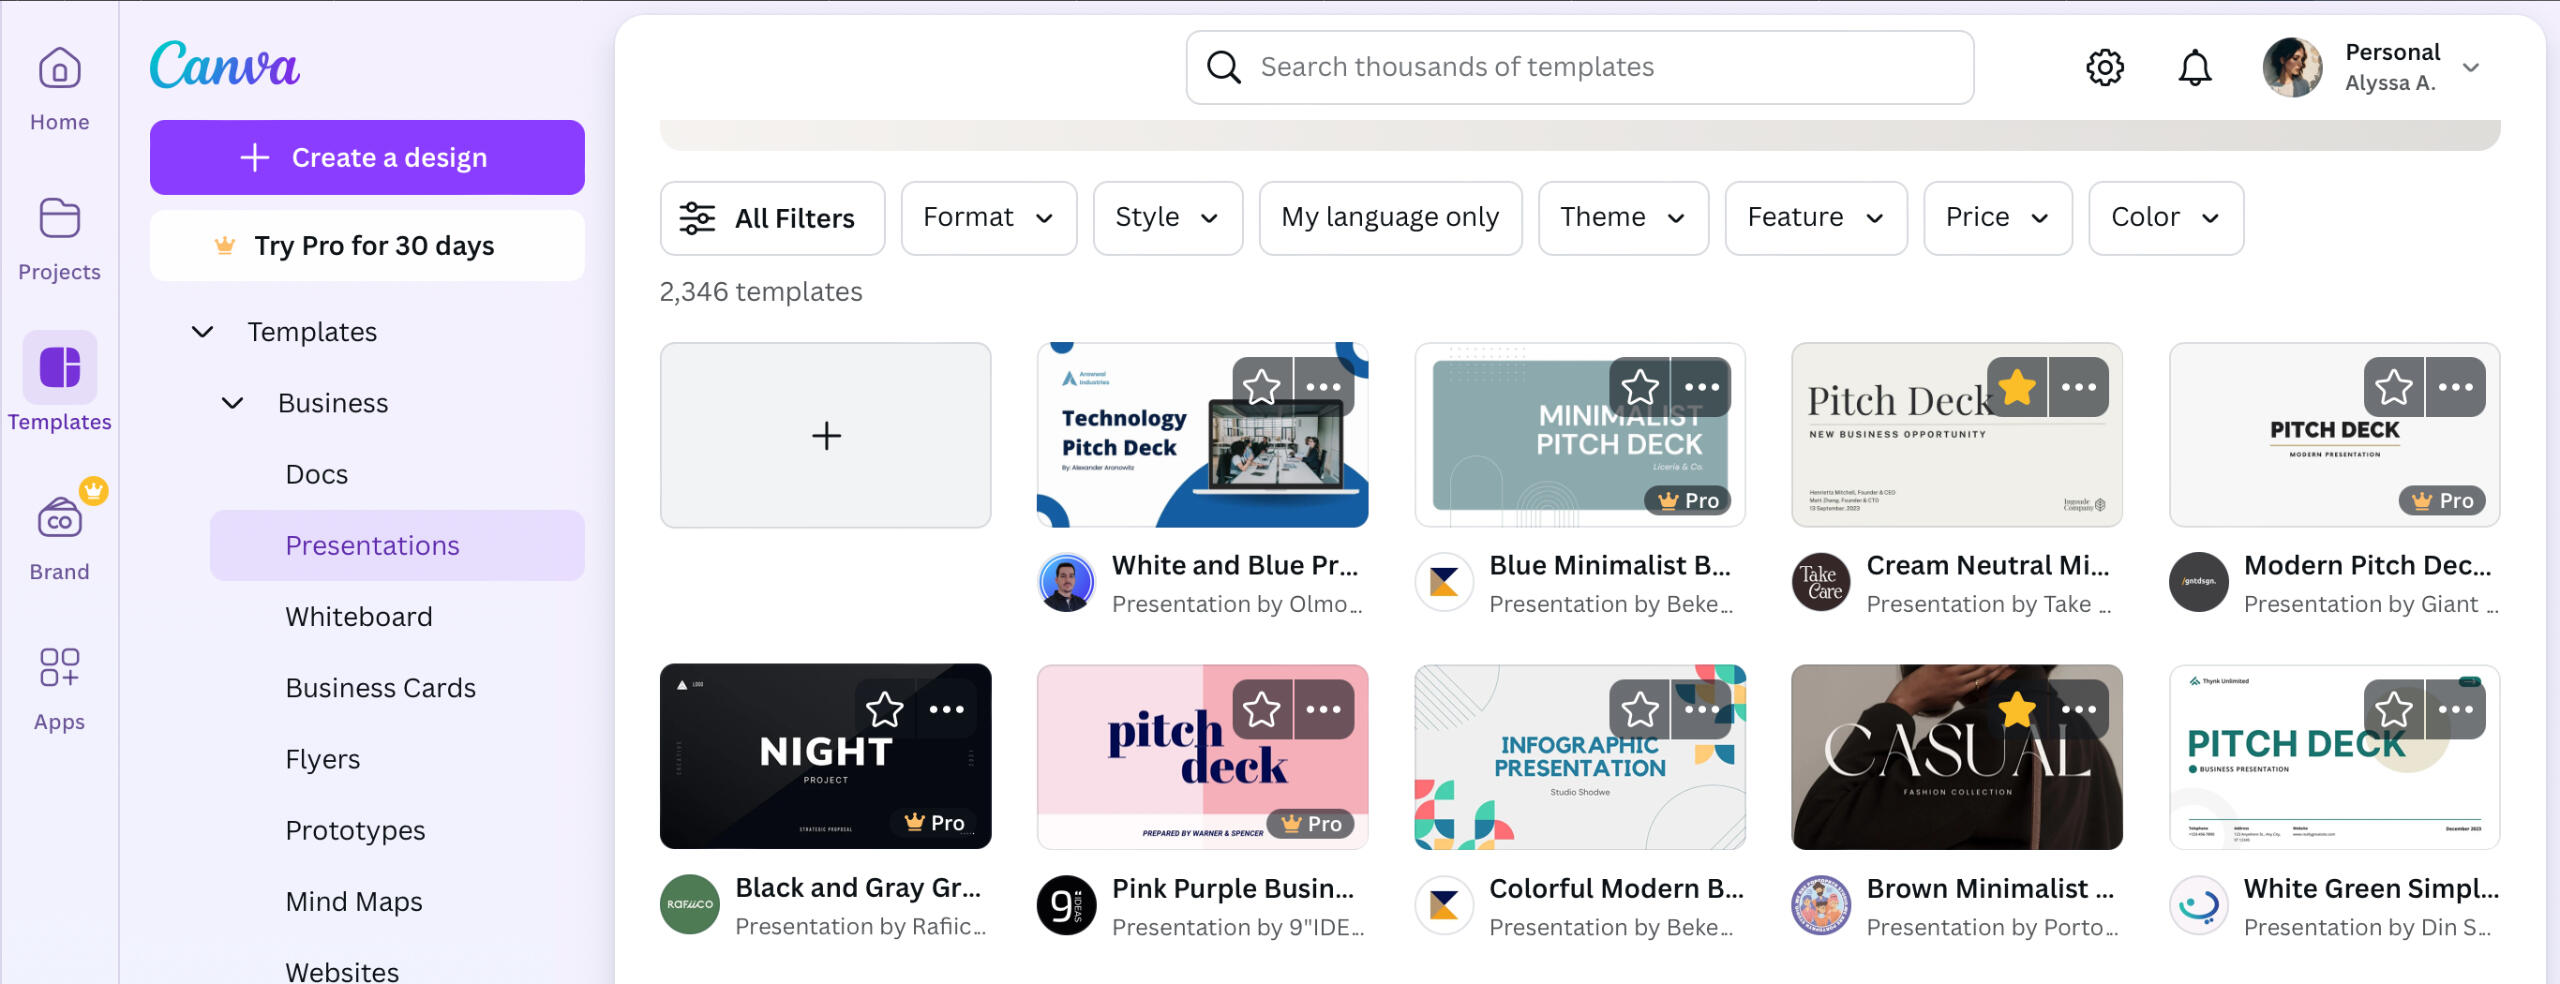
STEP 2: DESIGN YOUR DECK WITH CANVA1. Import Content to Canva: Once your content is ready in Slidebean, you can export it or copy the text to use in Canva for enhanced design flexibility.
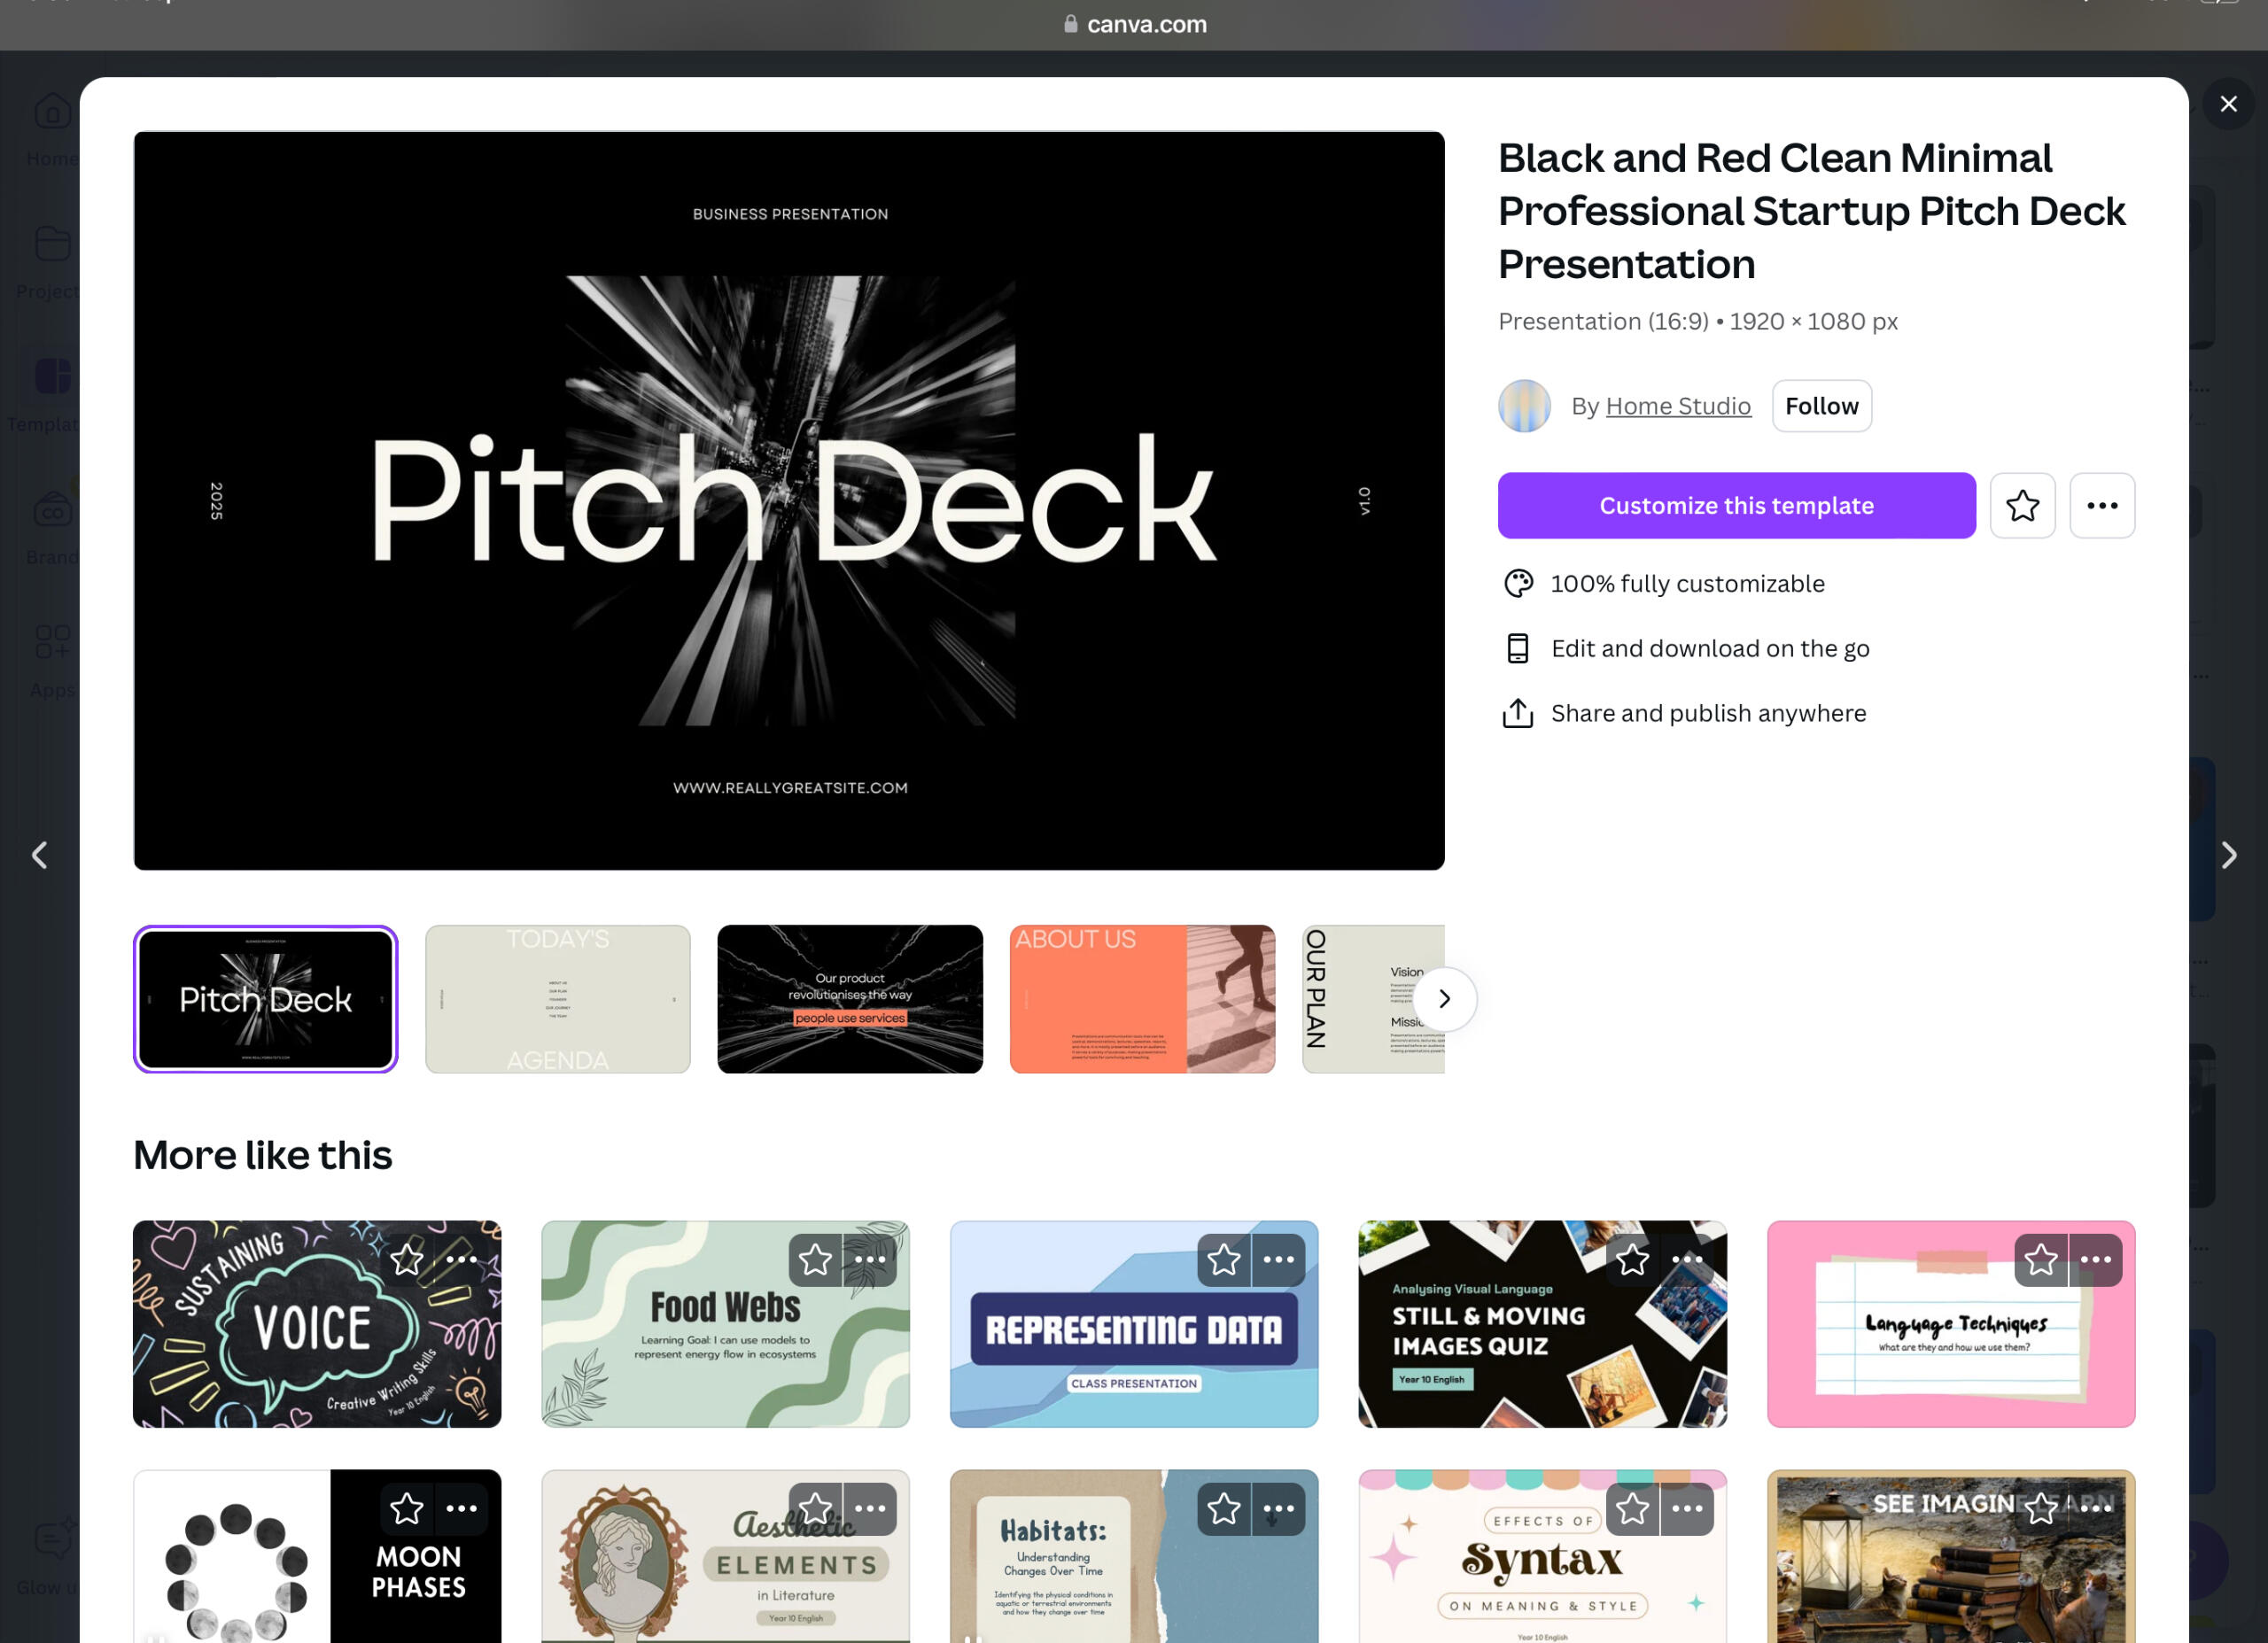
2. Choose a Design Template: In Canva, search for “pitch deck” templates. Choose one that aligns with your brand’s style and the tone of your presentation.
3. Customize the Design: Use Canva’s drag-and-drop interface to customize your slides. Adjust colors, fonts, and layouts to make your deck visually cohesive. Canva also offers a wide range of icons, charts, and elements that you can incorporate into your design.
STEP 3: GENERATE CUSTOM IMAGES* Enhance your pitch deck with custom images using free tools like Bing Image Creator. Simply input a prompt, such as “futuristic skyline” or “modern start-up office space,” and let the AI generate unique visuals. The more specific your prompt, the better the results. For more control, consider using Leonardo.ai’s paid subscription, which offers advanced options to fine-tune details like composition and style, making it ideal for matching your deck’s aesthetic.
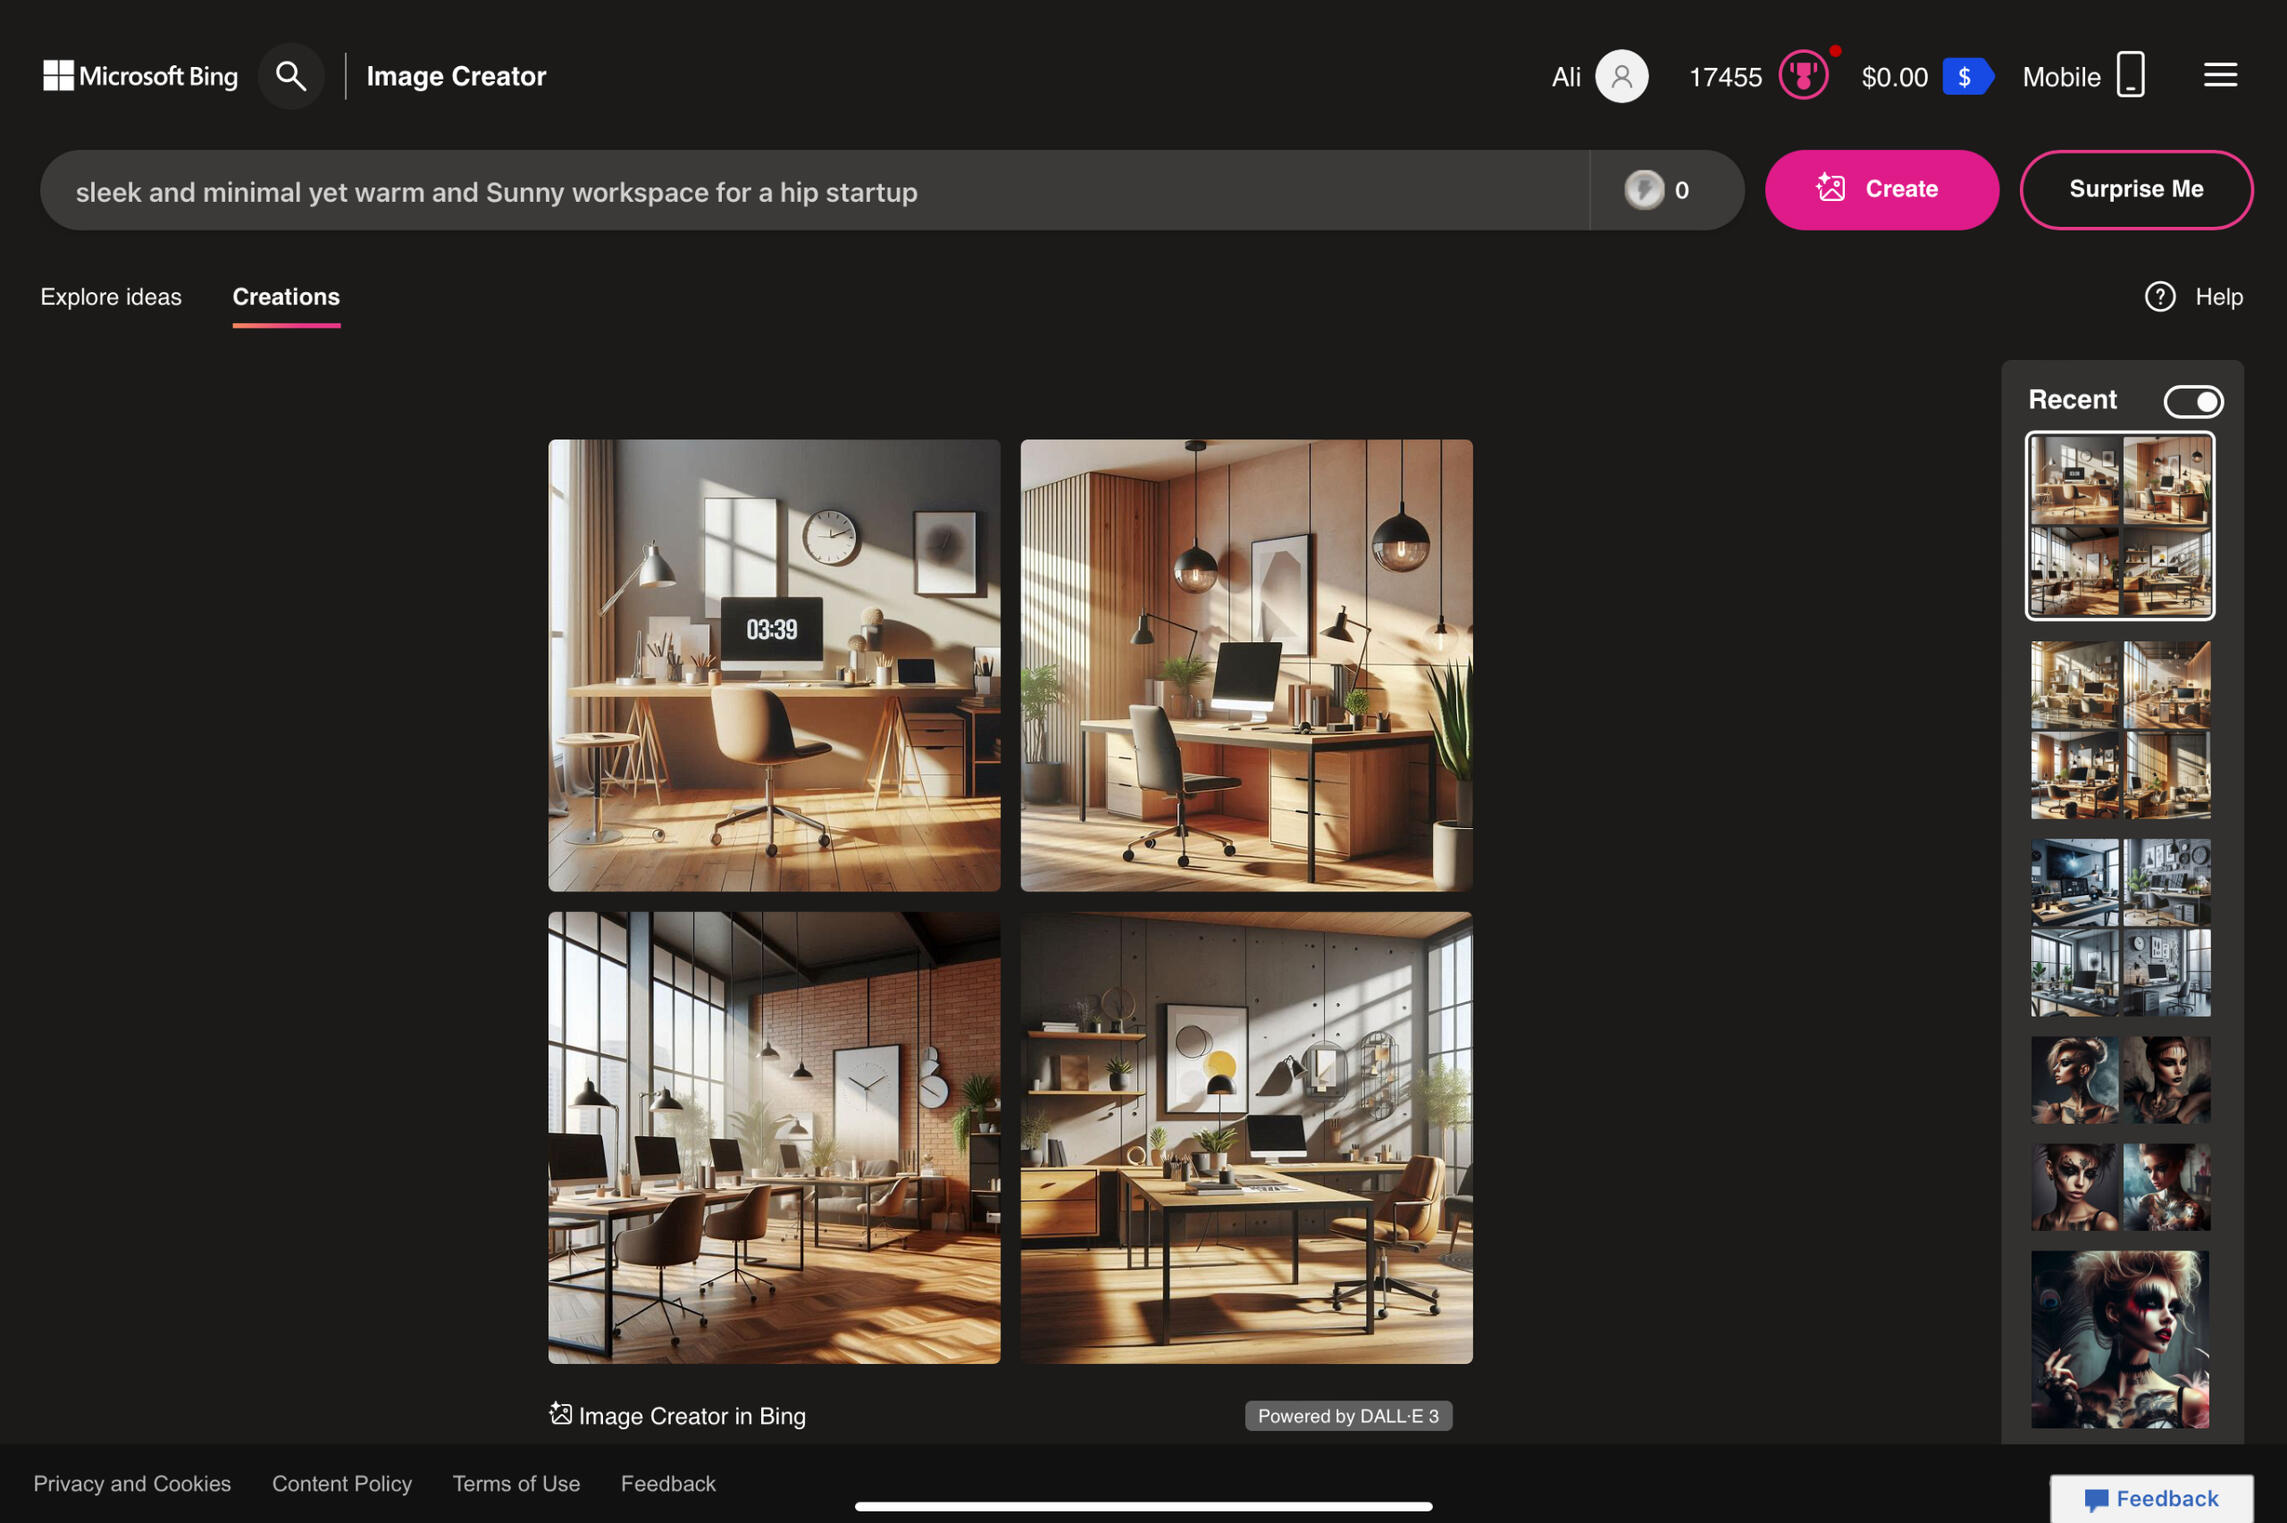
STEP 4: INTEGRATE IMAGES AND FINALIZE THE DECK1. Upload Images to Canva: Download the images from Bing Image Creator or Leonardo.ai and upload them to Canva. Incorporate these visuals into your slides to add impact and creativity.2. Polish Your Slides: Ensure that each slide is balanced and not too cluttered. Use whitespace effectively to make your content stand out.3. Review and Export: Once your deck is complete, review it for consistency in design and content.
Canva allows you to export your presentation in various formats, including PDF and PowerPoint.
FINAL THOUGHTSBy leveraging the strengths these tools, you can create a pitch deck that is not only informative but also visually stunning. This process is accessible to anyone, regardless of design experience, making it easier to create a deck that leaves a lasting impression.

Next Post
How to
Customize iOS App Icons

Personalizing your home screen isn't just about flair—it's about crafting a space that enhances both aesthetics and functionality. With tools like Photoleap AI editor and the Shortcuts app, tailoring your app icons is more straightforward than it sounds. This approach not only beautifies your daily digital view (considering how much screen time we clock), but it also helps streamline your focus and keep essential apps within easy reach. Customizing your icons lets you minimize visual clutter, match your background perfectly, and keep prying eyes away from more private apps. Here’s a step-by-step guide to refining your device with custom icons, enhancing both its look and usability.
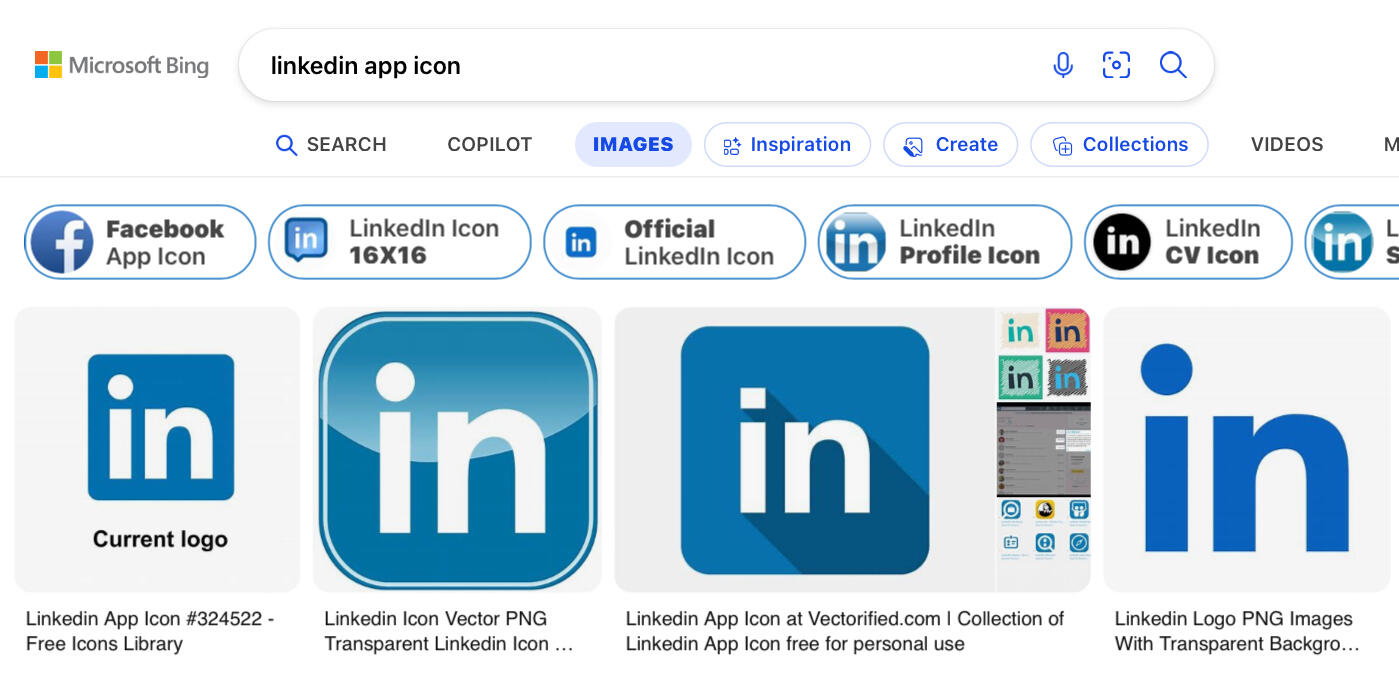
STEP 1: FIND YOUR ICON IMAGEFirst, you need to find the image of the original app icon that you want to customize. A simple Google search with the app name followed by “icon” (e.g., “Safari icon”) should do the trick. Save the image to your Photos app.
STEP 2: EDIT WITH PHOTOLEAP AI SELFIE EDITORNext, open the Photoleap app and select AI Tools, then AI Selfies. Why the Selfie editor? It tends to handle details and colors more effectively, giving your icons a more polished look. Upload your saved icon image and start playing around with the editing tools. You can switch between the various filters, like Painting and Pop Art, tweak the intensity, or even make your own by using unique detailed prompts. Once you’re satisfied with your new icon, save the edited image back to your Photos.
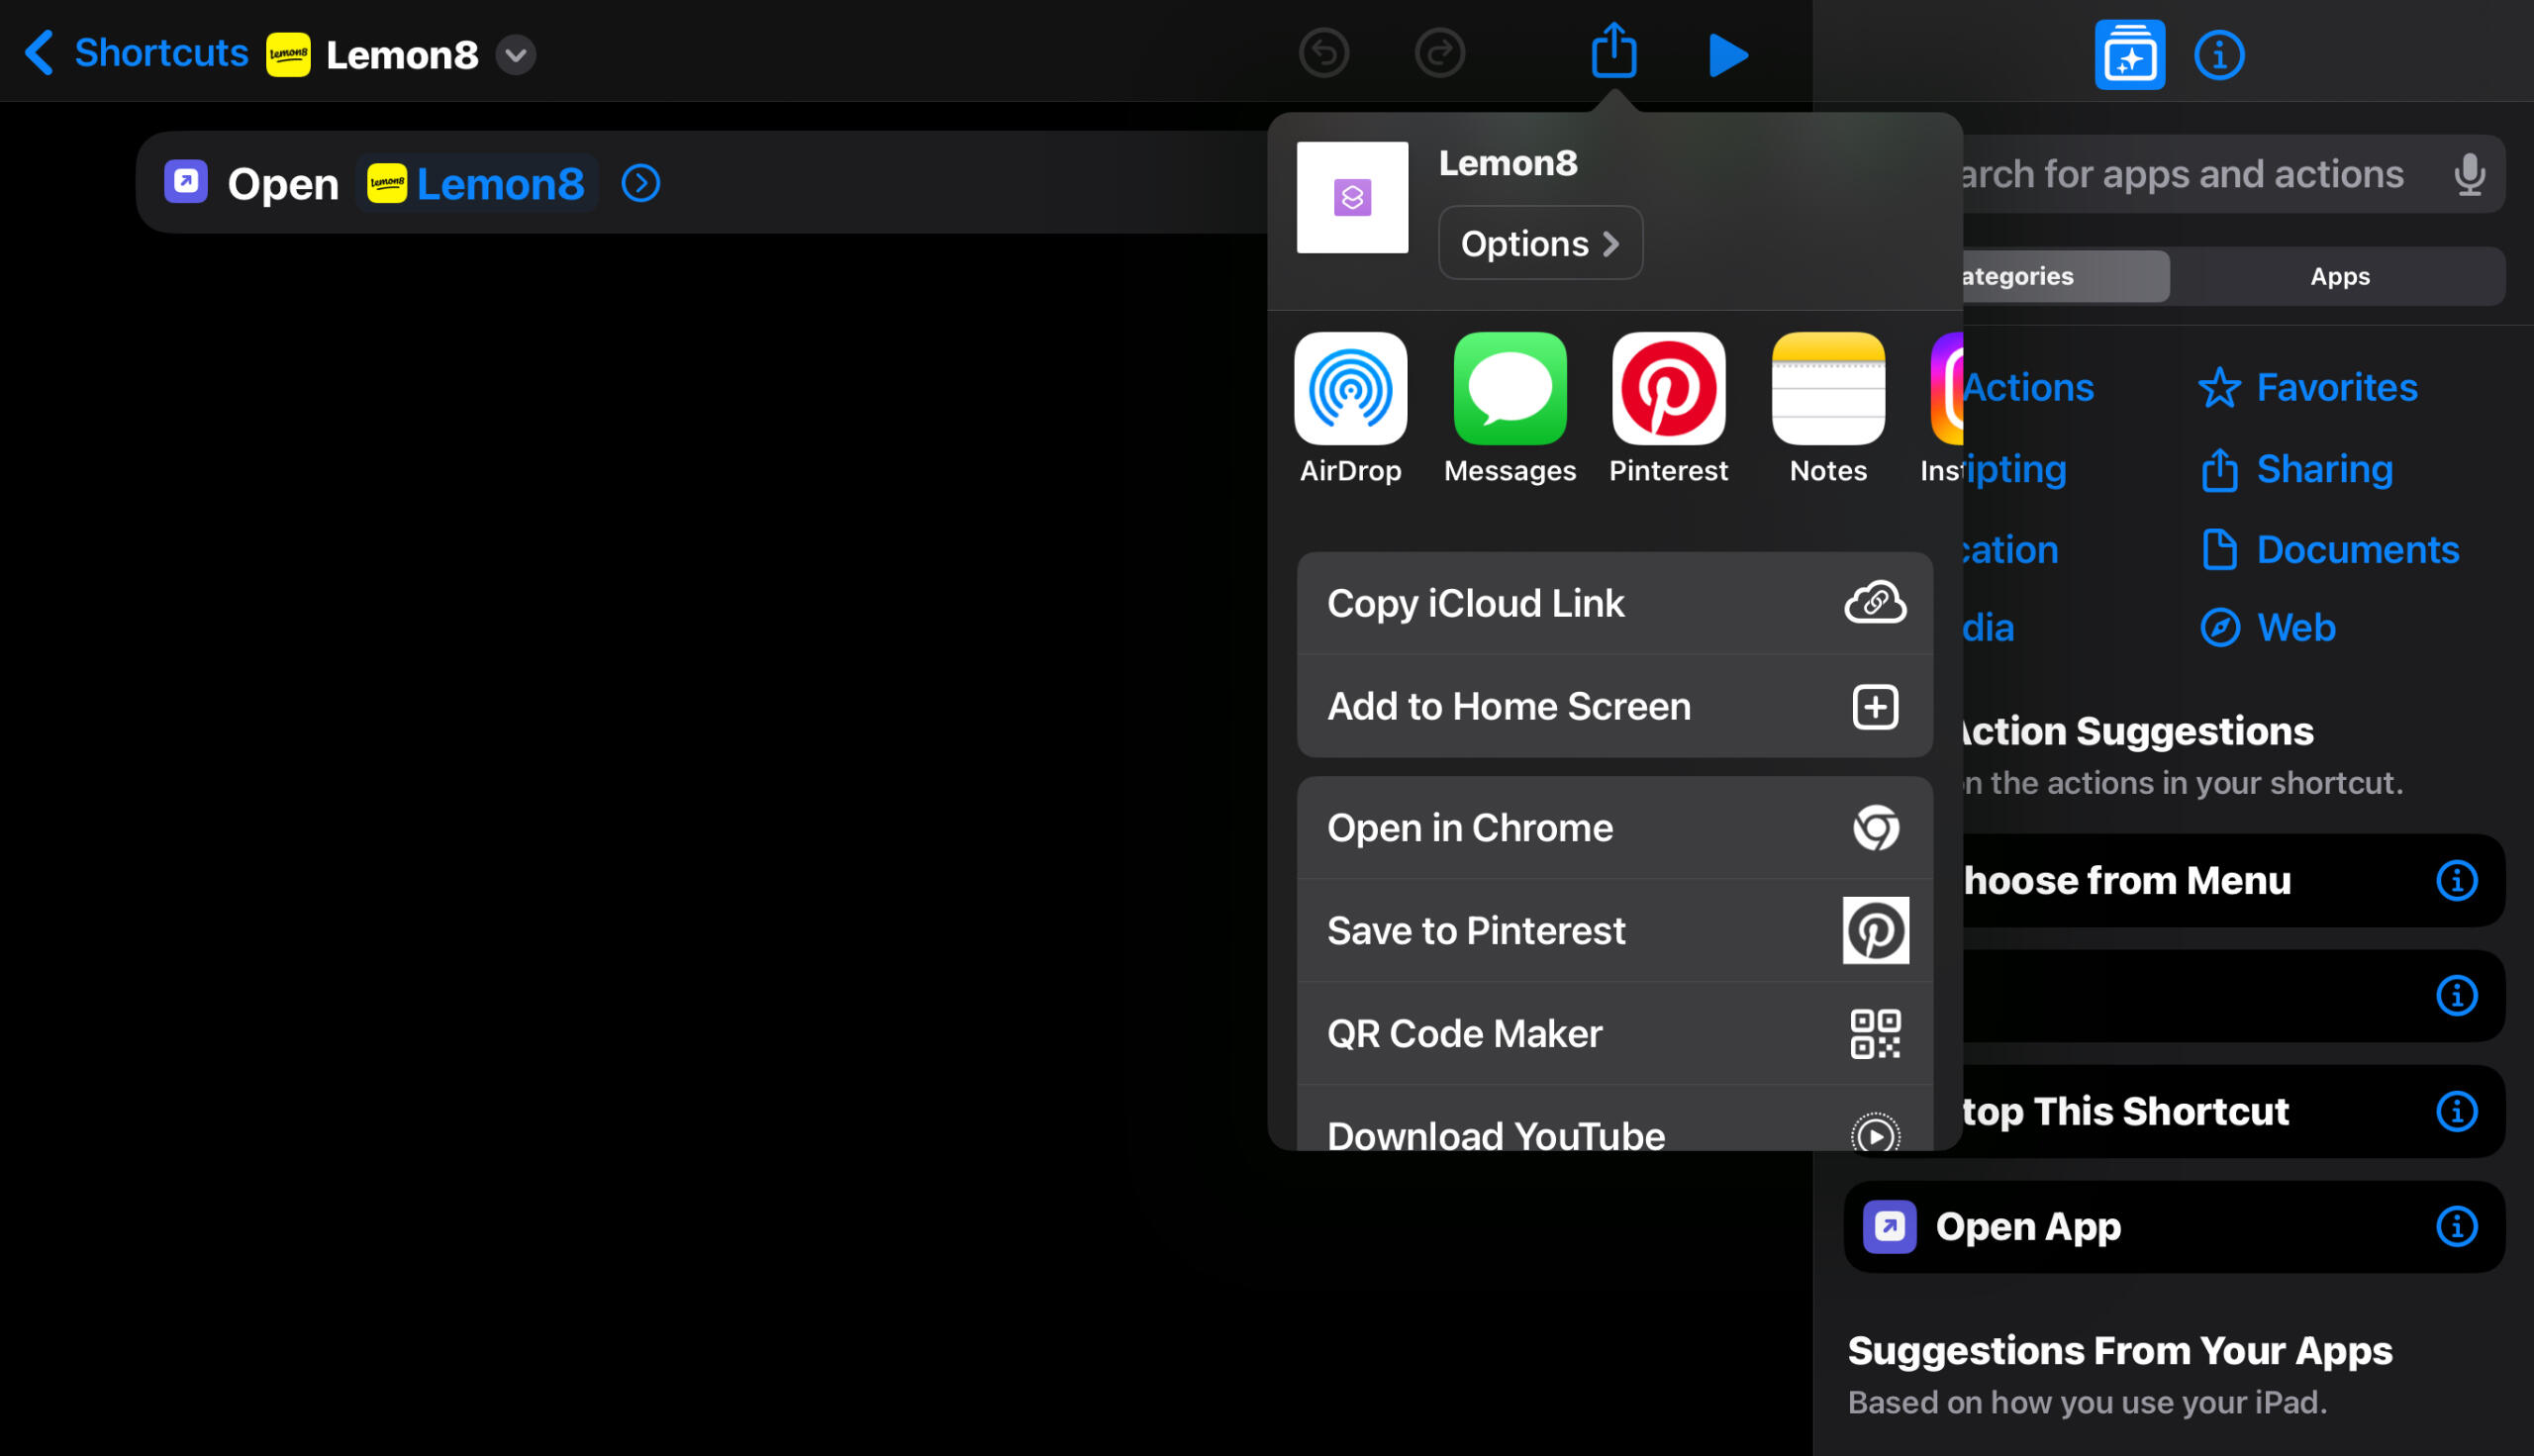
STEP 3: LINK YOUR CUSTOM ICON WITH THE SHORTCUTS APPNow, let’s link your new icon to the app it represents using the Shortcuts app:▫️ Open the Shortcuts app on your iPhone or iPad.
▫️ Tap on the ‘+’ icon at the top right to create a new shortcut.
▫️ Select ‘Add Action,’ then ‘Scripting,’ followed by ‘Open App.’ Choose the app you’re customizing.
▫️ Tap the three dots in the upper right of your Shortcut, then tap 'Add to Home Screen.'
▫️ Tap the placeholder icon next to the shortcut name and select ‘Choose Photo.’ Pick your custom icon from your Photos.
▫️ Rename the shortcut to the app's name and tap ‘Add.’
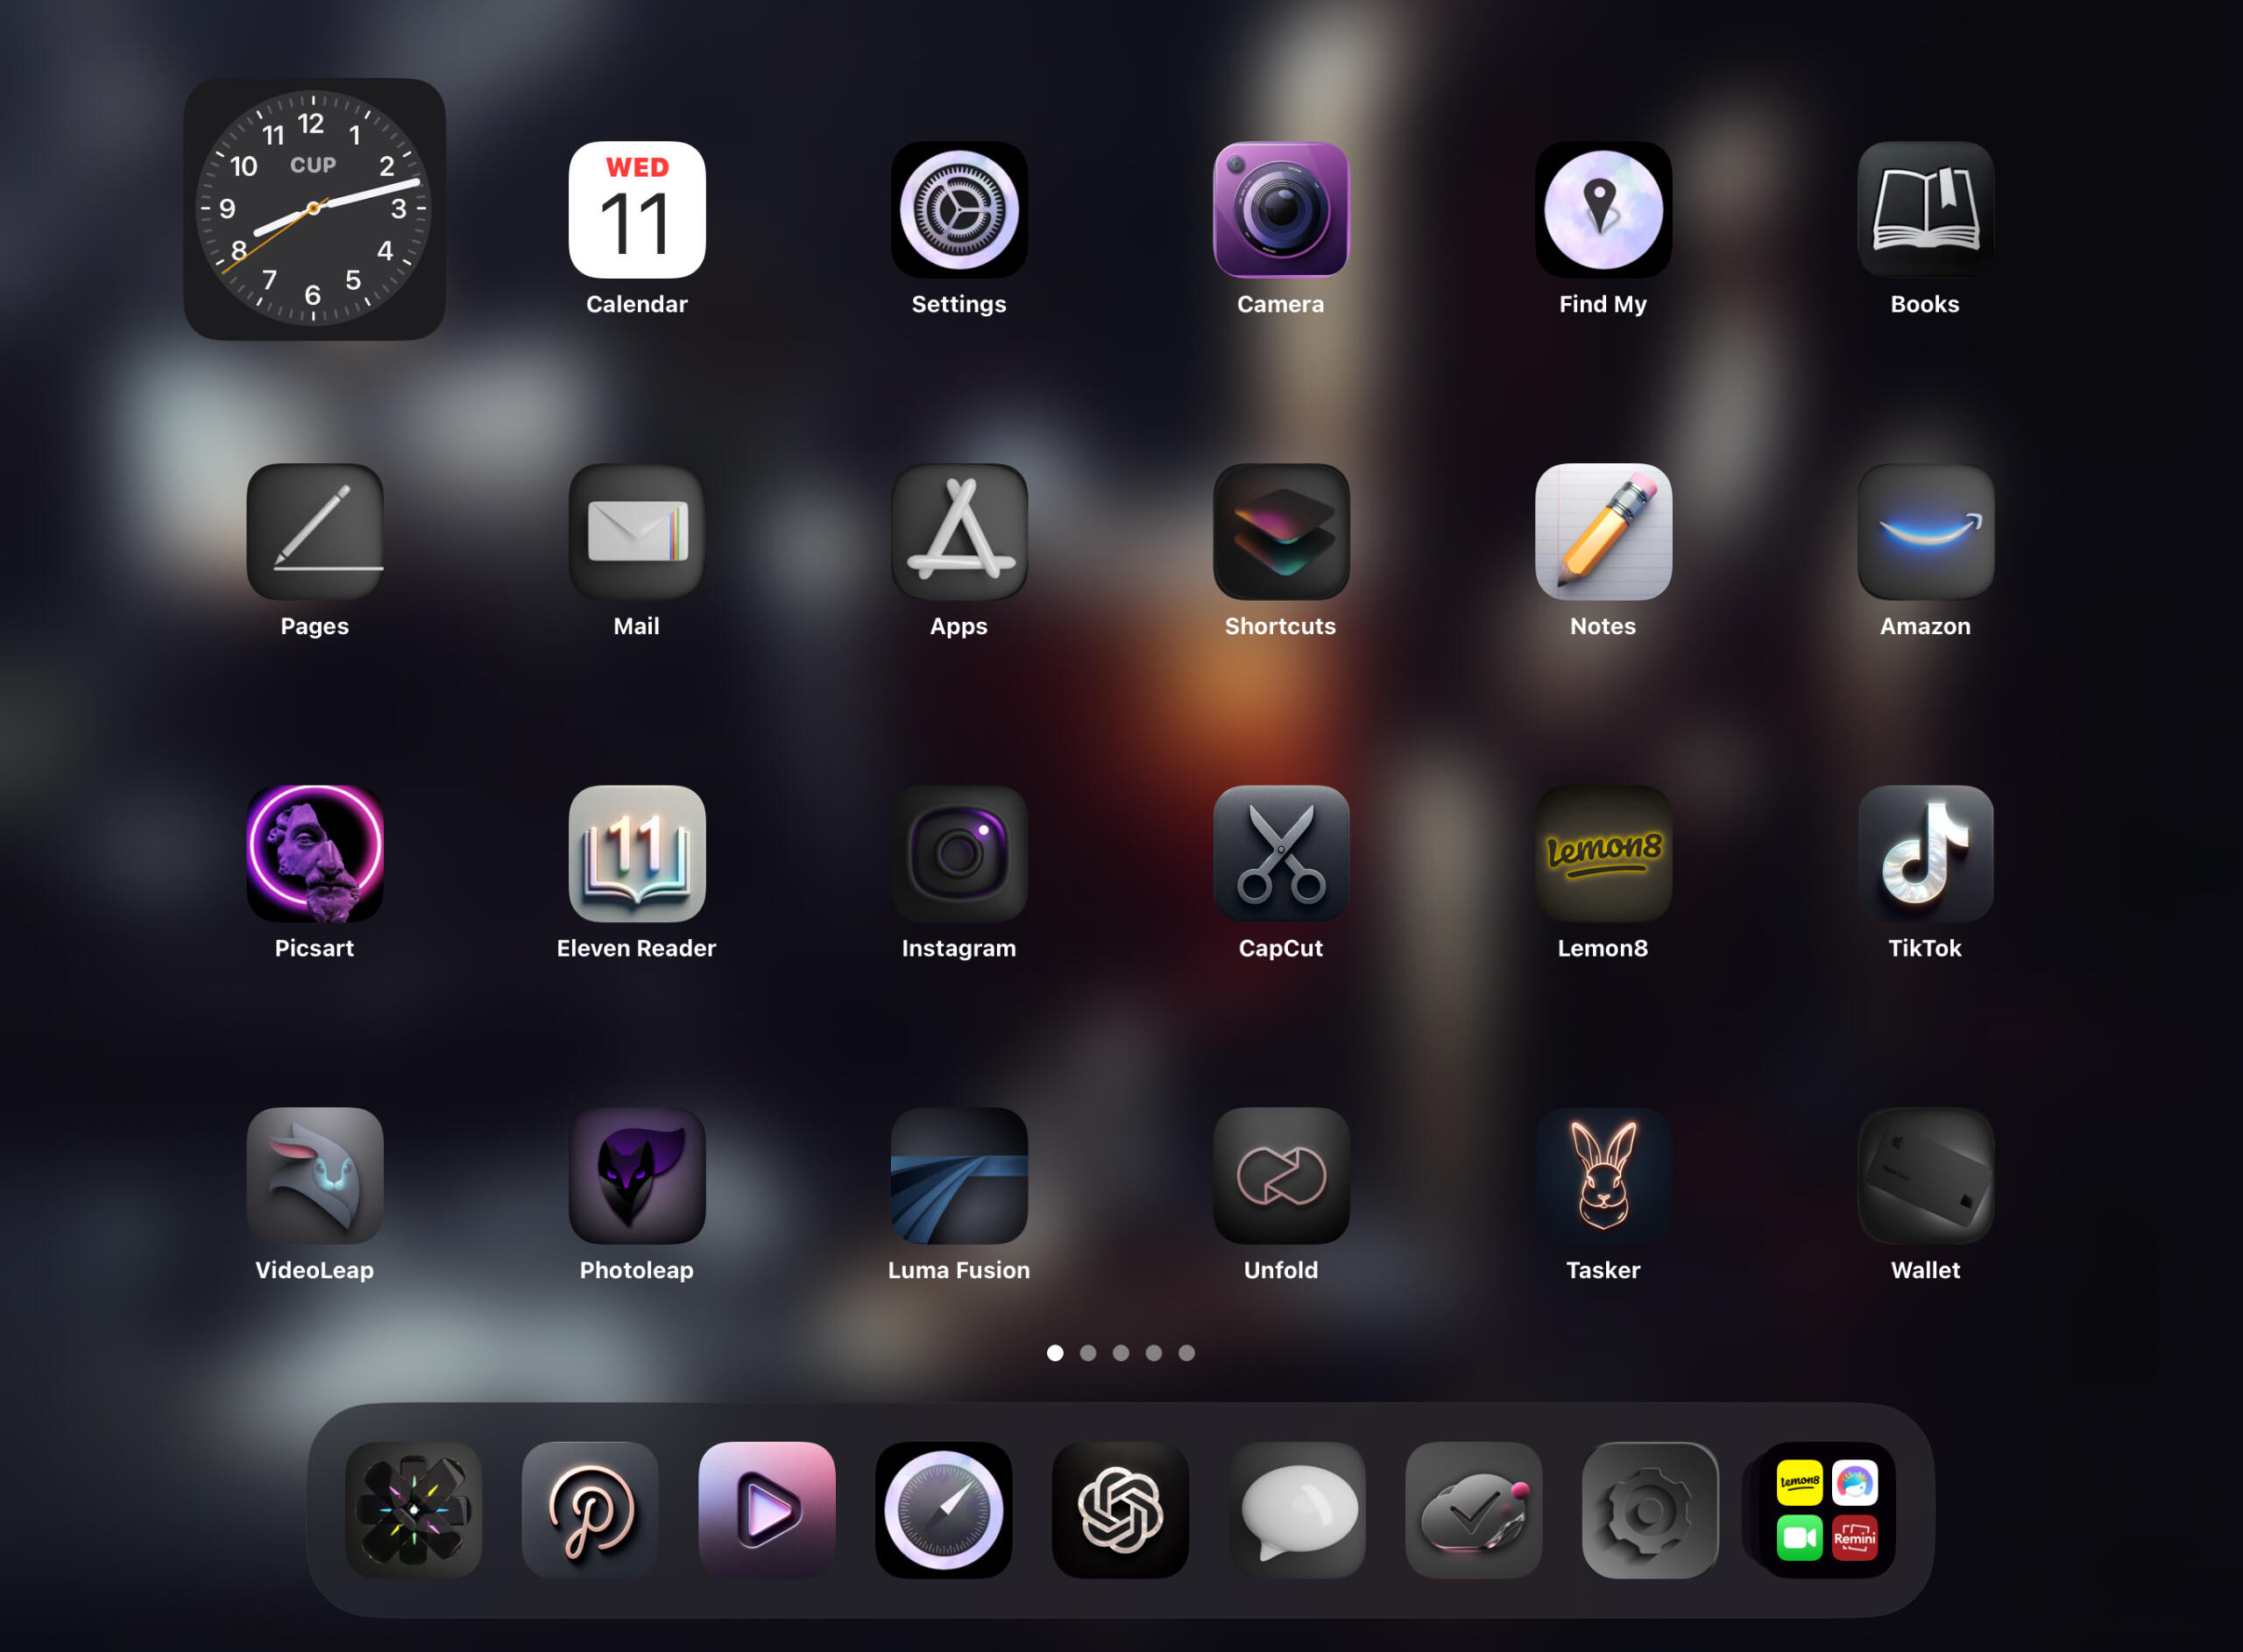
STEP 4: TEST YOUR NEW ICONOnce you've added the shortcut with the custom icon to your home screen, tap it to ensure it opens the app correctly. If everything works, you're all set! You can now replace the original app icon with your new custom one by moving the original off your main home screen or into an app library.
And there you have it—a fresh, personalized look for your iOS device.

Next Post
How to
Enhance and Upscale Your
Images Using Leonardo.ai
Upscaling images to improve their quality and resolution is a crucial step in ensuring your digital art, photography, or AI-generated images look professional and polished. Leonardo.ai offers a powerful tool known as the Universal Upscaler, which allows you to enhance your images with just a few simple steps. Whether you’re a designer, photographer, or simply looking to improve your personal images, this tool can help you achieve higher quality visuals with ease.
Steps to Upscale Your Images with Leonardo.ai
1. Access Leonardo.ai and Select Universal Upscaler:
Begin by logging into your Leonardo.ai account. On the main page, navigate to the left sidebar and click on the “Universal Upscaler” option. This will take you to the workspace where you can start enhancing your images.2. Upload or Select an Image:
You can either choose an AI-generated image from your Leonardo.ai gallery or upload a new image from your device. Simply click on the “Add Image” button to select your file.3. Adjust the Upscaler Settings:
Leonardo.ai offers several customization options to control how your image is upscaled:
• Creativity Strength: Adjust this to control how much detail the AI adds during upscaling. A higher setting will introduce more creative details, while a lower setting will focus on improving resolution without altering the image’s original features.
• Upscaler Style: Choose from various style presets that influence the aesthetic outcome, such as “Cinematic” or “2D Art & Illustration.”
• Upscale Multiplier: This allows you to scale your image up to 2x its original size, depending on your needs.4. Initiate the Upscaling Process:
Once you’ve set your preferences, click on the “Upscale Image” button. The upscaling process will begin, and within a few moments, your enhanced image will be ready.5. Save and Download Your Image:
After the upscaling is complete, the enhanced image will be saved to your personal feed within Leonardo.ai. You can easily download the image by clicking the download button in the upper right corner of the interface.
Who Can Benefit from
Using Leonardo.ai’s Upscaler?
• Photographers looking to improve the resolution of their photos for printing or display.
• Digital artists who want to refine the details of their AI-generated artwork.
• Graphic designers in need of high-quality images for branding, presentations, or other design projects.By following these steps, you can transform your images into high-quality, professional-grade visuals, ensuring that they meet the standards required for any project.For more detailed guidance and additional tips on using the Universal Upscaler, you can visit Leonardo.ai’s help center and tutorials .

Next Post
How to
Create Beautiful QR Codes

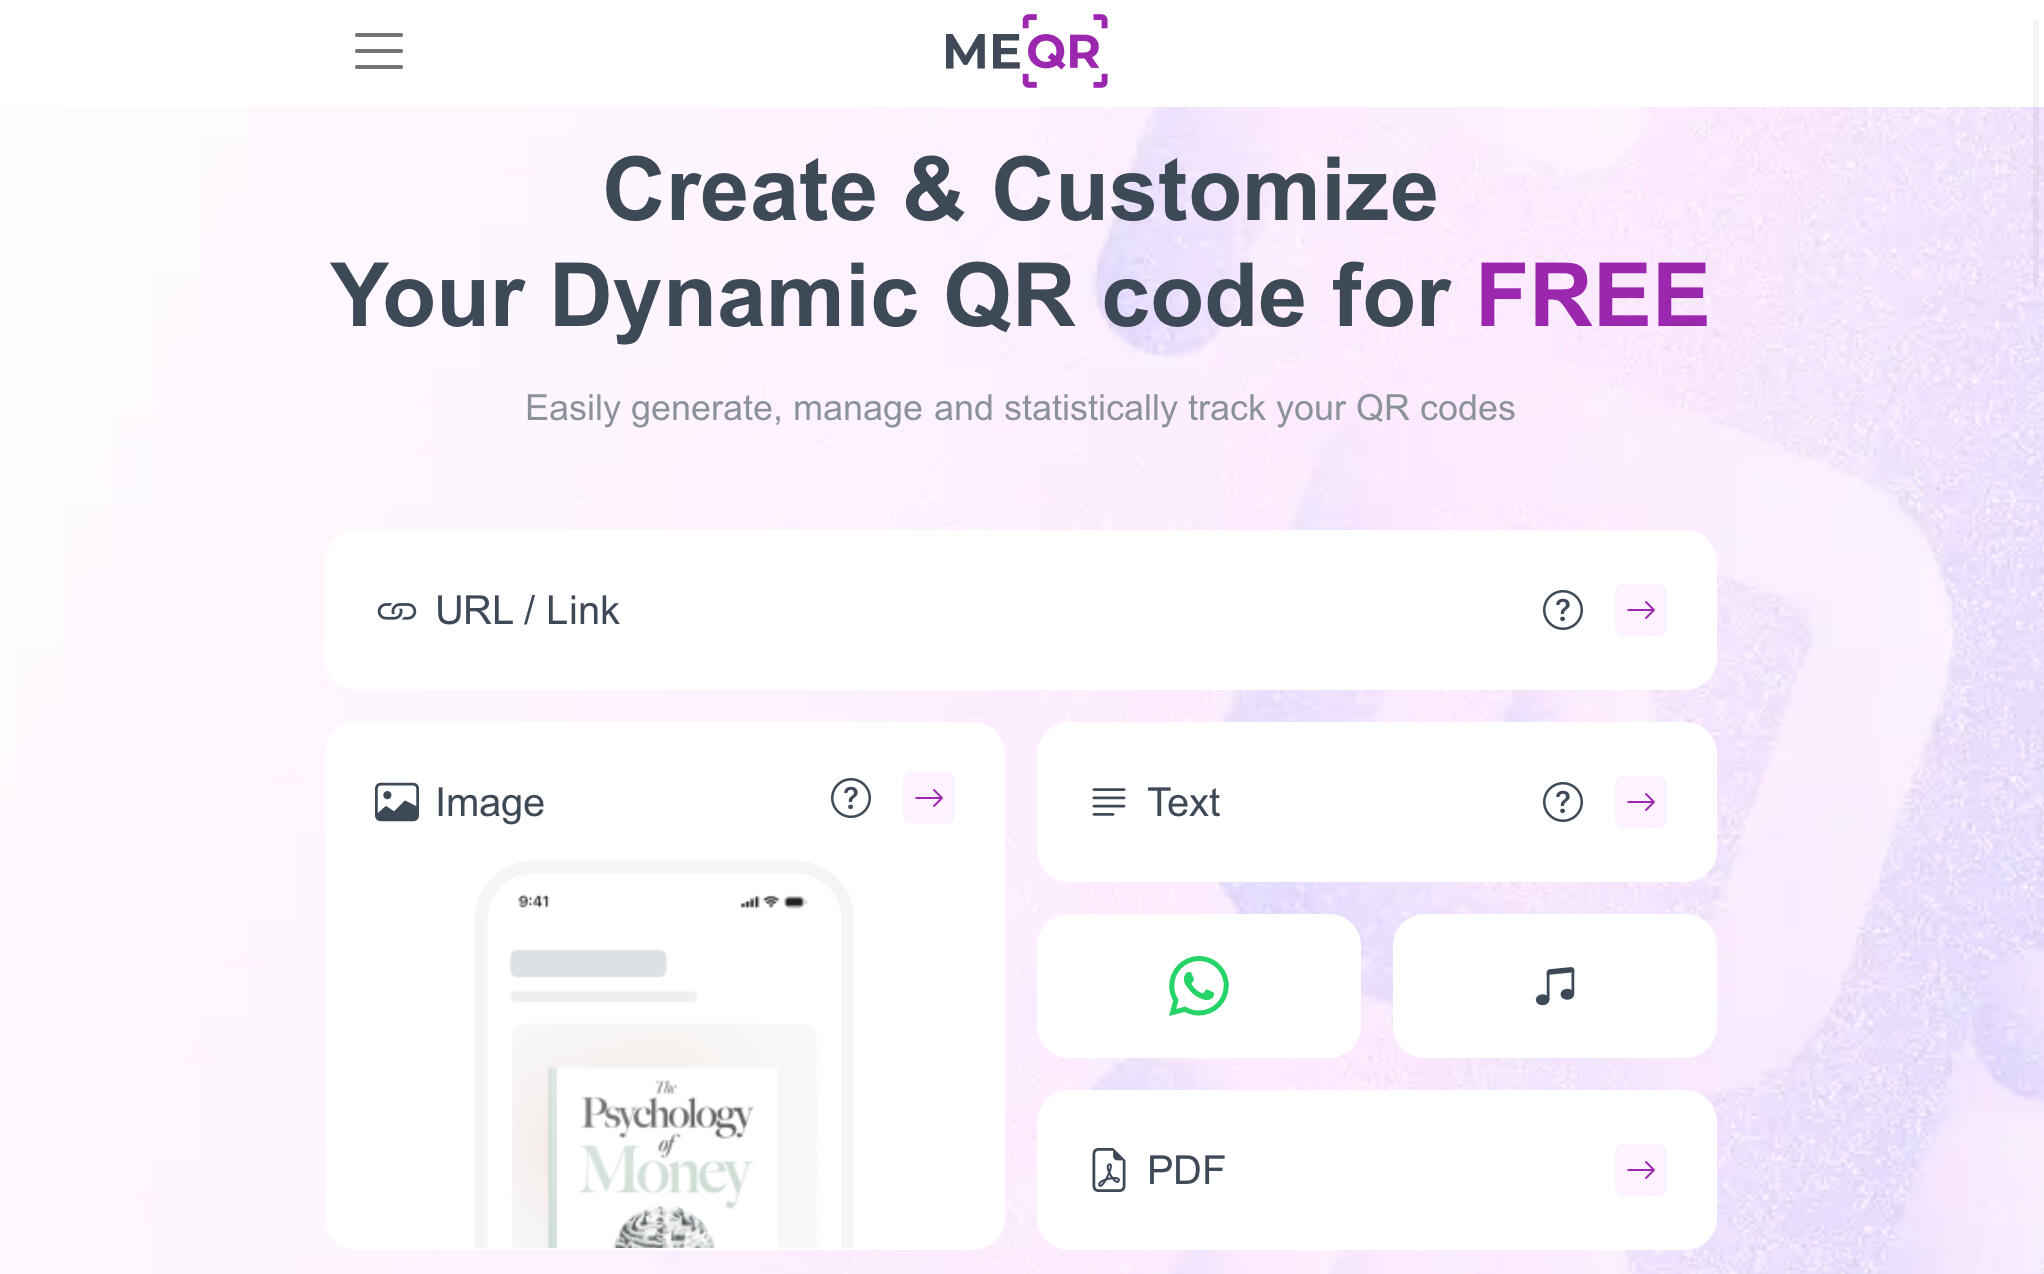
QR codes are becoming increasingly popular for their ability to seamlessly connect the physical and digital worlds. Whether you’re looking to share a website, send a text message, or even provide a digital business card, a well-designed QR code can make a lasting impression. But not all QR code generators are created equal. If you want a tool that offers a blend of customization, simplicity, and aesthetics, ME-QR.com stands out as a top choice.
Why ME-QR.com?
1. Extensive Customization Options
What sets ME-QR.com apart is its ability to create highly customizable QR codes without the intrusion of ads. Many free QR code generators limit the design options unless you pay for a premium version, but ME-QR.com allows you to tailor your codes extensively at no cost. You can tweak colors, patterns, and even incorporate logos to ensure your QR code aligns with your brand’s identity.2. Neat and Attractive Designs
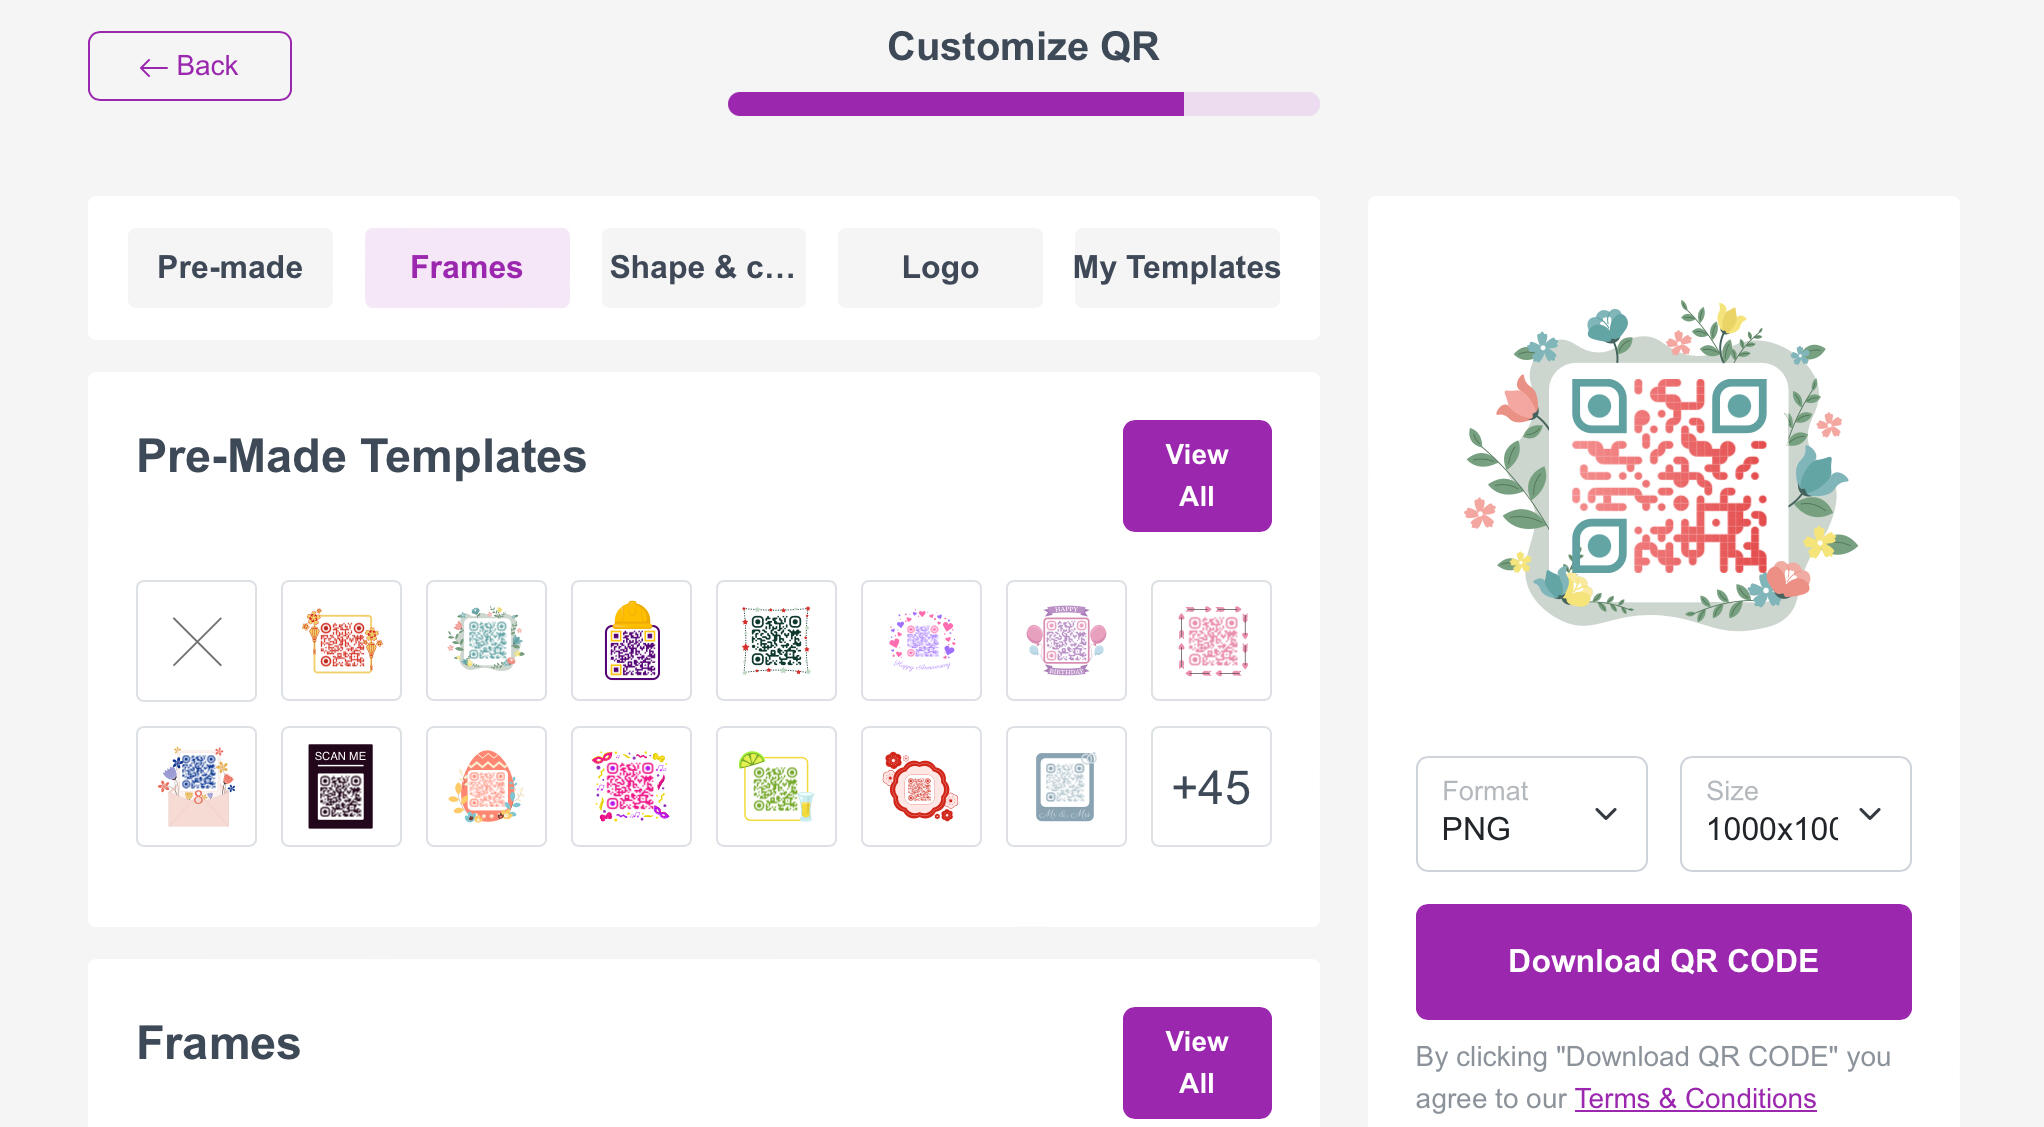
For tasks as varied as sending a text message or linking to complex web content, ME-QR.com provides QR codes that remain clean and aesthetically pleasing, even when the code’s complexity increases. The larger patterns available through the platform ensure that even detailed codes look neat, which is often a challenge with other generators.3. Save and Reuse Templates
Another standout feature is the ability to save your designs as templates for future use. This is especially useful for businesses or individuals who need to generate multiple QR codes that maintain a consistent style or branding. Instead of starting from scratch each time, you can quickly apply your saved template, ensuring visual consistency across all your QR codes.
How to Get Started
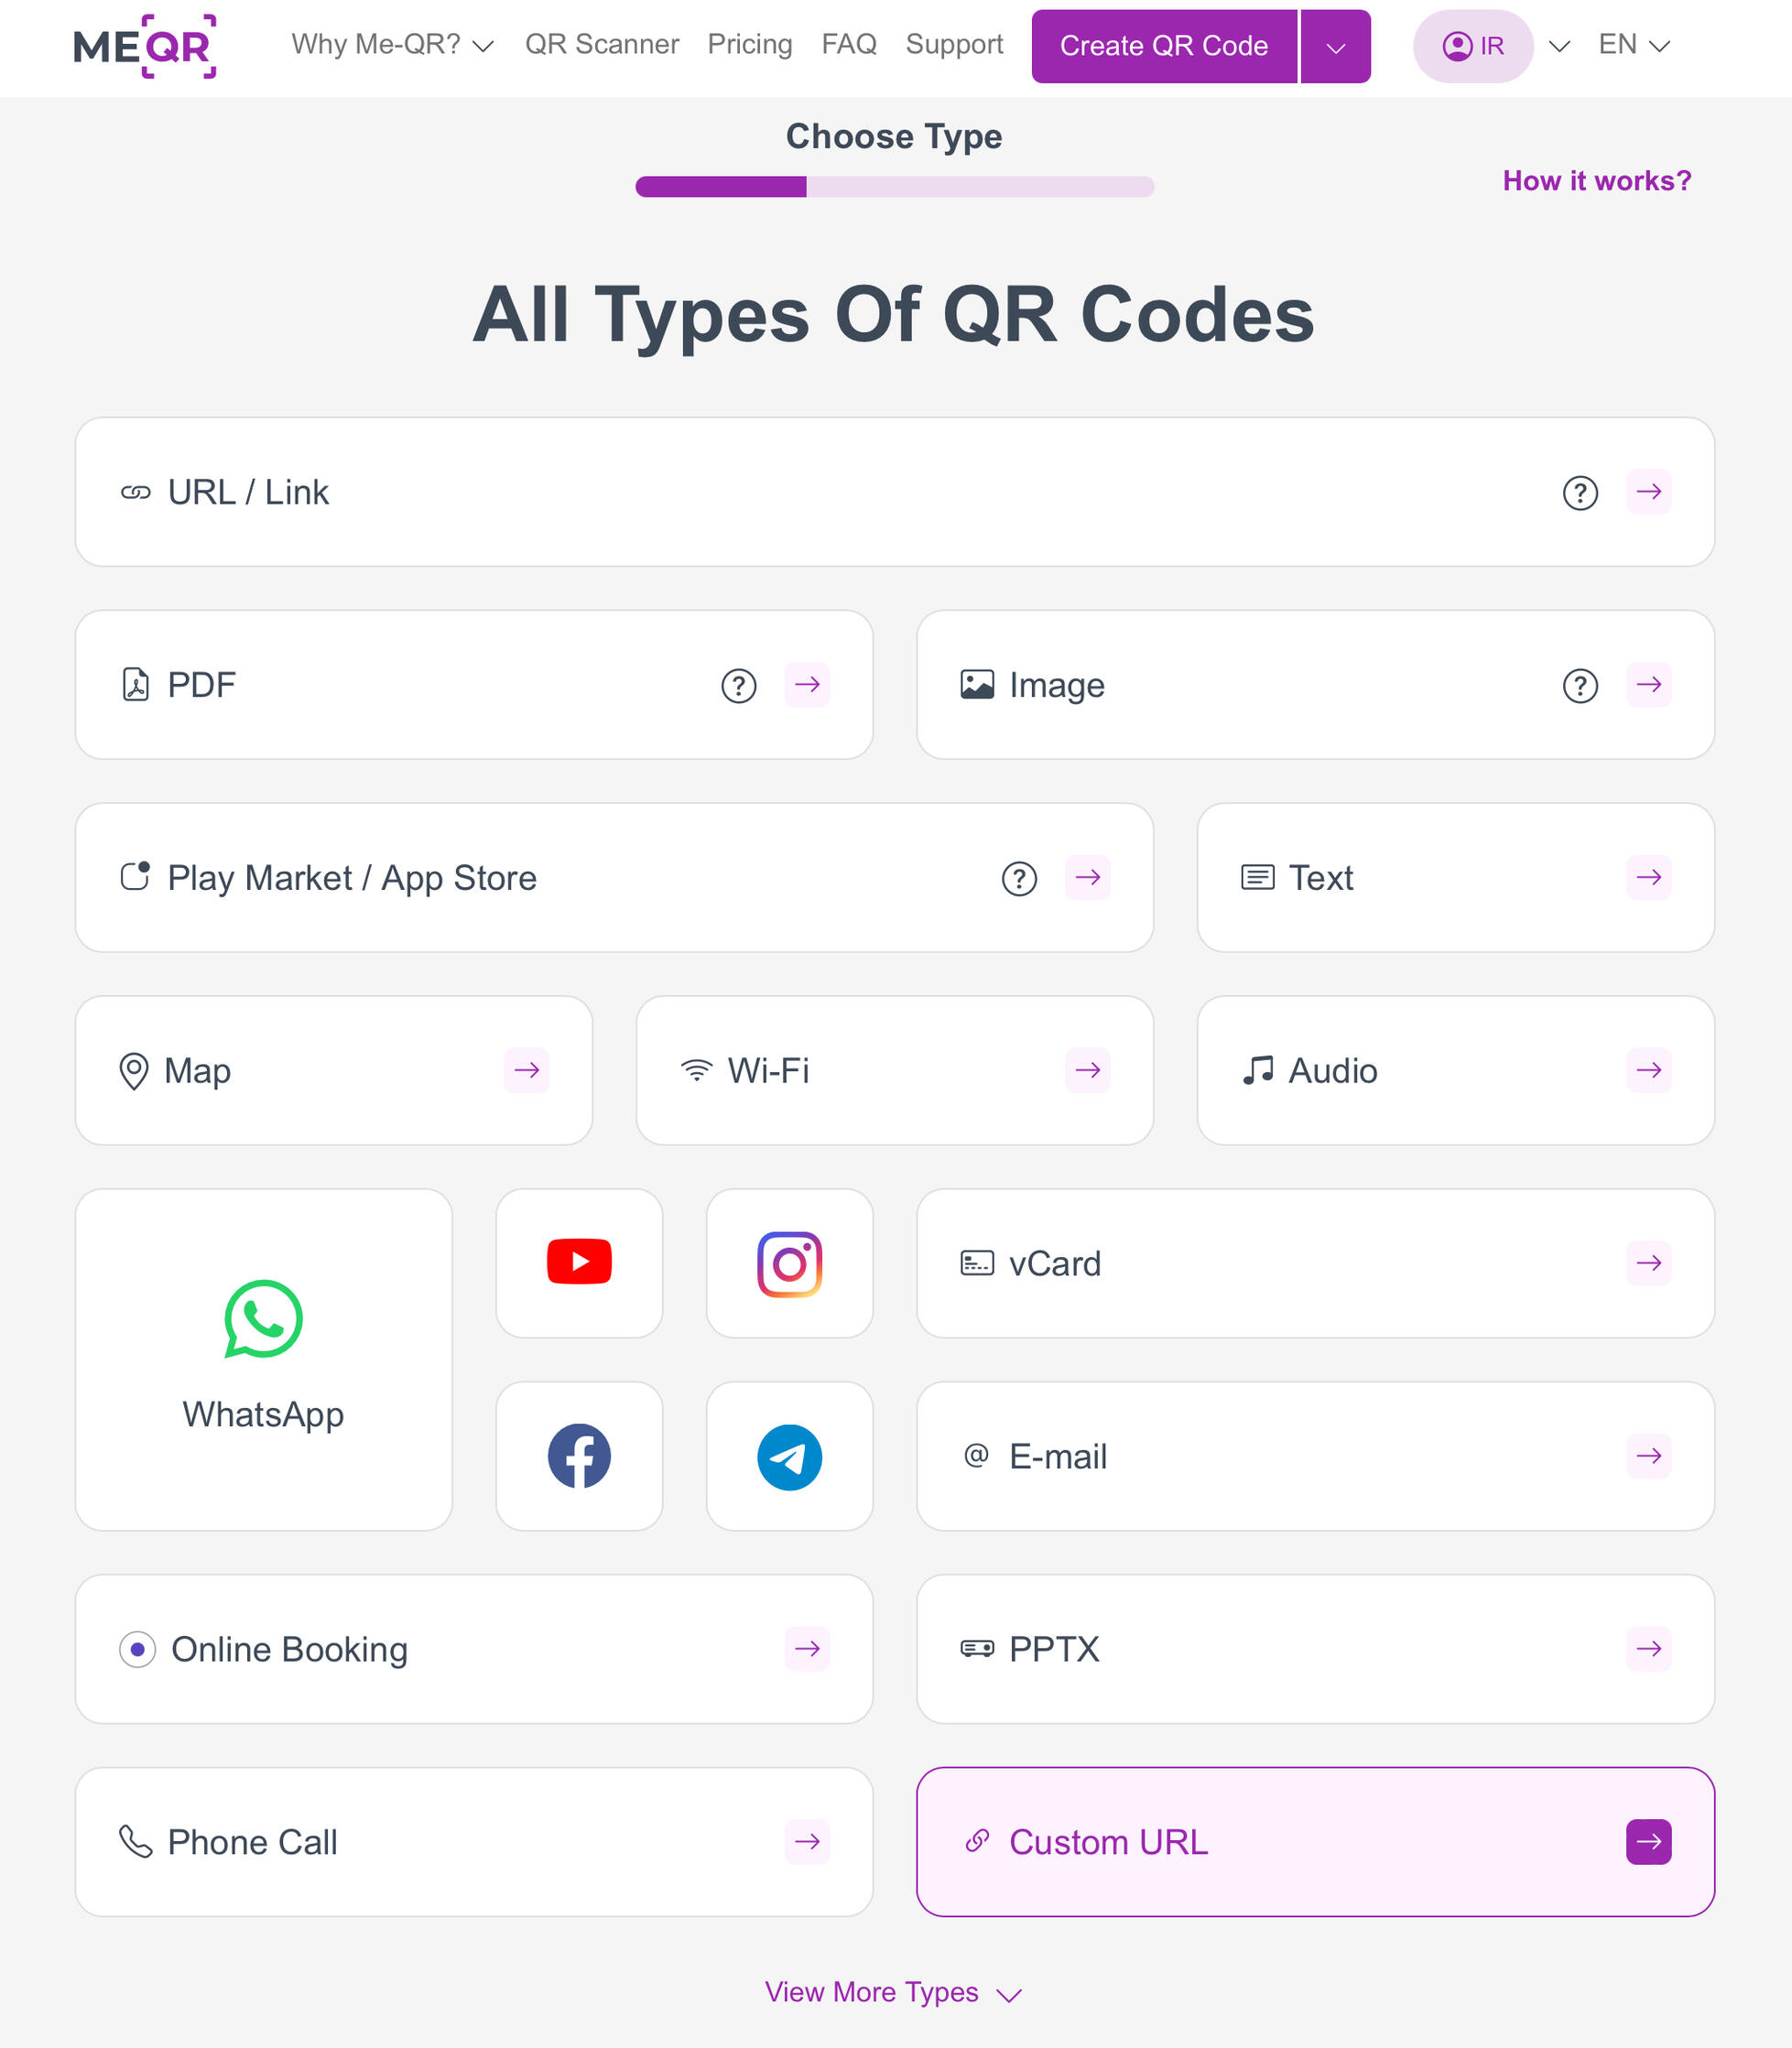
1. Choose Your Content:
Decide what you want your QR code to do—whether it’s sending a message, linking to a website, or sharing contact information.2. Customize Your Design:
Use ME-QR.com’s customization tools to adjust the color scheme, add a logo, and choose a pattern that reflects your brand’s identity. The platform’s intuitive interface makes it easy to see your changes in real-time.3. Save Your Template:
Once you’ve created a design you’re happy with, save it as a template.4. Download and Share:
After finalizing your design, download the QR code in your preferred format and start using it in your marketing materials, product packaging, or wherever you need it.
Final Thoughts
Creating beautiful and functional QR codes doesn’t have to be a complicated or expensive process. With tools like ME-QR.com, you can easily customize your QR codes to match your brand’s identity or personal style without dealing with the hassle of ads or hidden fees. The platform offers a range of design options that allow you to create clean, visually appealing codes, even for more complex tasks.By taking advantage of features like template saving and advanced customization, you can streamline your QR code creation process, ensuring consistency and ease of use. Whether you’re designing a single QR code or multiple codes for different purposes, focusing on simplicity and aesthetics will help you create codes that not only work well but also look great.By taking advantage of features like template saving and advanced customization, you can streamline your QR code creation process, ensuring consistency and ease of use. Whether you’re designing a single QR code or multiple codes for different purposes, focusing on simplicity and aesthetics will help you create codes that not only work well but also look great.

Next Post
How to

Create a bio site without
Linktree
When the platform I used for my link-in-bio, Koji, unexpectedly shut down, I realized that I’ve had enough of the third-party bio sites and decided for build my own bio site using Carrd. This guide will walk you through the process of creating a personalized and professional-looking bio site without relying on platforms like Linktree.

Why Carrd
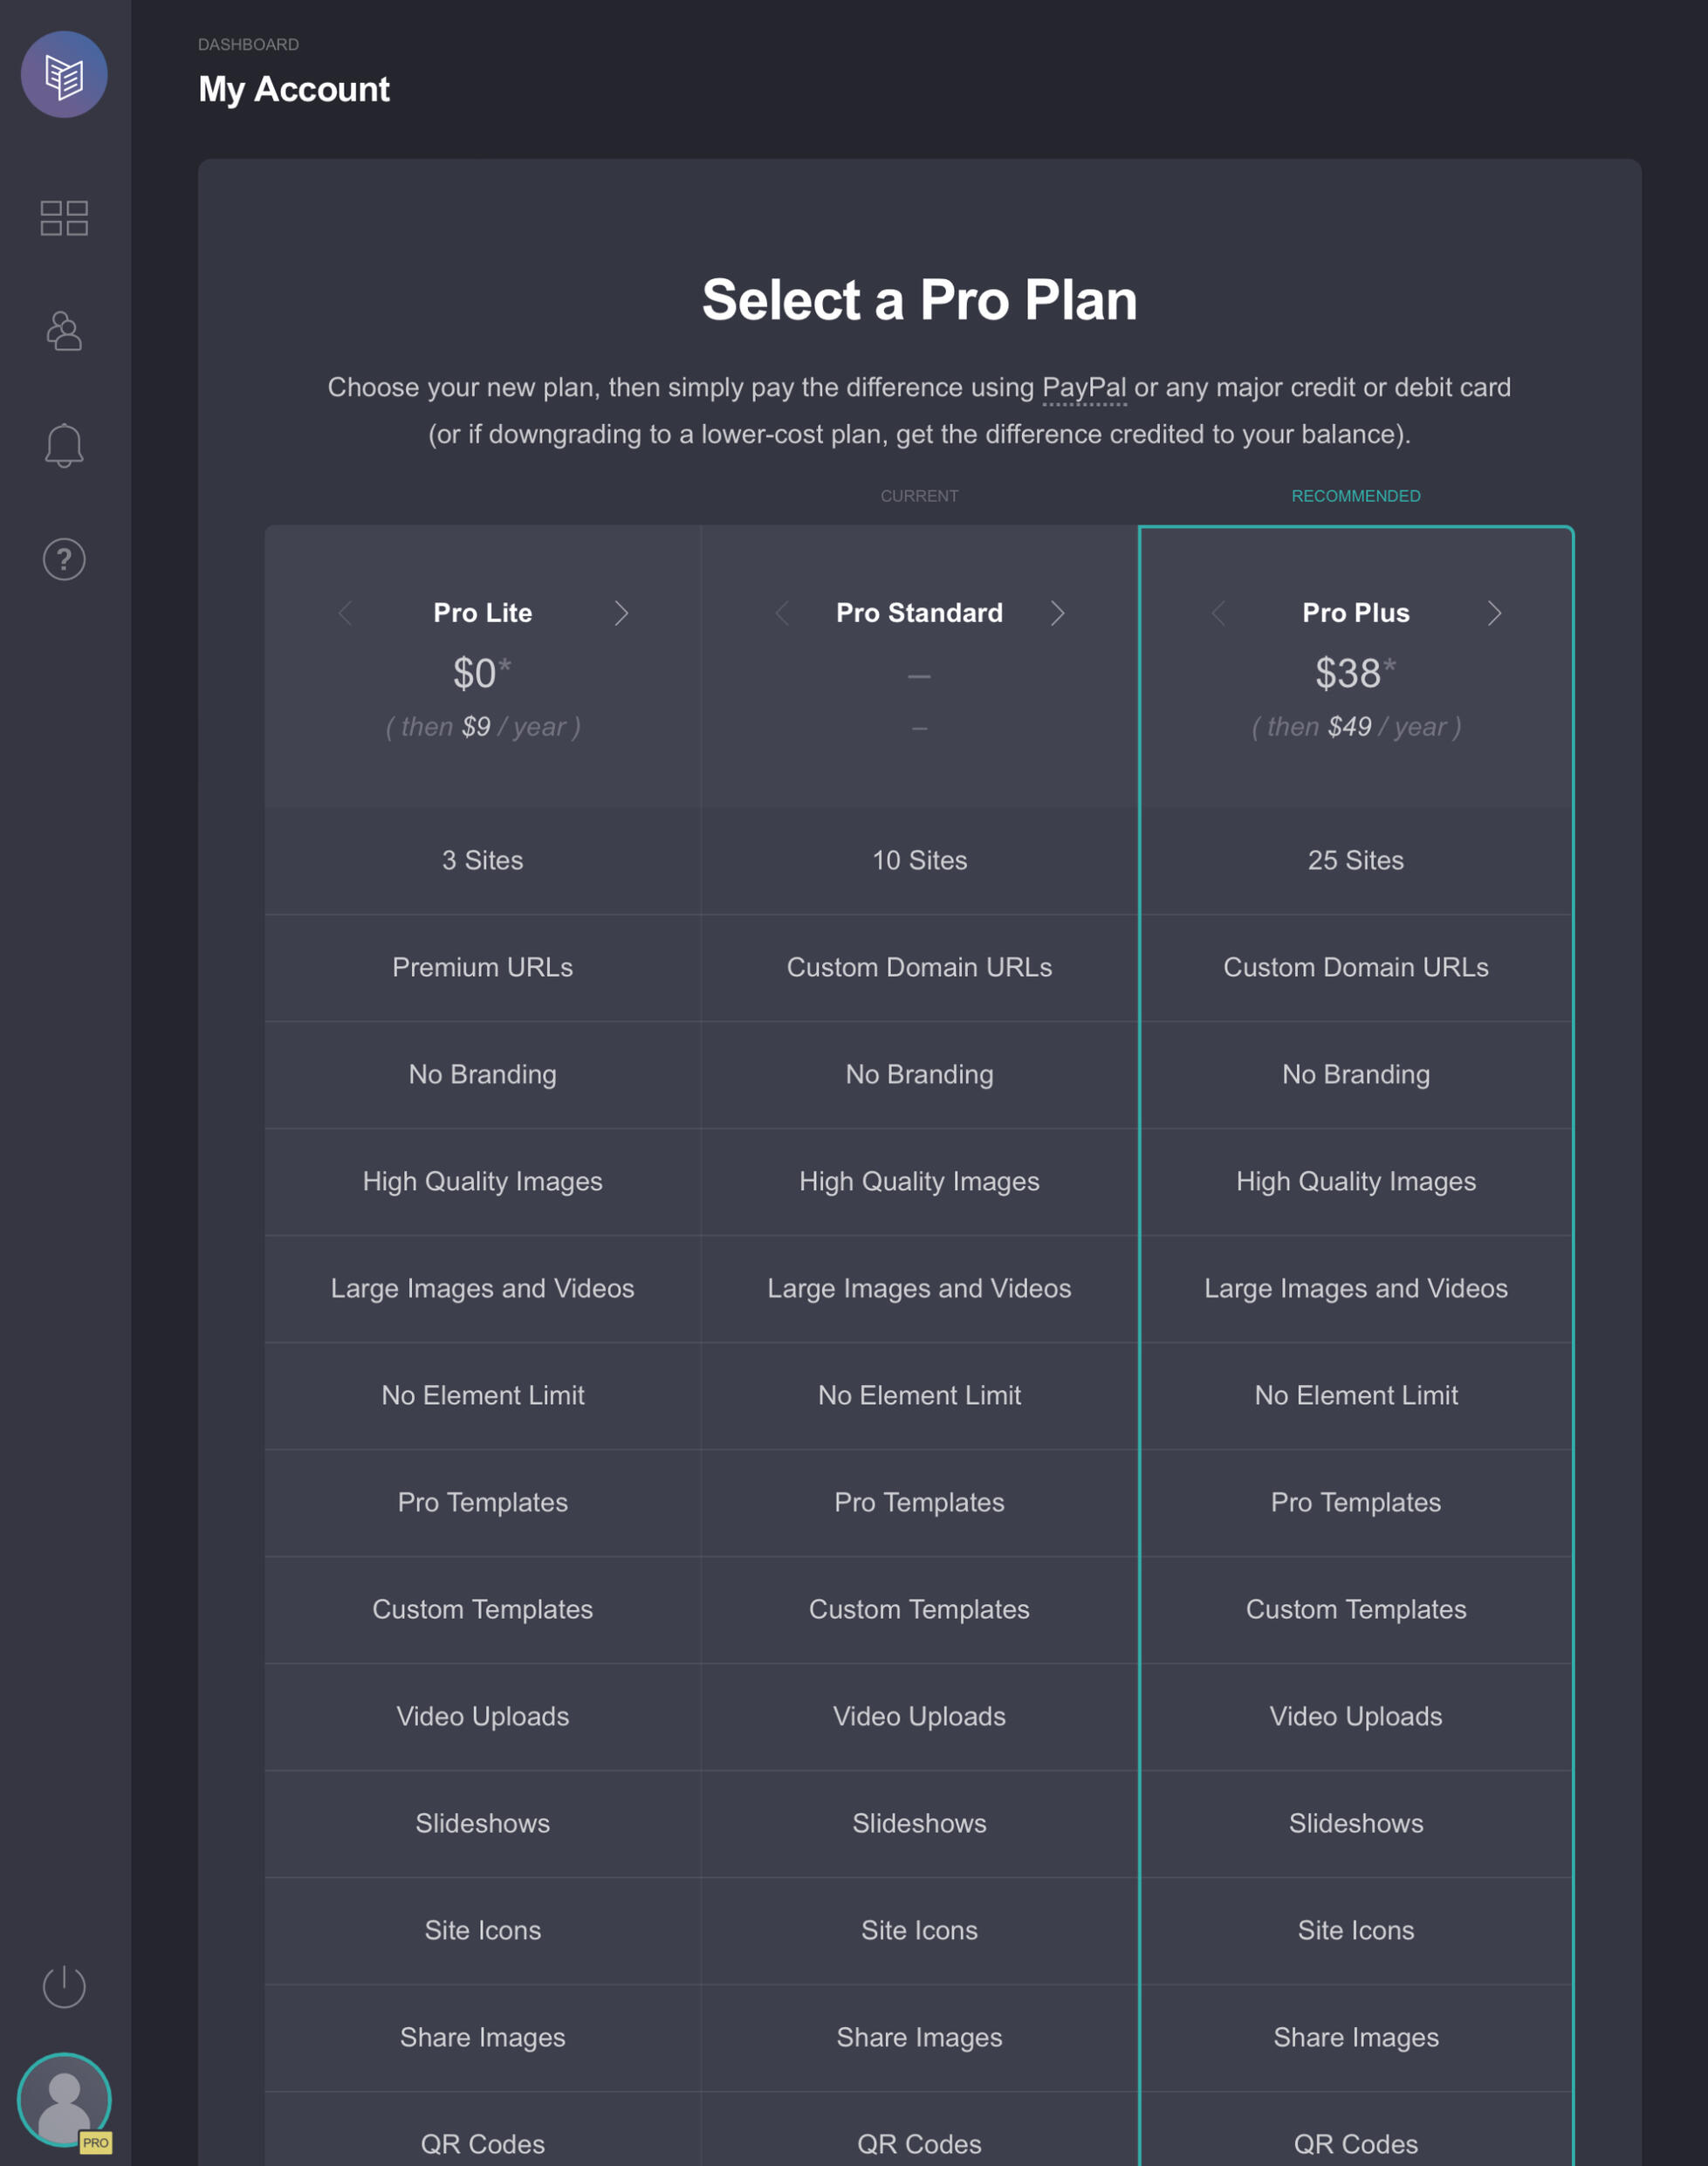
1. Customization: Carrd offers extensive customization options, allowing you to control every aspect of your bio site—fonts, colors, layouts, and more—so you can create a page that truly reflects your brand.2. Affordability: Carrd is one of the most cost-effective options available, with plans starting at just $9 per year for the Pro Lite plan. The Pro Standard plan, which offers additional features, costs $19 per year, and the Pro Plus plan is $49 per year.3. Flexibility: Unlike traditional link-in-bio platforms, Carrd lets you create standalone websites that can serve multiple purposes, from portfolios to landing pages.
Step-by-Step Guide to Building Your Bio Site with Carrd
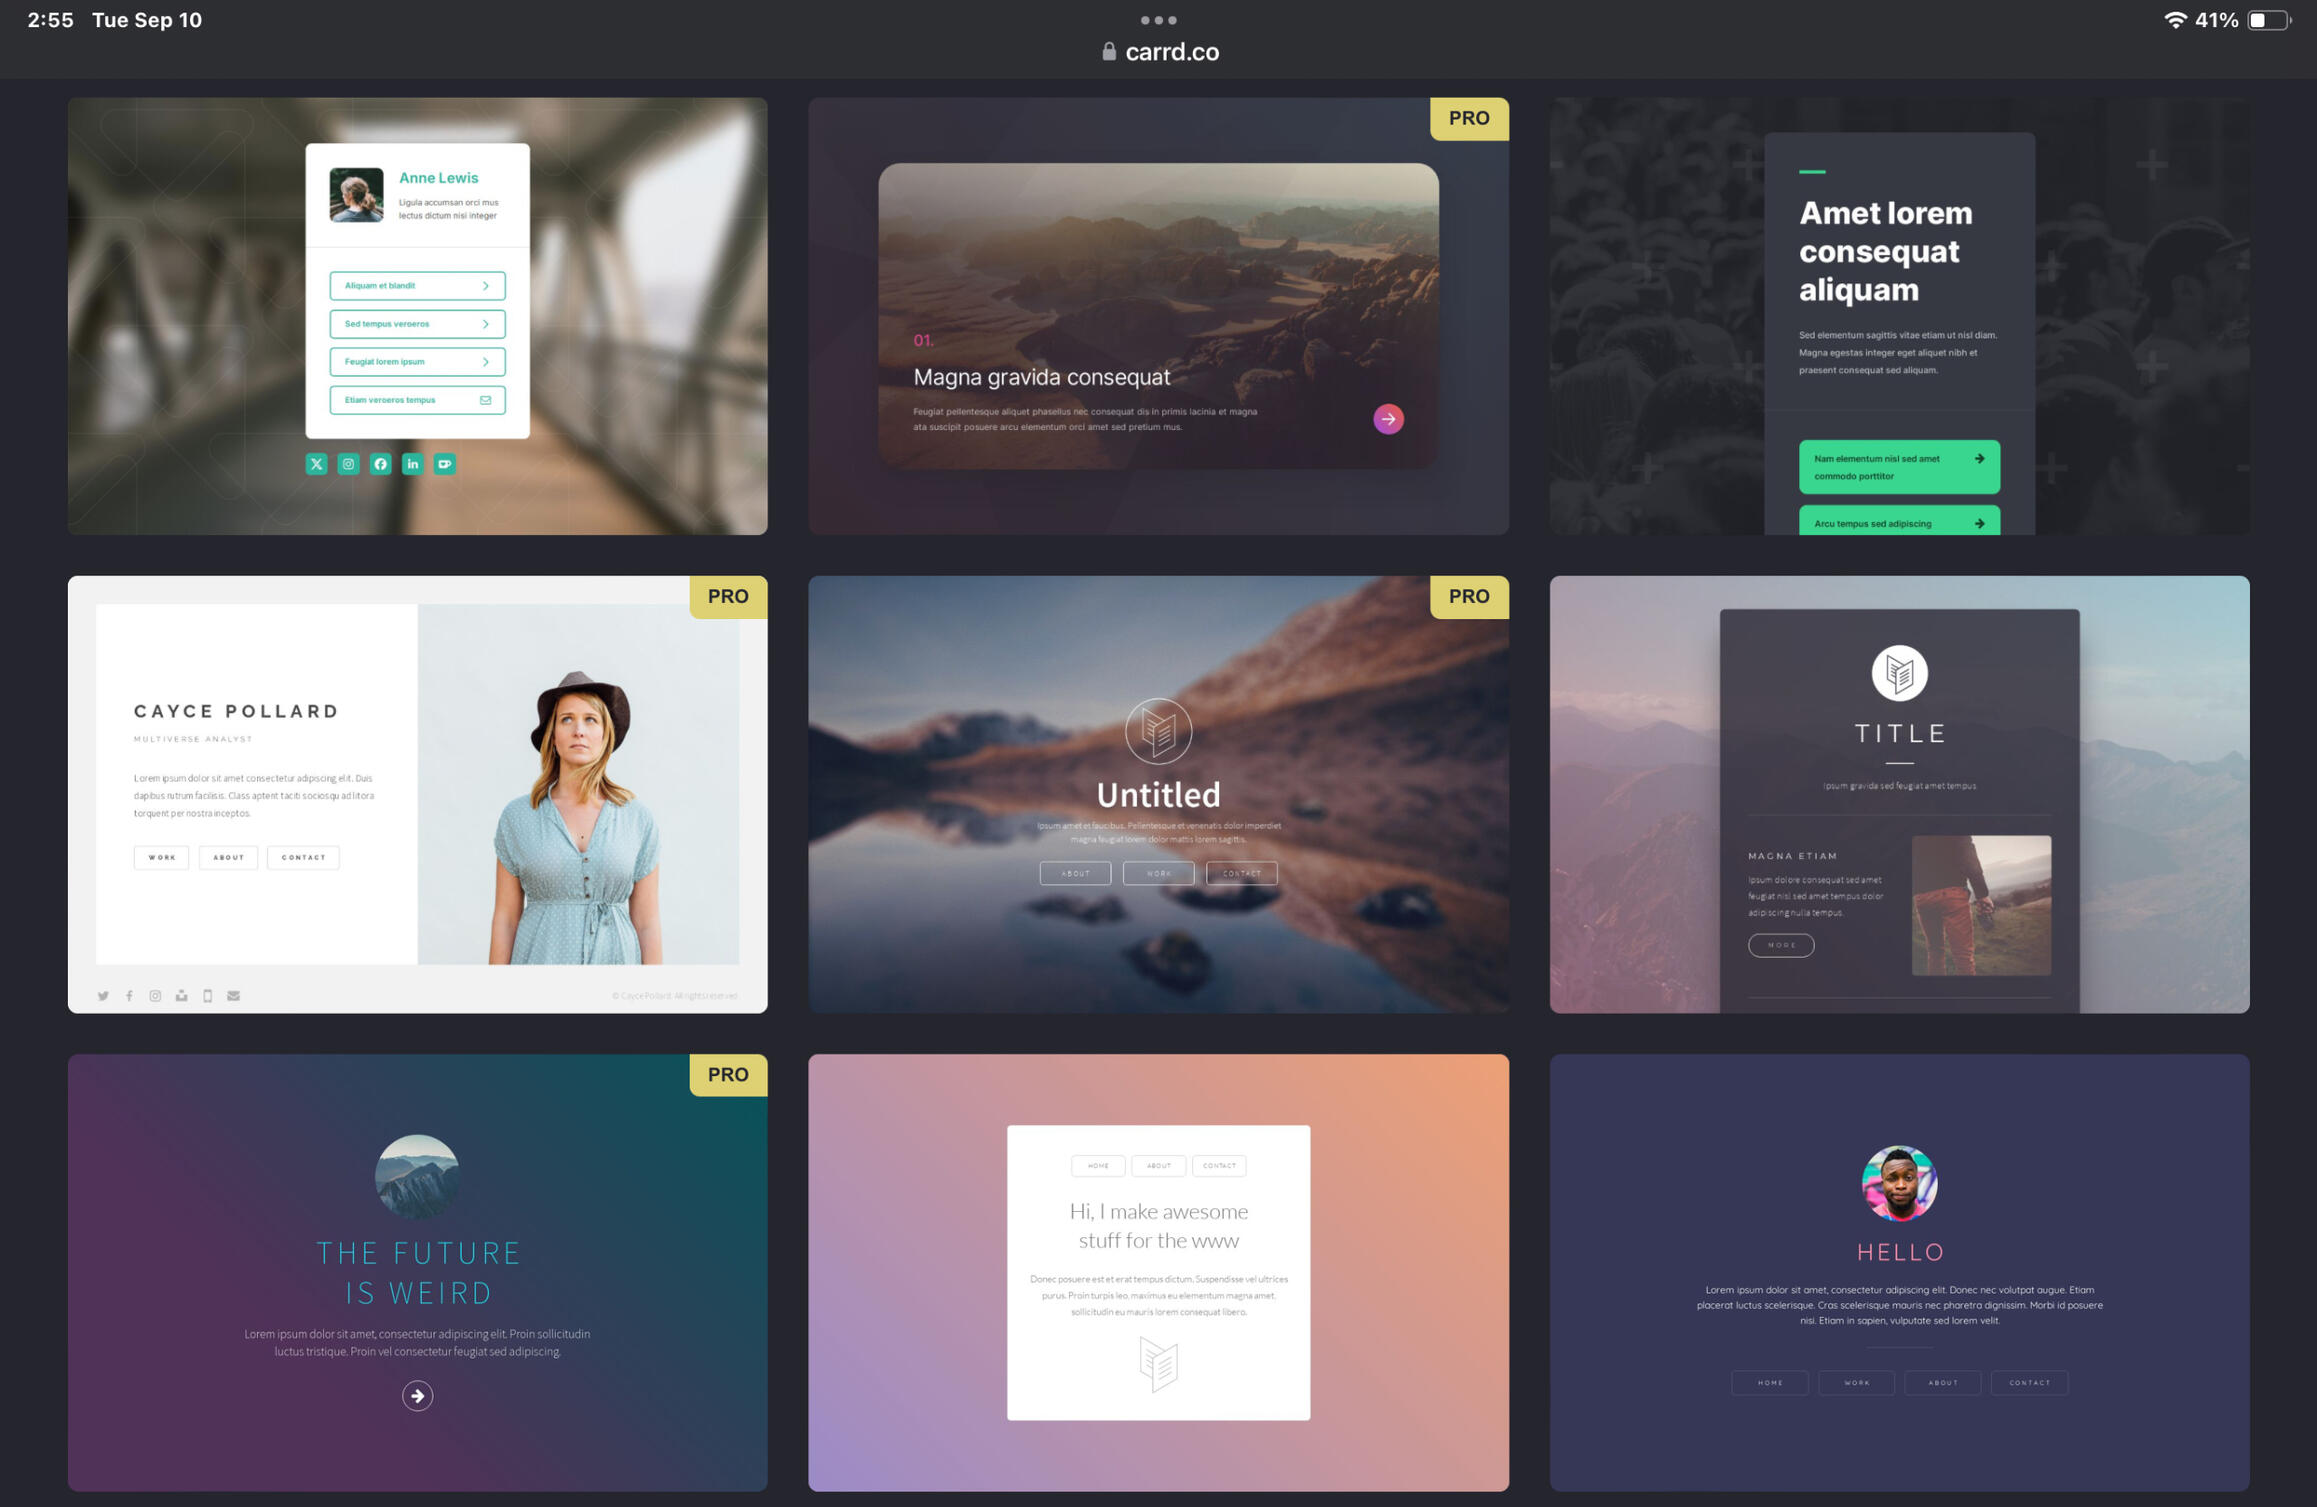
STEP 1: SIGN UP AND CHOOSE A TEMPLATE- Start by signing up at Carrd. Once you're registered, browse through their selection of templates.
- Carrd offers templates specifically designed for bio sites, which are fully customizable and mobile-friendly. Select one that suits your style.STEP 2: CUSTOMIZE YOUR TEMPLATE
- Edit Content: Replace placeholder text with your name, bio, and links to your social media profiles, websites, or other relevant pages.- Adjust Layout: Carrd's drag-and-drop editor allows you to rearrange elements with ease. You can add or remove sections, buttons, and images as needed.- Personalize the Design: Customize the color scheme, fonts, and backgrounds to align with your personal or brand identity. Carrd also supports custom fonts and additional design features on its paid plans.STEP 3: ADD CUSTOM IMAGES- Enhance your bio site by adding custom images. You can browse Unsplash for free stock images or generate unique visuals using tools like Bing Image Creator.
- Upload these images directly to Carrd, using them as background images or icons to make your site stand out.STEP 4: PREVIEW AND PUBLISH- After customizing your design, preview your site to ensure it looks good on both desktop and mobile devices.- When you're satisfied, publish your site. Carrd allows you to use a custom domain (if you have one) or a free Carrd.co URL, with the option to upgrade for additional features like custom forms, widgets, and the removal of Carrd branding.
Conclusion
Switching to a more robust platform for creating a custom bio site offers greater control and flexibility than conventional link-in-bio tools like Linktree. Whether showcasing your work, engaging with your audience, or managing your digital links, full control over your site is always advantageous—even if it's merely a list of links. You can customize your site's appearance and connect your domain without additional costs. Additionally, platforms like Carrd allow you to host your main website and your bio site together, simplifying management without incurring extra fees per website.

Next Post
The Best AI Tools for Podcasting

Podcasting has become the go-to platform for sharing stories, expertise, and—let’s face it—endless opinions. But behind every well-produced episode is a ton of work that listeners never see. From audio clean-up to transcription, content generation to marketing, it’s easy to feel like you’re drowning in tasks before you even hit “publish.”Enter AI.In the ever-evolving world of content creation, AI tools are quickly becoming the secret weapon for podcasters looking to streamline their workflow. Whether you’re an indie creator trying to level up or a seasoned pro aiming for more efficiency, the right AI tools can save you hours without compromising quality.Here’s a look at the best AI-driven tools that can transform every part of your podcasting process, from sound editing to social media promotion.
1. Sound Clean-up & Mixing:
• Auphonic: If you need your audio to sound balanced, clean, and professional without hiring a sound engineer, this is your go-to. It levels your volume, reduces background noise, and handles loudness normalization. Think of it as the digital janitor that makes sure your podcast doesn’t sound like it was recorded in a cave.
• Adobe Podcast (formerly Project Shasta): This one has an “Enhance Speech” tool that’s basically a magic button for audio clean-up. You upload garbage audio, and it spits back something that sounds studio-produced. Worth a look if you’re recording on the go or in less-than-ideal environments.
2. Transcription & Editing:
• Descript: Probably the most talked-about in the AI podcasting world for a reason. It transcribes your podcast and lets you edit by tweaking the transcript. Cut out words, move sentences around—it’s all synced to the audio. Perfect if you hate traditional audio editing software but still want a polished result.
• Sonix Solid for quick and accurate transcription across multiple languages. It’s good for podcasters working with international guests or wanting to expand into new markets. Plus, it integrates with most podcasting platforms seamlessly.
3. Voice Generation & Cloning:
• Podcastle: It takes text and converts it to lifelike speech. Good if you’re working on solo episodes or adding narration and don’t want to record every word yourself. It also offers AI voice cloning, so you can create consistent episodes without re-recording. The tech is good, but it’s best used sparingly, unless you want your audience questioning if you’re real.
• Revoicer: If you’re interested in experimenting with different voices for characters, interviews, or even just to add variety, Revoicer’s voice library is a solid choice. Think of it as your podcast voice actor, minus the human interaction. It won’t win an Oscar for realism, but it’s good enough to mix things up without sounding entirely robotic.
4. Automated Show Notes & Summarization:
• Podium: It generates show notes, episode summaries, and even episode titles for you, based on the content of your podcast. Perfect for those who want to save time on the admin side and focus on the creative stuff. Not bad for SEO, either, since detailed show notes help with discoverability.
• Capsho: It takes your podcast and turns it into a blog post, email copy, social media captions—you name it. Great for podcasters who want to repurpose content across platforms without the extra grind.
5. AI Content Creation & Scripting:
• Jasper AI: If you need help generating podcast scripts, brainstorming topics, or even writing intros and outros, Jasper is one of the better AI content generators. It’s great if you’re stuck in writer’s block or just need some inspiration. Keep in mind, though, it’s not going to nail your brand voice perfectly—yet.
6. Background Music & Sound Effects:
• Soundraw: An AI music generator that lets you customize tracks based on mood, genre, and length. It’s royalty-free and completely original, so you don’t have to worry about takedown notices. Ideal if you need some original music but don’t want to spend days digging through stock libraries.
• Boomy: Another AI music generator, but this one’s more focused on full tracks, allowing you to create unique intro or background music in minutes. It’s a quick fix for those who aren’t musically inclined but still want something custom.
7. Marketing & SEO Optimization:
• Headliner: Automatically generates audiograms (those little soundbite videos with captions) from your episodes. Good for promoting your podcast on social media without having to manually edit clips or videos. Audiograms are effective for grabbing attention and driving listeners to the full episode.
• Buzzsprout’s Magic Mastering: If you’re using Buzzsprout to host, this is an add-on that polishes your audio for all platforms. It’s not quite the level of Auphonic, but it’s integrated and requires zero extra effort.
8. Text-to-Speech for Narration:
• Murf.ai: A solid text-to-speech tool if you’re looking to narrate parts of your podcast or supplement guest interviews with voiceovers. It has a wide selection of voices that sound fairly human—definitely less robotic than older text-to-speech options.
These tools can cover just about any angle of podcast production without requiring you to become an expert in sound engineering, editing, or marketing. You can cherry-pick the ones that fit your workflow, and before you know it, you’re running a professional-grade operation without selling your soul to endless hours of post-production.
Next Post
Techniques for Fast Reading and Information Retention

In a world overloaded with information, finding ways to read faster and retain what’s important can be a real asset. Whether you’re tackling work reports, textbooks, or just trying to get through a stack of articles, honing your reading speed without sacrificing comprehension is a skill worth developing. Here’s a breakdown of methods to help you do just that.
1. Eliminate Subvocalization
Subvocalization, the habit of silently pronouncing words in your head while reading, can significantly slow you down. To combat this, focus on visualizing the text instead of pronouncing it mentally. Try concentrating on a single word and allow your brain to recognize it without vocalizing it internally.
2. Use a Visual Pacer
Employing a visual guide, such as your finger or a pen, can help maintain focus and increase speed. Move your guide smoothly across the lines to encourage your eyes to follow without pausing excessively on individual words. This technique also helps engage your peripheral vision, allowing you to capture more words at once.
3. Preview the Material
Before diving into a text, take a moment to skim through headings, subheadings, and any highlighted sections. This preview establishes a mental framework for what you are about to read, enhancing comprehension and retention as you read through the material in detail.
4. Skip Small Words
Practice skipping over minor words such as "the," "and," and "if." These words often do not alter the meaning of sentences significantly and can be omitted without losing comprehension. This technique allows you to maintain a faster pace while still grasping the main ideas.
5. Take Strategic Notes
Effective note-taking is crucial for retention. After reading each section or chapter, jot down key points or summarize concepts in your own words. Highlight important quotes or facts for later reference. This active engagement with the material reinforces memory and understanding.
6. Practice Regularly
Like any skill, speed reading improves with practice. Dedicate at least 30-60 minutes daily to reading using these techniques. Consistent practice not only enhances speed but also strengthens comprehension over time.
7. Connect New Knowledge
Relate new information to what you already know. Making connections helps embed the material in your memory and facilitates easier recall later on.
8. Set Goals and Track Progress
Establish clear reading goals and monitor your progress over time. This practice helps maintain motivation and allows you to see tangible improvements in both speed and comprehension.
By integrating these strategies into your reading habits, you can significantly increase your reading speed while ensuring that you retain essential information effectively. Speed reading is a skill that pays off with practice, offering more efficiency in your everyday life. With each step forward, you’ll find yourself consuming more knowledge in less time, giving you more time to concentrate on the information worth retaining.

Next Post
Artificial Intelligence in Fashion

Generative Design,
Style Transfer, and Beyond
The fashion industry is undergoing a remarkable transformation, largely due to the integration of artificial intelligence (AI) into the design process. AI technologies are not only enhancing efficiency but also unlocking new realms of creativity for designers. This essay explores how AI—particularly generative design and style transfer—is revolutionizing fashion design and visualization, along with other innovative applications that are shaping the future of fashion.
Generative Design in Fashion
Understanding Generative DesignGenerative design is an AI-driven process where algorithms autonomously generate a wide array of design solutions based on set parameters and constraints. In fashion, this means that designers can input specific requirements—such as materials, colors, and functional needs—and the AI will produce numerous design options that fulfill these criteria.How It Works• Generative Adversarial Networks (GANs): A key technology in generative design, GANs consist of two neural networks—the generator and the discriminator—that work together. The generator creates new designs, while the discriminator evaluates them against real-world examples, providing feedback to improve the outputs.
• Data Input: Designers feed the AI with extensive datasets of existing fashion designs, patterns, and styles. The AI learns from this data to understand design principles and aesthetics.Applications in Fashion• Innovative Pattern Creation: AI generates unique textile patterns by combining elements from different styles, leading to fresh and original designs that might not emerge through traditional methods.
• Exploration of Silhouettes: By inputting parameters like fabric type and desired fit, AI can suggest new garment shapes and structures, expanding the designer’s creative horizon.
• Sustainable Design: Generative design can optimize material usage, reducing waste by suggesting designs that make the most efficient use of fabrics.Benefits• Enhanced Creativity: Provides a vast array of design options, inspiring designers to experiment and innovate beyond conventional boundaries.
• Efficiency: Speeds up the initial stages of design by quickly generating multiple viable concepts.
• Customization: Enables personalized designs tailored to specific customer preferences, enhancing the consumer experience.Real-World Examples• Adidas and Nike: These brands have experimented with generative design to create footwear with optimized structures for performance and comfort.
• Iris van Herpen: The Dutch designer is known for integrating technology and AI into her haute couture collections, resulting in avant-garde and intricate designs.
Style Transfer in Fashion Design
Understanding Style TransferStyle transfer is an AI technique that blends the style of one image (like the texture and color of a painting) with the content of another image (such as the shape of a garment). This allows designers to apply different artistic styles to their designs, creating unique and visually striking pieces.How It Works• Neural Networks: The AI uses deep learning algorithms to deconstruct images into style and content components, then recombines them to produce a new image that retains the content but adopts the new style.Applications in Fashion• Artistic Integration: Designers can infuse their garments with styles inspired by famous artworks or movements, such as Impressionism or Abstract Expressionism.
• Cultural Fusion: Style transfer enables the blending of traditional patterns from various cultures with modern fashion silhouettes, promoting diversity and innovation.
• Rapid Visualization: Helps designers quickly visualize how different textures, patterns, or colors would look on a garment without manually creating each variation.Benefits• Creative Exploration: Encourages experimentation with unconventional combinations of styles and patterns.
• Personalization: Allows for the creation of bespoke designs that reflect individual customer tastes or current trends.
• Efficiency: Reduces the time and resources needed for prototyping by enabling virtual testing of design ideas.Tools and Platforms• DeepArt.io and Prisma: User-friendly applications that allow designers and consumers alike to apply style transfer techniques to images, fostering creativity and accessibility.
Other Creative AI Applications in Fashion
Virtual Prototyping and 3D Modeling• Realistic Simulations: AI helps create detailed 3D models of garments, allowing designers to see how a piece would drape and move on a virtual model.
• Cost and Time Savings: Virtual prototypes eliminate the need for multiple physical samples, reducing material waste and speeding up the design process.Augmented Reality (AR) and Virtual Try-Ons• Enhanced Shopping Experience: AR applications let customers virtually try on clothes using their smartphones or in-store mirrors, providing immediate feedback on fit and style.
• Design Feedback: Data from virtual try-ons can inform designers about popular styles and common fit issues, guiding future designs.AI-Driven Personalization• Customized Recommendations: AI analyzes customer data to suggest styles and designs that align with individual preferences, increasing customer satisfaction and loyalty.
• Adaptive Design: Brands can adjust their offerings in real-time based on consumer behavior and feedback, staying ahead of trends.Creative Collaboration• AI as a Creative Partner: Some designers view AI not just as a tool but as a collaborator that can inspire new ideas and challenge traditional design thinking.
• Breaking Creative Barriers: AI can suggest combinations and patterns that a designer might not have considered, pushing the boundaries of what is possible in fashion.
The Impact on the Fashion Industry
Innovation and CreativityAI technologies empower designers to explore uncharted territories in fashion, leading to innovative products that captivate consumers.SustainabilityBy optimizing designs and reducing waste through virtual prototyping and efficient material usage, AI contributes to more sustainable fashion practices.AccessibilityTools that incorporate AI make advanced design capabilities available to a broader range of designers, including those without extensive technical backgrounds.Challenges• Technical Expertise: Effective use of AI requires a certain level of understanding, which may necessitate training or collaboration with tech experts.
• Ethical Considerations: Issues such as data privacy and the potential loss of the human touch in design need to be carefully managed.
To Summarize
Artificial intelligence is reshaping the fashion industry by augmenting human creativity and streamlining the design process. Generative design and style transfer are at the forefront of this transformation, offering designers powerful tools to create innovative and personalized fashion. As AI continues to evolve, it promises to open even more possibilities in fashion design and visualization, fostering a dynamic interplay between technology and artistry. Embracing these technologies allows the fashion industry to stay ahead of trends, meet consumer demands, and contribute to a more sustainable future.By integrating AI into their workflows, fashion designers and brands can unlock new levels of creativity and efficiency. Whether it’s through the limitless possibilities of generative design, the artistic fusion enabled by style transfer, or other AI-driven innovations, the future of fashion is poised to be more imaginative and consumer-centric than ever before.
* * *
Blog
Foreword

Our modern world is rife with distractions, pressures, and the relentless pursuit of more—more possessions, more achievements, more experiences. This constant bombardment can often leave us feeling overwhelmed and disconnected from our true selves.My mission is to help you declutter your life, both physically and mentally, so you can fully embrace the beauty of simplicity and discover the joys of living with intention. Through practical problem-solving methods and time-tested mindfulness techniques, I’ll guide you on a transformative journey to create a space that nourishes your soul and empowers you to lead a more purposeful, fulfilling life.In this blog, I’ll be sharing actionable tips, inspiring stories, and valuable resources to help you declutter your home, streamline your routines, and cultivate mindfulness in your daily life. We'll delve into a range of topics, from minimalist home organization and thoughtful problem-solving techniques, to mindfulness practices that help you find stillness and clarity in the midst of chaos. The goal is to empower you with the tools and knowledge you need to create a life that feels more spacious, intentional, and joyful.

Orphan Heiress
Environment Design
Harnessing Your Environment
to Promote Healthy Habits,
Foster Inspiration,
and Achieve Goals
The environment we live in plays a crucial role in shaping our behavior, attitudes, and overall well-being. A well-organized and thoughtfully designed space can not only enhance our daily experiences but also significantly contribute to the development of healthy habits, inspire creativity, and help us achieve our goals. In this essay, we will explore the importance of optimizing our surroundings to promote a productive and healthy lifestyle, and offer practical tips to create an environment that supports our aspirations and nurtures our well-being.The Impact of Environment on Behavior and Well-beingOur environment influences our thoughts, emotions, and actions in both subtle and profound ways. Research has shown that factors such as lighting, color, and space layout can directly affect our mood, focus, and overall well-being. For instance, exposure to natural light has been linked to improved mood and alertness, while cluttered spaces can lead to feelings of stress and decreased productivity. Consequently, by purposefully designing our environment, we can encourage positive behaviors and foster healthy habits that support our personal and professional goals.Strategies for Optimizing Your Environment1. Define your goals and habits: Begin by identifying your specific objectives and the habits you need to develop or maintain to achieve them. This clarity will enable you to create an environment tailored to your unique needs and aspirations.2. Designate spaces for specific activities: Assigning specific areas for various tasks or activities can help to establish clear boundaries between work, relaxation, and personal pursuits. This separation can boost focus and productivity, while also ensuring that you have dedicated spaces for self-care and leisure.3. Declutter and organize: A clean and organized space not only reduces distractions but also instills a sense of control and order. Implement storage solutions and regularly declutter your space to create an environment that fosters focus and efficiency.4. Prioritize ergonomics: A comfortable and ergonomically-sound workspace can improve posture, prevent discomfort, and enhance productivity. Invest in a suitable chair, desk, and lighting to create a workspace that supports your physical well-being.5. Incorporate healthy habit reminders: Use visual cues to encourage healthy habits, such as placing a water bottle on your desk for hydration, a calendar to track exercise, or a to-do list to maintain focus on tasks.6. Use color and lighting strategically: Colors and lighting can impact your mood and energy levels. Opt for calming colors and natural light whenever possible to create a positive and inspiring atmosphere.7. Create a comfortable environment: Adjust temperature, air quality, and noise levels to suit your preferences. Incorporate plants, air purifiers, and noise-canceling headphones to enhance your environment further.8. Establish routines: Consistent routines can reinforce healthy habits and support goal achievement. Set routines for daily tasks, such as tidying up, exercise, and self-care activities, to foster discipline and structure.9. Personalize your space: Adding personal touches to your environment can inspire creativity and motivation. Use artwork, inspirational quotes, or family photos to create a space that reflects your unique personality and aspirations.10. Evaluate and adjust: Regularly assess your environment and habits to identify areas for improvement. Adapt your space and routines as needed to better support your goals and promote overall well-being.ConclusionIn conclusion, creating an environment that promotes healthy habits, fosters inspiration, and supports goal achievement is an essential aspect of personal and professional success. By being mindful of our surroundings and making intentional adjustments, we can enhance our daily experiences, cultivate positive behaviors, and ultimately, achieve our aspirations. By harnessing the power of our environment, we can pave the way for a more productive, healthy, and fulfilling life.

Orphan Heiress
The Pillars of Resilience:
The Essential Role of
Support Systems
Life is filled with challenges and adversities that demand resilience, determination, and persistence to overcome. The journey to success hinges not only on an individual's personal attributes but also on the support of those around them. A reliable support system serves as a vital cornerstone for achieving success, navigating life's hurdles, and promoting personal growth. The presence of friends, family, and mentors in our lives provides us with the necessary tools, motivation, and uplifting encouragement to tackle obstacles and reach our goals. As we navigate the winding paths of personal and professional growth, the nurturing bonds within our support network not only help us overcome obstacles but also enrich our lives with encouragement, understanding, and valuable learning experiences.Emotional Support and EncouragementA strong support system provides emotional backing, which significantly impacts an individual's ability to cope with stress and adversity. Friends, family, and mentors offer a nurturing environment that encourages individuals to believe in their abilities, foster self-confidence, and embrace their potential. They provide a shoulder to lean on, a listening ear, and words of encouragement, helping people weather life's storms, recharge, and regain their determination to keep moving forward.Constructive Feedback and AccountabilityOvercoming life's hurdles often requires self-reflection and the ability to learn from mistakes. A good support system plays a vital role in providing honest, constructive feedback that helps individuals identify areas for improvement and development. Friends and mentors can objectively assess one's performance, offering insights and guidance that enable growth. Furthermore, a supportive network can hold individuals accountable for their actions and decisions, promoting responsibility and a sense of ownership over one's progress.Networking and OpportunitiesA well-connected support system can open doors to new opportunities and networks, significantly impacting one's ability to succeed in various aspects of life. Friends, mentors, and professional connections can introduce individuals to potential collaborators, job openings, or resources that may not have been accessible otherwise. These networks can empower people with the tools and opportunities necessary to overcome obstacles and achieve their goals.Skill Development and LearningThe journey to success often entails acquiring new skills and knowledge to overcome challenges and achieve personal and professional goals. A robust support system can provide resources, advice, and even training to help individuals develop the skills necessary to excel in their chosen fields. By learning from the experiences and expertise of others, individuals can better adapt to changing circumstances and navigate complex situations.In conclusion, a reliable support system is essential for facing life's challenges and working towards success. The encouragement and understanding from those close to us not only boost our confidence but also help us navigate difficult situations with ease. By providing valuable insights, guidance, and connections, our support network contributes to our personal growth and development. Simply put, a strong support system is a crucial ingredient in the recipe for a fulfilling and successful life, reminding us that we are never alone in our journey.

Orphan Heiress
Simplify and Thrive:
How Essentialism Can Enhance
Your Life and Home
INTRODUCTIONEssentialism is a philosophy that encourages individuals to focus on the essential aspects of life, thus leading to a more purposeful and meaningful existence. By incorporating essentialism principles in daily life and at home, one can achieve a higher level of mental well-being, improved time management, and a more organized living environment. This essay will explore the core principles of essentialism, its benefits in decluttering and organizing the home, and its impact on mental well-being, decision-making, and time management.DEFINING ESSENTIALISM AND ITS CORE PRINCIPLESEssentialism is a way of thinking that emphasizes the importance of identifying and prioritizing the most essential elements of life. The core principles of essentialism include:1. Eliminating the non-essential: Focus on what truly matters, and eliminate distractions and unnecessary commitments.
2. Prioritizing: Clearly define priorities and devote time and energy to the most important tasks.
3. Simplifying: Streamline daily routines and minimize clutter to create an environment that promotes focus and well-being.ESSENTIALISM FOR A FOCUSED AND PURPOSEFUL LIFEIncorporating essentialism principles in daily life can lead to a more focused and purposeful existence. By eliminating distractions and non-essential activities, individuals can dedicate their time and energy to what truly matters. This approach allows for a deeper connection with one's core values and passions, ultimately resulting in a more fulfilling and meaningful life.DECLUTTERING AND ORGANIZING THE HOMEEssentialism encourages individuals to declutter their homes and create organized living spaces. By simplifying and eliminating unnecessary belongings, individuals can reduce the physical and mental clutter that often leads to stress and overwhelm. A well-organized home promotes a sense of calm and order, providing a conducive environment for productivity and relaxation.Improving Mental Well-Being and Stress LevelsIMPROVING MENTAL WELL-BEING AND STRESS LEVELSPracticing essentialism can significantly improve mental well-being and reduce stress levels. By focusing on what truly matters and eliminating distractions, individuals can experience a greater sense of control and accomplishment in their lives. Additionally, decluttering and organizing the home can contribute to a more peaceful and relaxing environment, further enhancing mental well-being.BENEFITS OF ESSENTIALISM IN DECISION-MAKING AND TIME MANAGEMENT
Incorporating essentialism principles in daily life can also greatly benefit decision-making and time management. By clearly defining priorities and focusing on essential tasks, individuals can make more informed decisions and allocate their time and resources more effectively. This approach promotes a more efficient use of time and energy, ultimately leading to a greater sense of satisfaction and achievement.CONCLUSIONEssentialism is a powerful philosophy that can help individuals lead a more focused, purposeful, and meaningful life. By incorporating essentialism principles in daily life and at home, individuals can experience numerous benefits, including improved mental well-being, enhanced decision-making and time management skills, and a more organized and clutter-free living environment. Embracing essentialism allows individuals to connect with their core values and passions, ultimately leading to a more fulfilling and satisfying existence.

Orphan Heiress
Hygge and Minimalism: Striking the Perfect Balance

IntroductionIn the quest for a balanced, harmonious life, two popular lifestyle concepts have emerged: Hygge and Minimalism. At first glance, they may appear to be in opposition, but in reality, they can be combined to create a comfortable and clutter-free environment that brings joy and contentment. By selectively embracing elements of Hygge and Minimalism, you can surround yourself with what you love while avoiding the suffocating feeling that often comes with excess possessions.Hygge: The Art of CozinessHygge, a Danish concept, refers to the feeling of coziness, contentment, and well-being that comes from enjoying life's simple pleasures. This lifestyle focuses on creating a warm and inviting atmosphere that fosters a sense of belonging and togetherness. Key elements of Hygge include soft lighting, warm textiles, and natural materials, as well as the presence of loved ones and meaningful connections.Minimalism: The Beauty of SimplicityMinimalism, on the other hand, is a lifestyle movement that encourages people to declutter their lives and focus on what truly matters. By eliminating unnecessary possessions, minimalists aim to create a more intentional, purposeful, and stress-free living space. Minimalism emphasizes the beauty of simplicity and the freedom that comes with owning less.The Intersection of Hygge and MinimalismAlthough Hygge and Minimalism may seem contradictory, they can coexist harmoniously when approached with a balanced mindset. The key is to focus on quality over quantity and prioritize items that truly bring joy, comfort, and a sense of well-being.1. Invest in Quality PiecesTo incorporate both Hygge and Minimalism into your life, consider investing in high-quality, versatile pieces that can serve multiple purposes. For example, a beautiful, cozy blanket can provide warmth and comfort while also serving as an attractive decorative element. By selecting items that are both functional and aesthetically pleasing, you can create a Hygge-inspired environment without excess clutter.2. Prioritize Meaningful ItemsOne of the core principles of Minimalism is the idea that everything in your space should have a purpose or hold personal significance. When deciding what to keep and what to discard, consider whether each item truly contributes to your sense of well-being and happiness. By surrounding yourself with meaningful possessions that spark contentment, you can create a Hygge atmosphere without feeling overwhelmed by material items.3. Embrace NatureBoth Hygge and Minimalism place a strong emphasis on incorporating natural elements into your living space. By adding plants, natural materials, and organic textures, you can create a calming, restorative environment that fosters a sense of peace and tranquility.4. Nurture ConnectionsOne of the most essential aspects of Hygge is the importance of spending time with loved ones and nurturing meaningful connections. By prioritizing relationships and experiences over material possessions, you can find balance between the coziness of Hygge and the simplicity of Minimalism.
Conclusion
Incorporating elements of both Hygge and Minimalism into your life can help you strike the perfect balance between coziness and simplicity. By investing in quality pieces, prioritizing meaningful items, embracing nature, and nurturing connections, you can create a living space that brings you joy and contentment without feeling suffocated by your possessions. With intention and mindfulness, it is possible to enjoy the best of both worlds and cultivate a harmonious, fulfilling lifestyle.

Orphan Heiress
Build Your
Capsule Wardrobe
In 10 Steps

Creating a capsule wardrobe can make your life simpler and more organized, while also reducing decision fatigue. Here's a step-by-step method to help you build a capsule wardrobe without getting overwhelmed or distracted:1. Set a clear goal: Begin by defining your objectives for the capsule wardrobe. This could include simplifying your morning routine, decluttering your closet, or creating a more sustainable wardrobe.2. Assess your lifestyle: Consider your daily activities, job, hobbies, and social life to determine what types of clothing you need. Make a list of key activities and settings, and prioritize them according to frequency.3. Determine your style: Spend some time reflecting on your personal style preferences. Consider your favorite colors, patterns, and silhouettes. Create a mood board, either physically or digitally, to help visualize your ideal wardrobe.4. Establish a color palette: Choose a base color that can be easily matched with other colors (black, navy, gray, or beige). Add 2-3 complementary colors to create a cohesive palette. You can also include a few accent colors for variety.5. Inventory your current wardrobe: Take all your clothes out of your closet and drawers, and categorize them into activity-based piles (e.g., work, casual, formal). This will help you identify gaps and redundancies in your wardrobe.6. Evaluate each item: For each item, ask yourself if it fits your style, color palette, and lifestyle. Be honest about whether you wear it regularly and if it makes you feel good. If it doesn't meet these criteria, it's time to let it go.7. Create a shopping list: Based on your inventory and evaluation, make a list of essential items that are missing from your wardrobe. Focus on versatile, high-quality pieces that can be easily mixed and matched.8. Set a budget: Determine how much you're willing to spend on your capsule wardrobe. Allocate your budget to the items on your shopping list, prioritizing essentials and high-quality pieces.9. Shop mindfully: Stick to your shopping list and avoid impulse purchases. Take your time to find the right items that fit your style, color palette, and budget. You may want to consider shopping at second-hand stores or online marketplaces for sustainable and budget-friendly options.10. Organize and maintain: Once you've acquired your capsule wardrobe items, organize them in a visually appealing way, making it easier to see what you have and make quick decisions. Maintain your capsule wardrobe by reassessing it every season and updating it as needed.Remember, the key to creating a capsule wardrobe is to focus on quality over quantity, and prioritize items that reflect your personal style and fit your lifestyle. With these steps, you'll be able to build a versatile, functional wardrobe without feeling overwhelmed.

Orphan Heiress
The Principles of Kaizen

The Kaizen philosophy is a Japanese management concept that emphasizes continuous improvement, focusing on small, incremental changes that eventually yield significant results. It is a powerful approach that can be applied to various aspects of life, including personal growth and self-improvement. This essay explores how you can challenge yourself using the principles of Kaizen to foster personal development, enhance skills, and promote overall well-being.1. Understanding the Kaizen PhilosophyThe term "Kaizen" originates from two Japanese words: "kai," which means change, and "zen," which means good. The philosophy encourages individuals to strive for constant improvement by making small, manageable changes in their daily routines, habits, and attitudes. It is important to understand that Kaizen does not advocate for drastic changes, but rather emphasizes the power of small, consistent efforts.2. Setting Realistic GoalsOne of the first steps in challenging yourself with the Kaizen philosophy is to set realistic goals. By breaking down your overarching objectives into smaller, attainable steps, you can avoid becoming overwhelmed and remain focused on your progress. This strategy also allows you to track your improvement over time, providing motivation and a sense of accomplishment as you achieve each milestone.3. Creating a Plan of ActionOnce you have set your goals, create a plan of action that outlines the specific steps needed to achieve them. The plan should be flexible, allowing you to adjust your approach as you learn and grow. As you progress, reevaluate your goals and strategies to ensure they remain in line with your long-term vision. Remember, Kaizen is about continuous improvement, and adapting your plan accordingly is key to your success.4. Implementing Daily PracticesTo challenge yourself and adhere to the Kaizen philosophy, it is crucial to incorporate daily practices that promote personal growth. These practices can include reading, meditation, exercise, or any other activity that encourages self-improvement. By dedicating time each day to your development, you create an environment in which growth and progress are prioritized.5. Embracing Failure as a Learning OpportunityOne of the most important aspects of the Kaizen philosophy is the acknowledgment that failure is an inevitable part of growth. Instead of fearing failure or viewing it as a setback, embrace it as an opportunity to learn and improve. Reflect on the experience to determine what went wrong and what can be done differently in the future. This mindset fosters resilience and adaptability, essential qualities for personal development.6. Cultivating a Growth MindsetChallenging yourself with the Kaizen philosophy requires the cultivation of a growth mindset. This involves believing in your ability to improve, being open to feedback, and staying committed to the learning process. By adopting this mindset, you will be more likely to persevere in the face of challenges and remain focused on your long-term goals.7. Celebrating Small VictoriesAs you challenge yourself and work towards your goals, it is important to celebrate your small victories along the way. Acknowledging and rewarding your progress not only boosts your motivation but also helps you maintain a positive outlook on your journey. Remember, the Kaizen philosophy is built on the power of small, incremental improvements, and recognizing their significance is crucial to your success.ConclusionIncorporating the Kaizen philosophy into your life can be an effective way to challenge yourself and foster personal growth. By setting realistic goals, creating a flexible plan of action, and committing to daily practices, you can steadily work towards self-improvement. Embracing failure as a learning opportunity, cultivating a growth mindset, and celebrating small victories further enhance your ability to develop and thrive. As you embark on this journey, remember that the power of Kaizen lies in the belief that continuous, incremental efforts can lead to remarkable achievements. Embrace the philosophy's principles and stay patient, committed, and persistent as you work towards your goals. By doing so, you will not only challenge yourself but also unlock your full potential, enhance your skills, and promote overall well-being. The journey of personal growth and development is a lifelong endeavor, and with the Kaizen philosophy as your guide, you will be well-equipped to navigate the path ahead.


